Amazon Web Services Integration
Contents:
1. Delegate Access to the AWS Billing and Cost Management Console
This guide provides information on how to integrate an AWS environment with the Binadox multi-cloud cost management and optimization platform to plan, analyze and reduce infrastructure costs.
To successfully integrate Binadox with an AWS account, it is required to create a new IAM user with access to the AWS API, read-only access to billing data, and certain AWS services for drill-down analysis, as well as to configure an S3 bucket for AWS cost and usage reports.
1. Delegate Access to the AWS Billing and Cost Management Console
Prerequisites:
IAM user access to the Billing and Cost Management Console is activated in the root user account only.
Before you add a new IAM user to represent Binadox, it is required to enable billing access on your AWS account, which will allow Binadox to view billing data for cost optimization.
By default, IAM user access to the Billing and Cost Management Console is disabled. Enable it for an IAM billing policy to take effect.
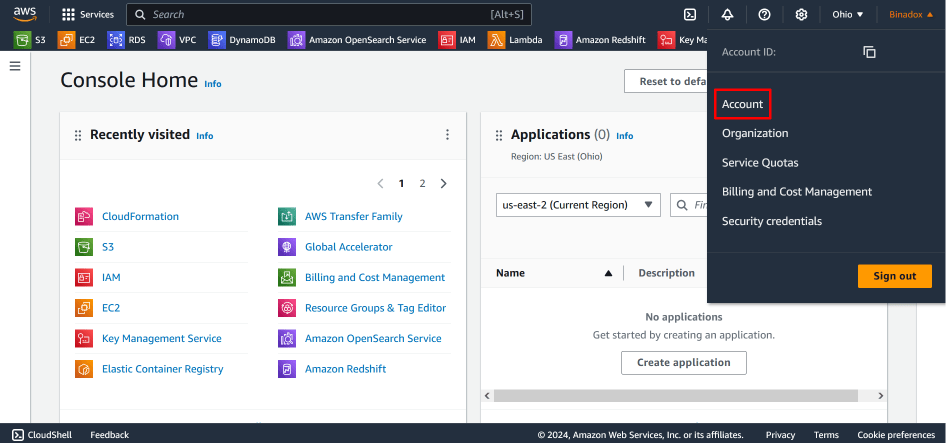
1. Sign in to the AWS Management Console with root account credentials.
2. In the top right corner of the console, click on the profile (account) name or number. Select Account in the drop-down list.
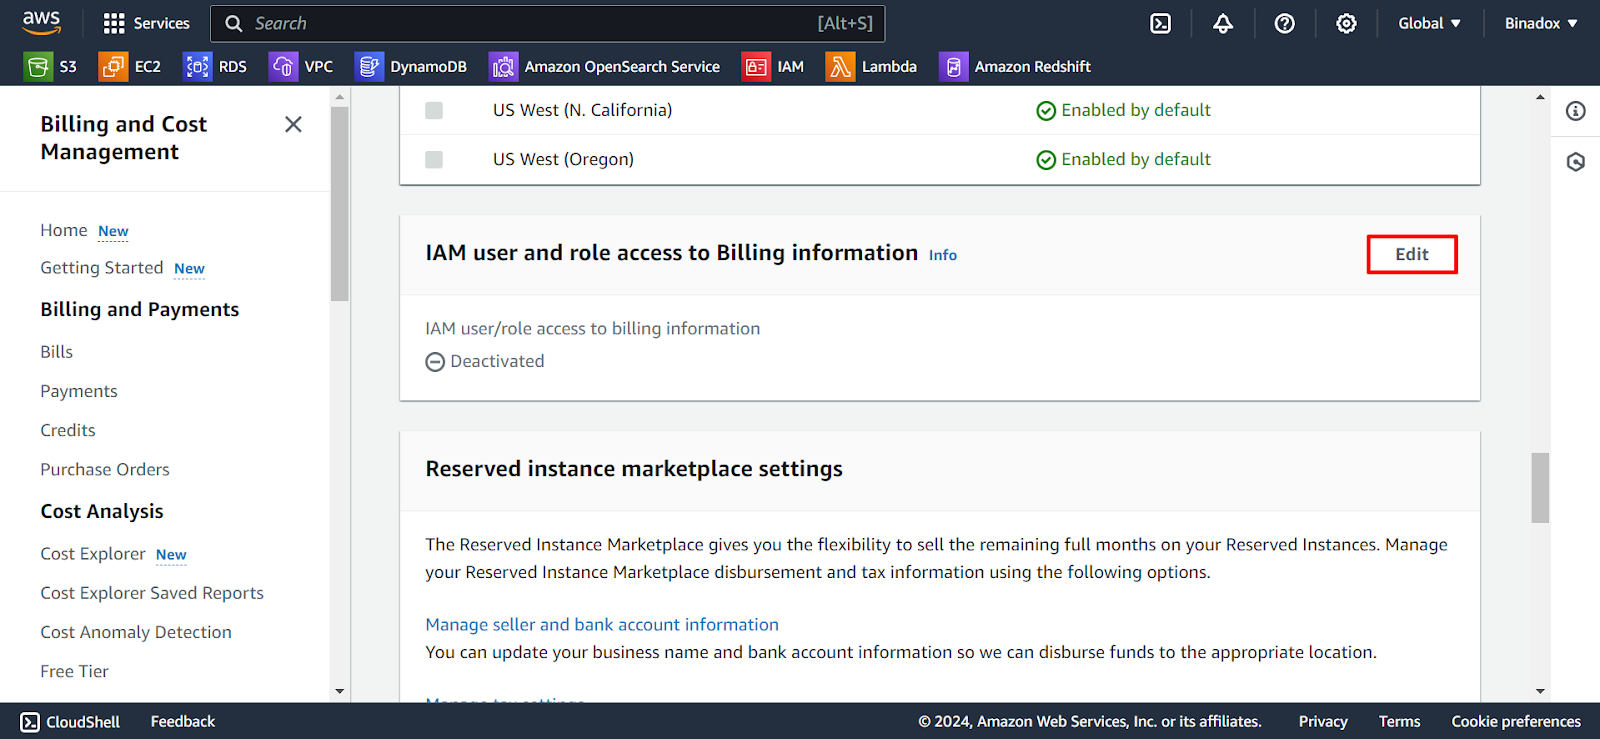
3. You will be redirected to the Billing and Cost Management Console. Scroll down to the IAM User and Role Access to Billing Information section. Click Edit.
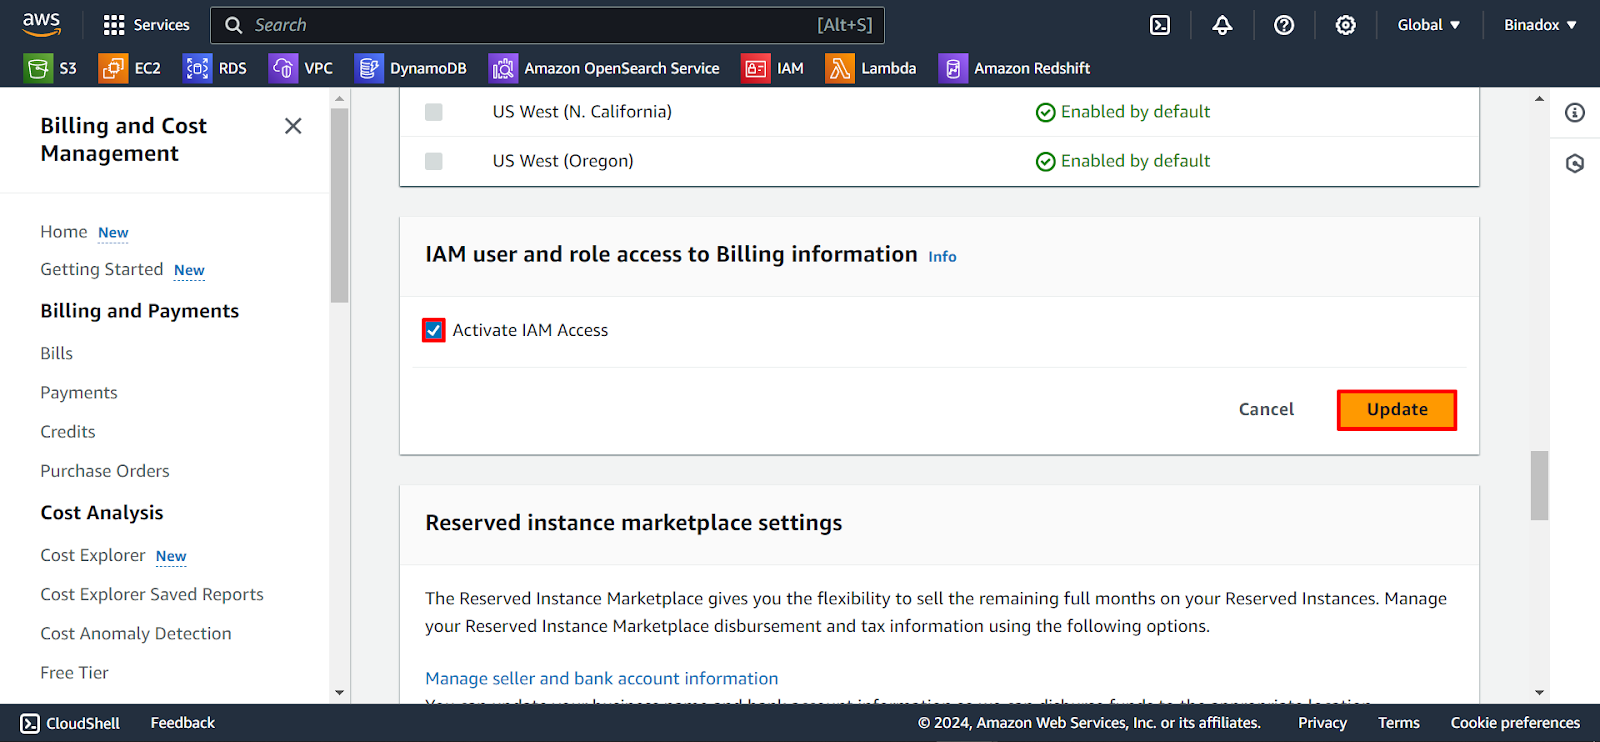
4. Put a tick mark against Activate IAM Access. Click Update to activate access to the Billing and Cost Management Console pages.
2. Create Cost & Usage Reports and Configure an S3 Bucket
2.1 Standard data export
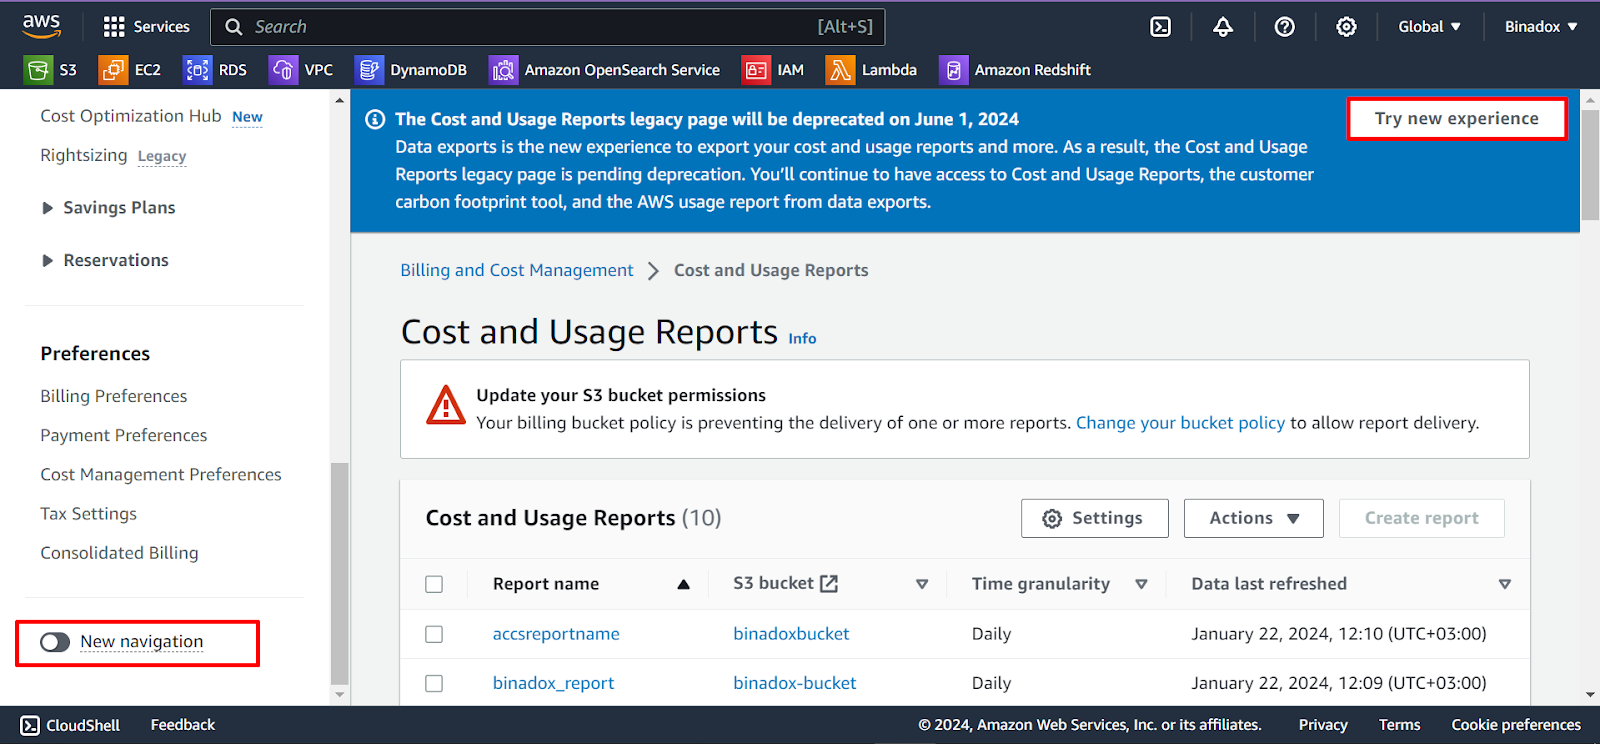
1. Amazon Web Services (AWS) recommends exploring a new user experience, and you can transition to this mode using either of the following two methods:
- On the Cost and Usage Reports page, an overlay window will appear at the top. Click the Try New Experience button.
- In the navigation pane, toggle the switch to activate the New Navigation mode.
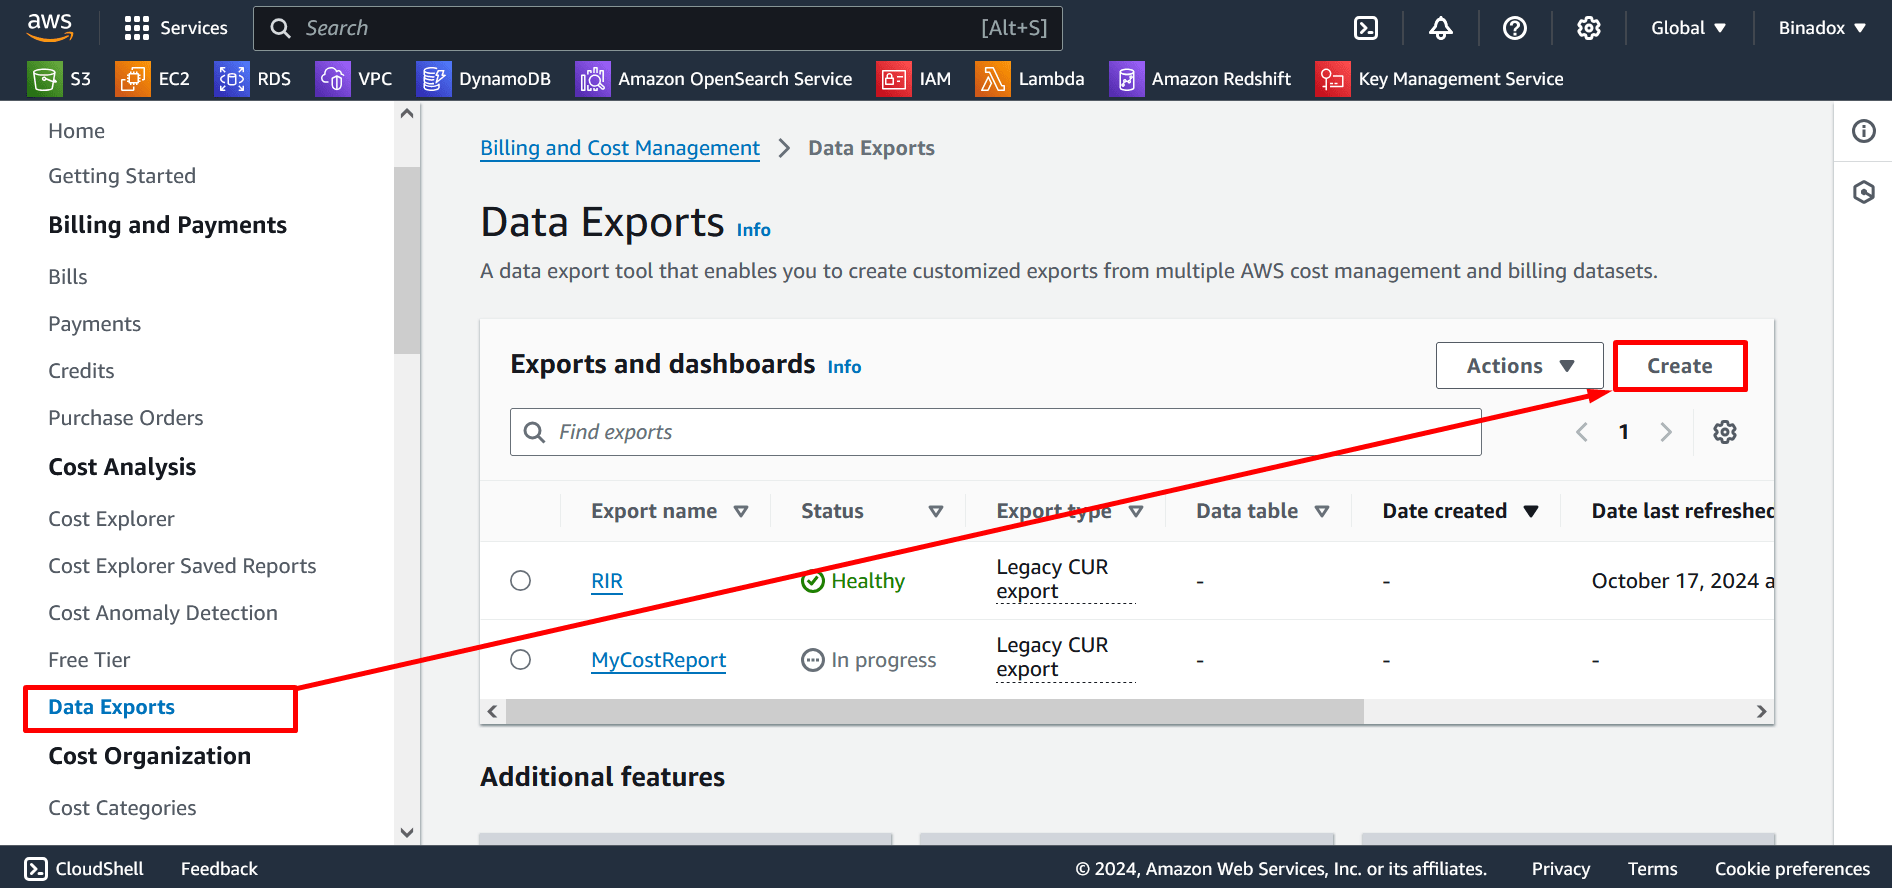
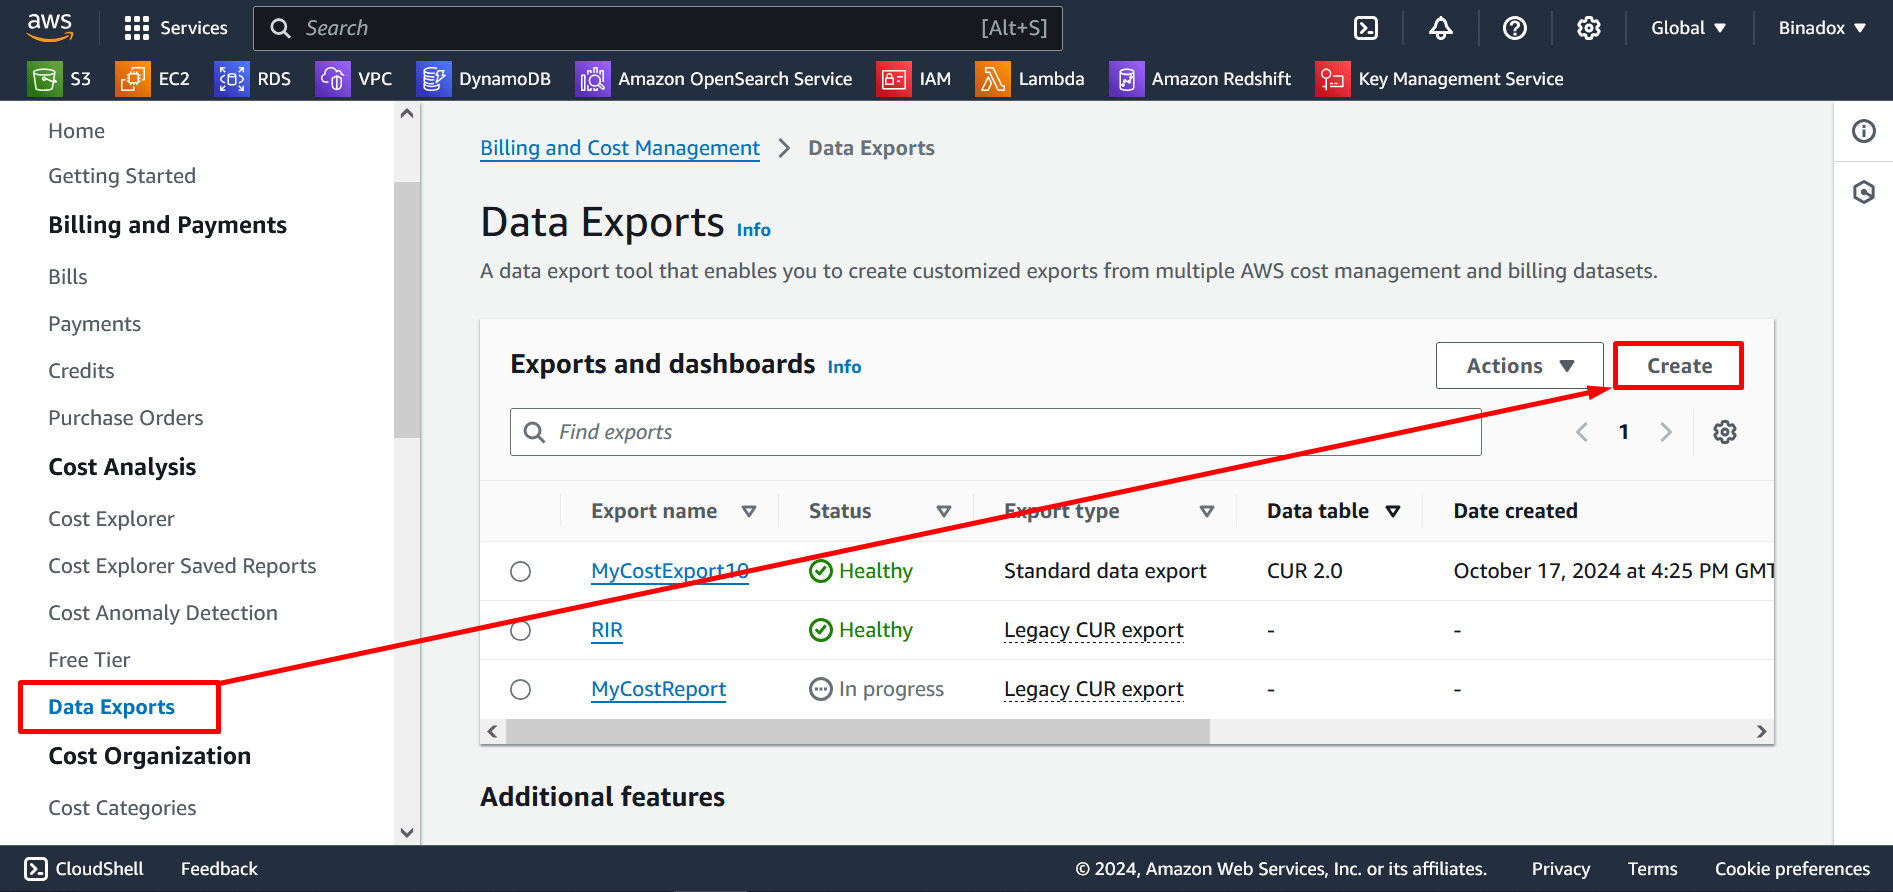
2. Click Data Exports in the navigation pane. Click the Create button.
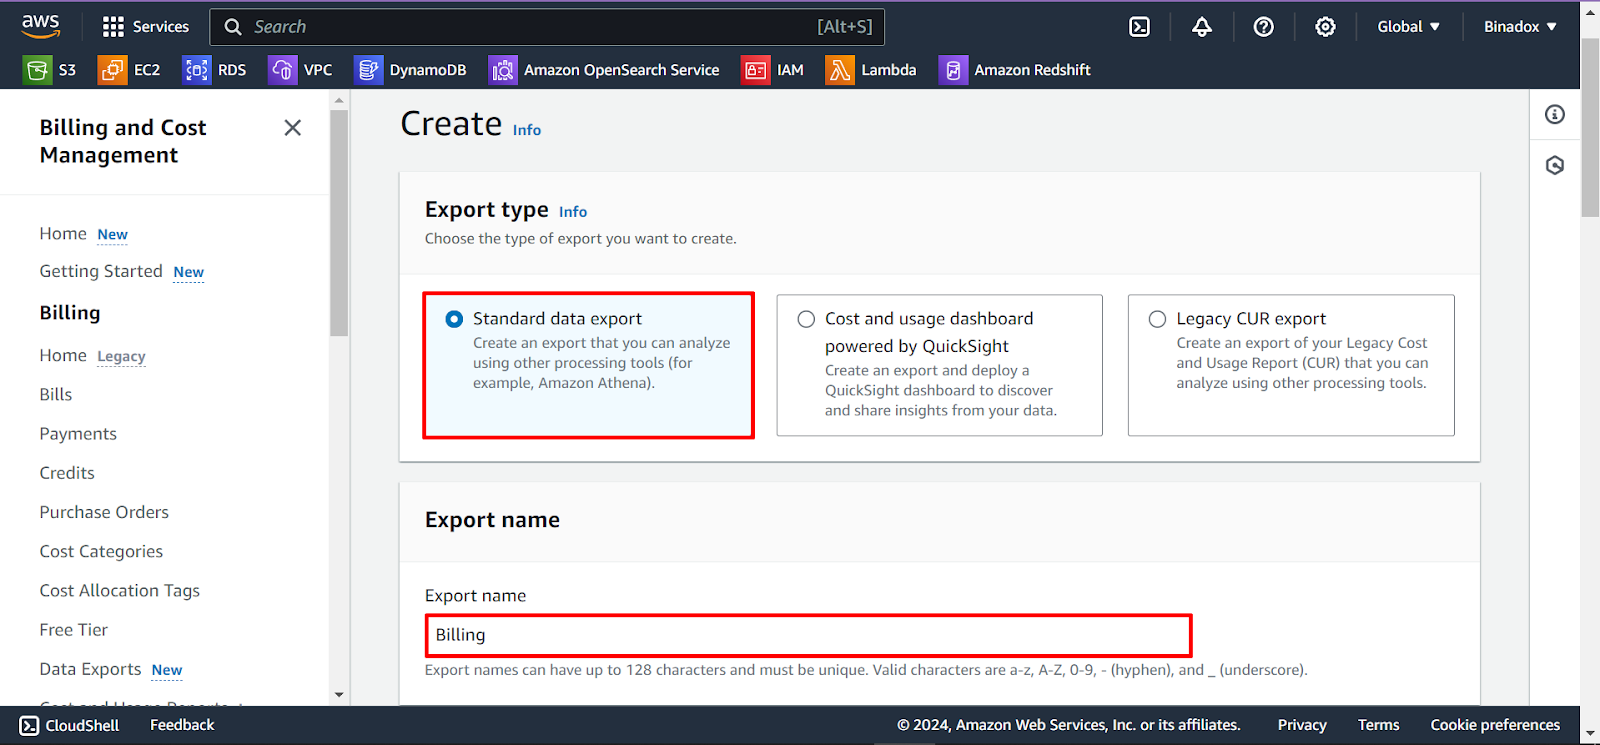
3. Within the Export type section, opt for Standard data export. In the Export name section, input the desired name into the Export name field.
4. In the Data table content settings section, provide the following details:
- Select CUR 2.0.
- In the Additional export content section, select the Include resource IDs
- In the Time granularity section, select the Daily radio button.

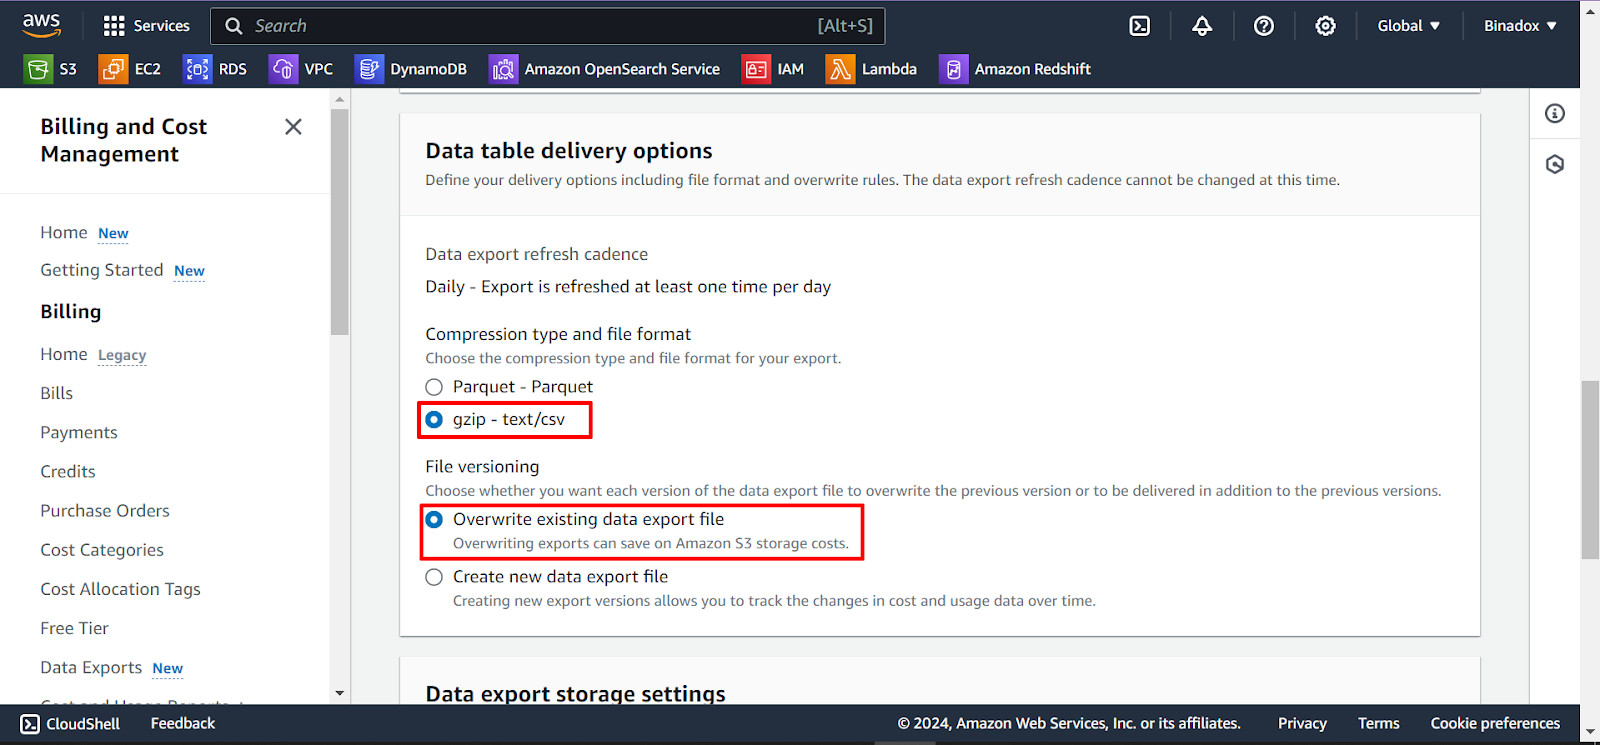
5. In the Data table delivery options section, select gzip – text/csv and Overwrite existing data export file radio buttons.
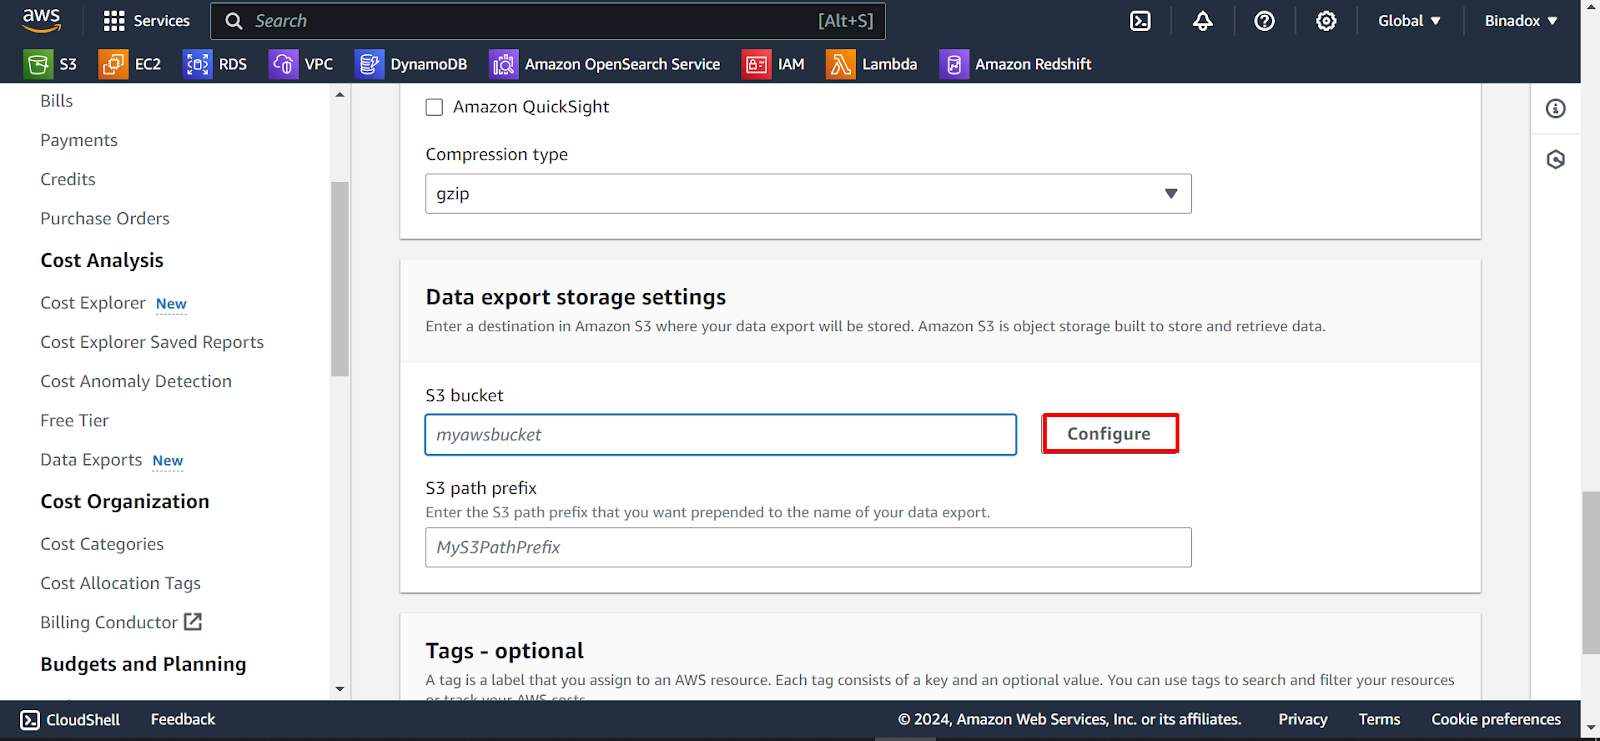
6. Within the section for Data export storage settings, click Configure.
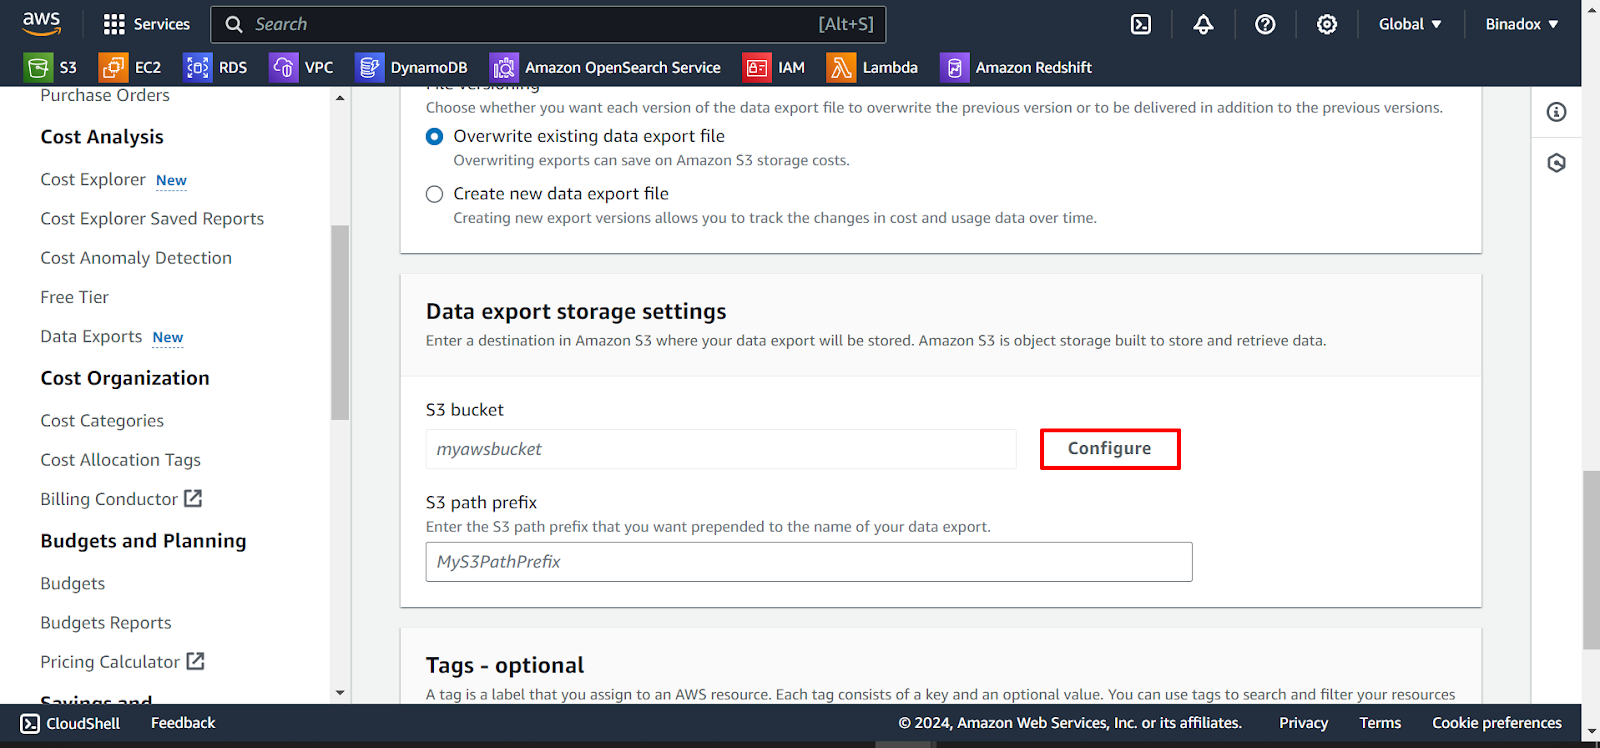
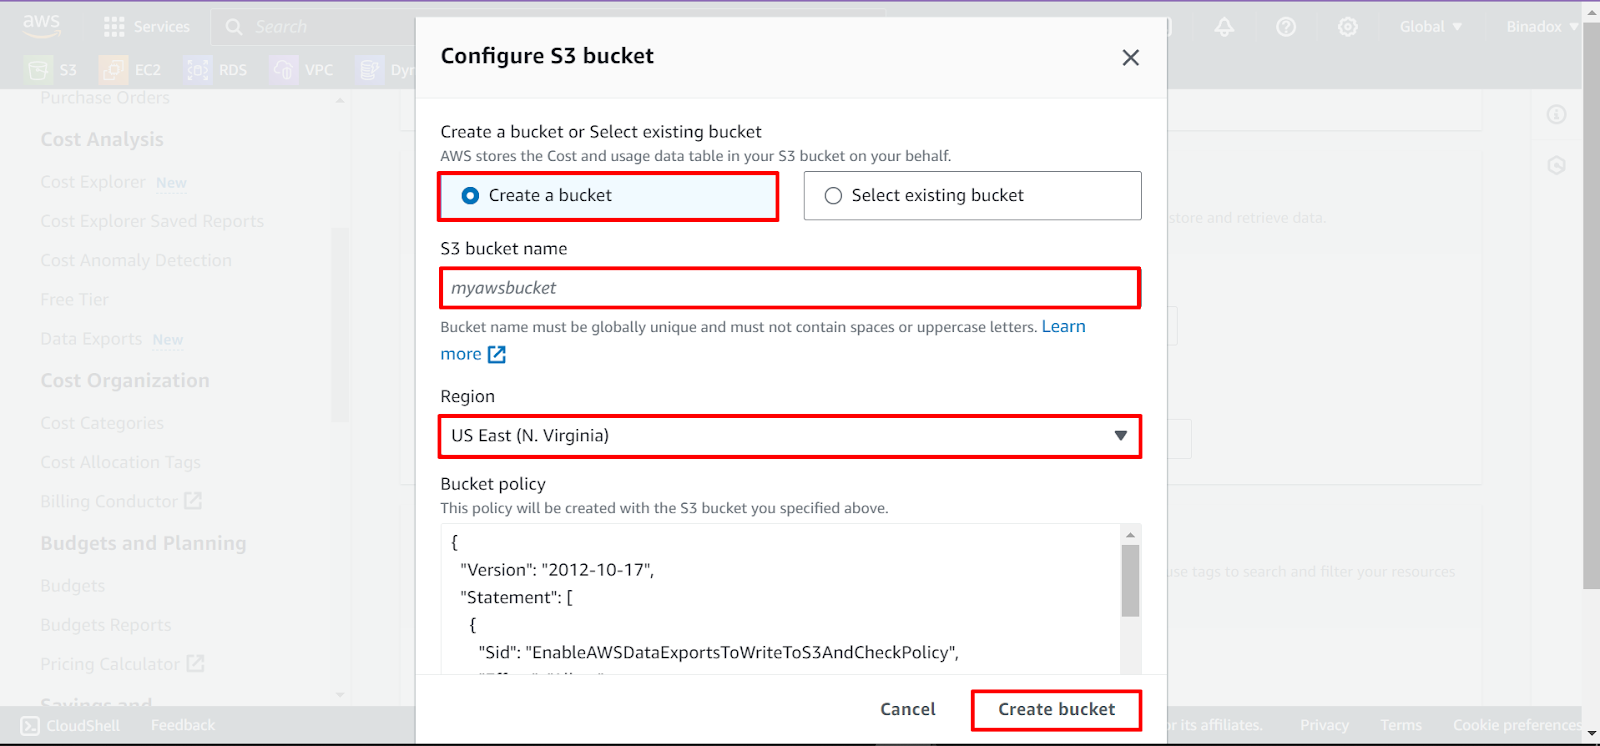
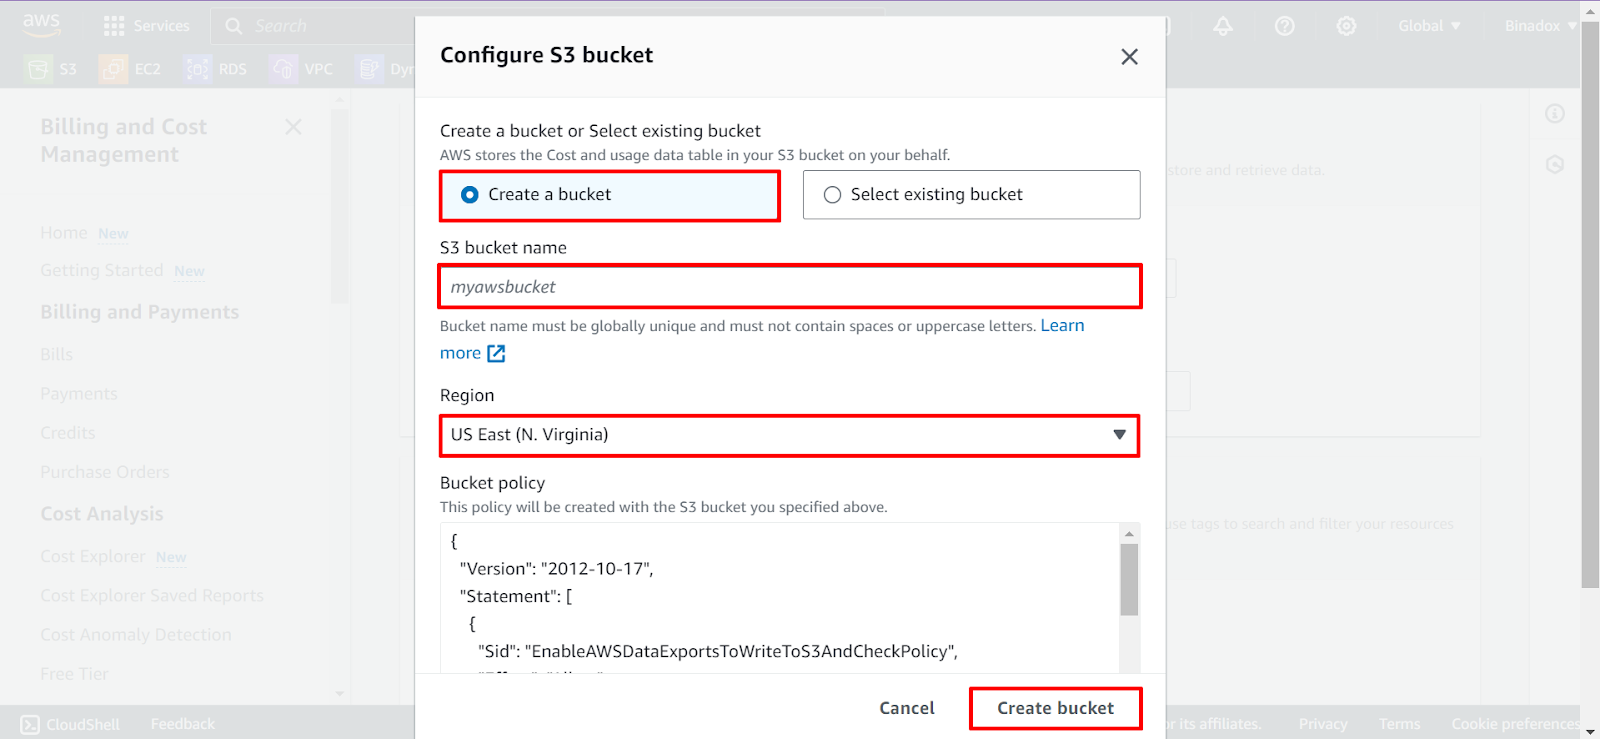
7. In the Configure S3 Bucket dialogue box, perform the following actions:
- Select Create a bucket.
- Enter a bucket name into the S3 bucket name field.
- Select the US East (N. Virginia) region in the Region drop-down list.
Click Create bucket.
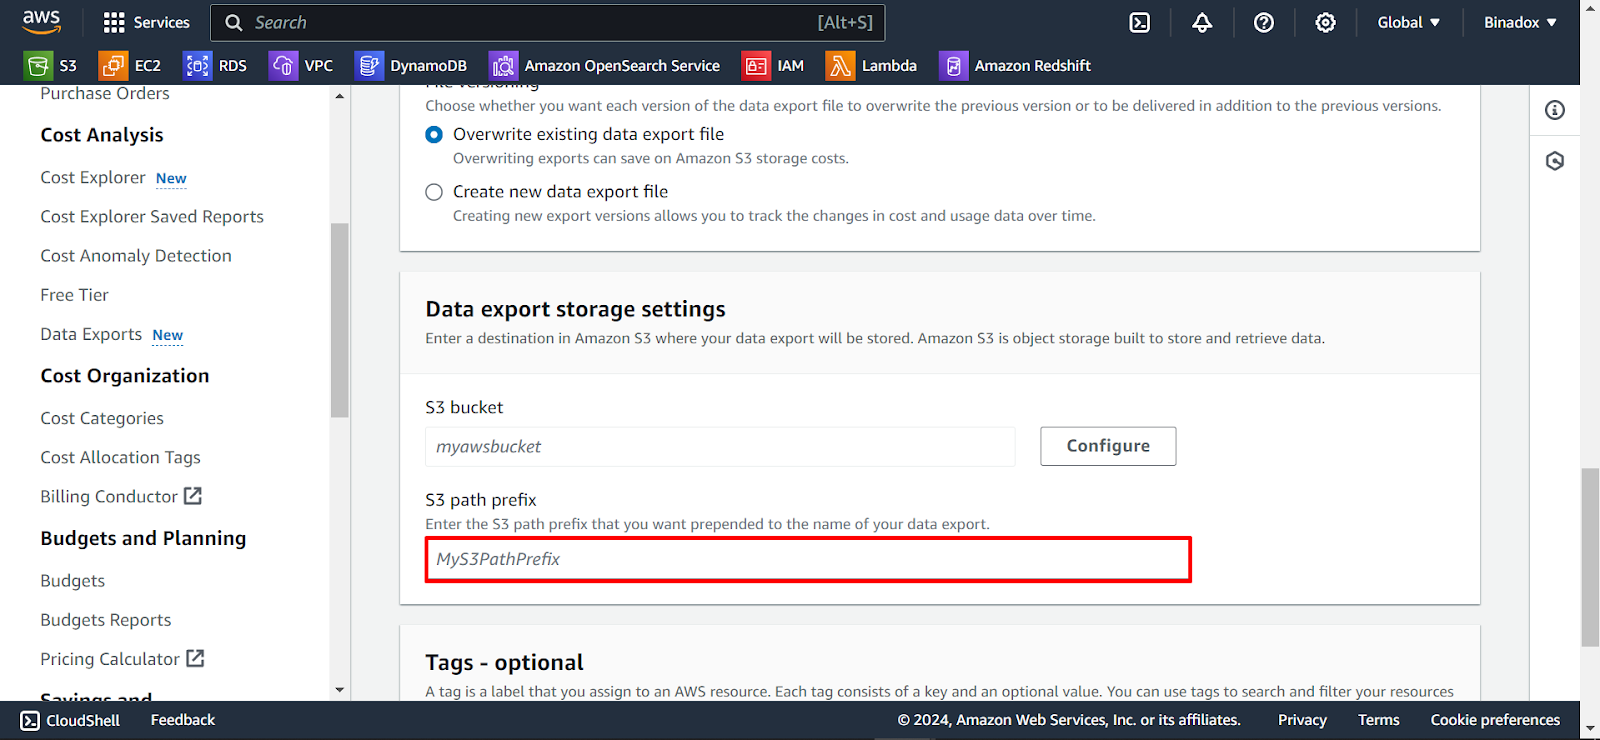
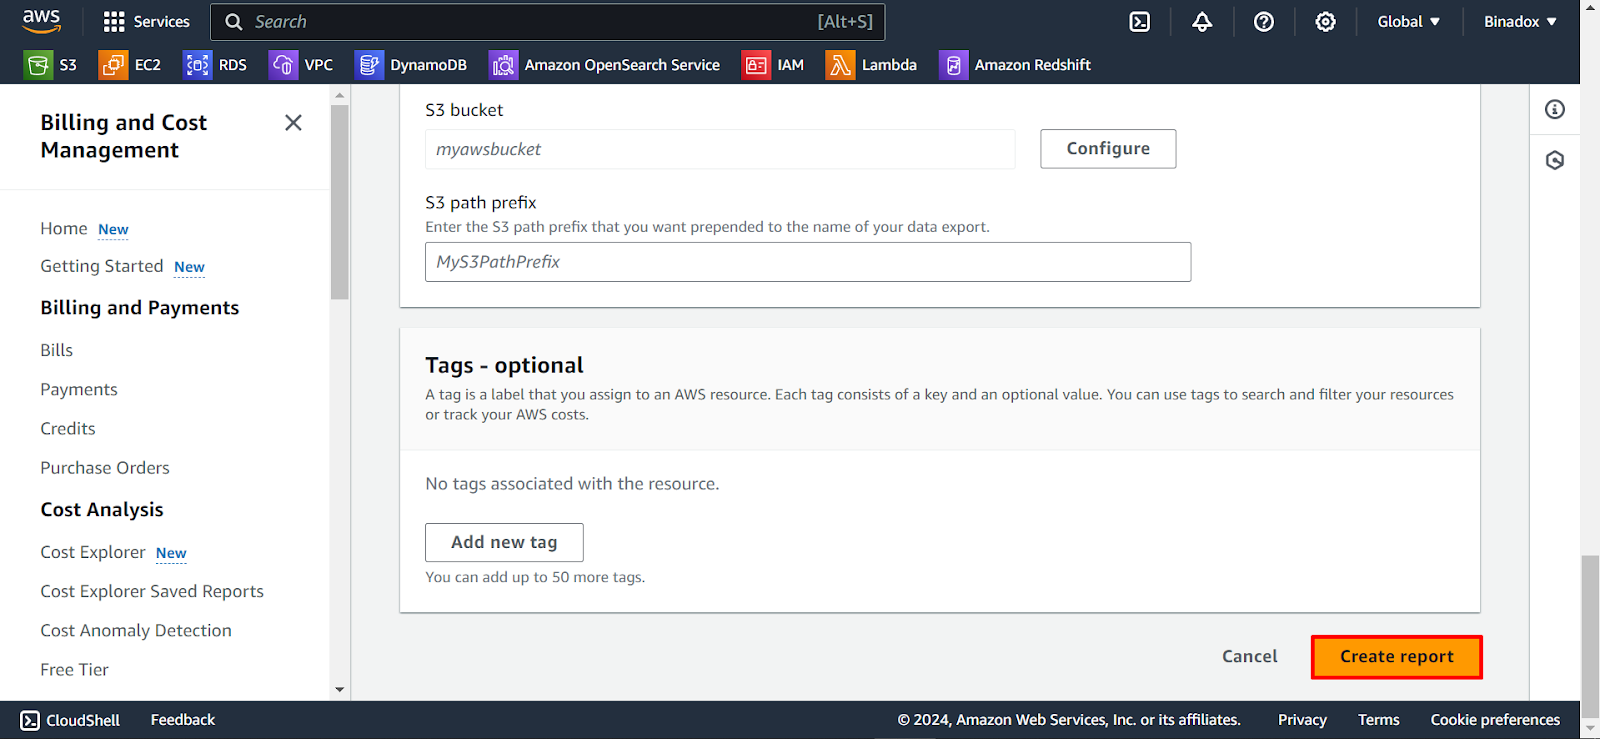
8. Specify the S3 path prefix that you intend to have prefixed to the name of your data export. Click the Create button at the bottom of the page.
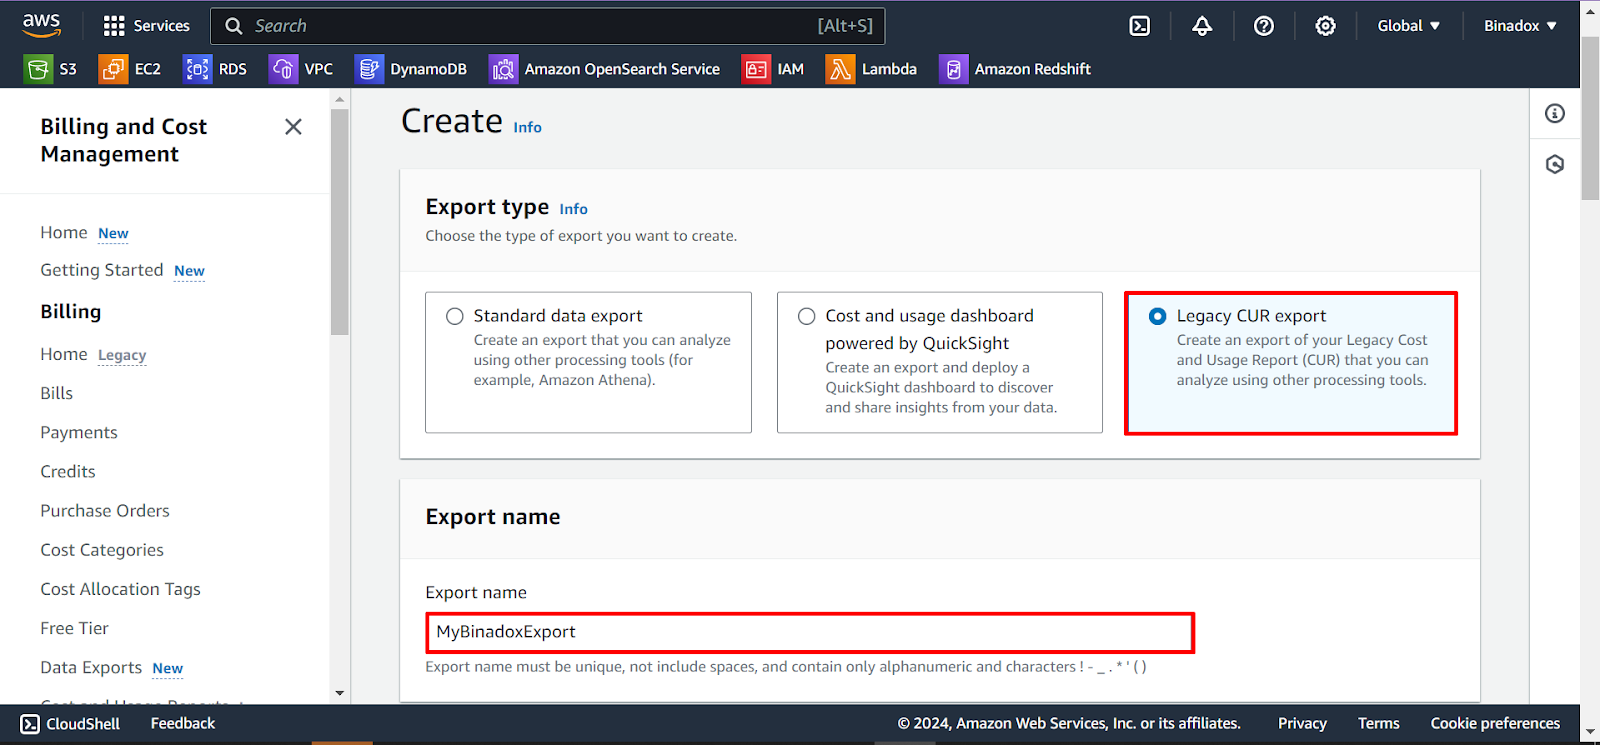
2.2 Legacy CUR export
1. Click Data Exports in the navigation pane. Click the Create button.
2. Within the Export type section, opt for Legacy CUR export. In the Export name section, input the desired name into the Export name field.
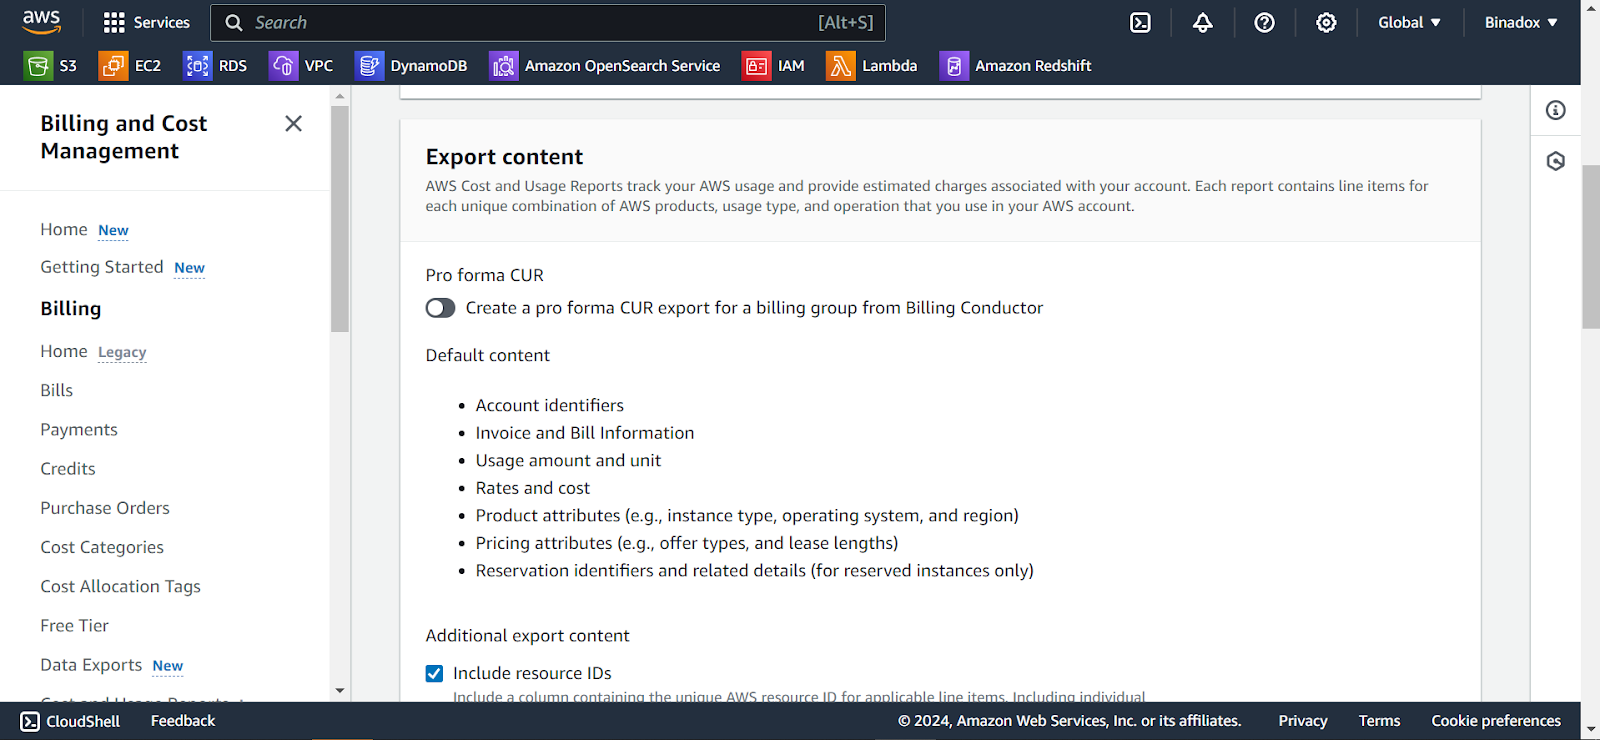
3. Navigate to the Export Content section, and proceed to Additional export content. Provide the following details:
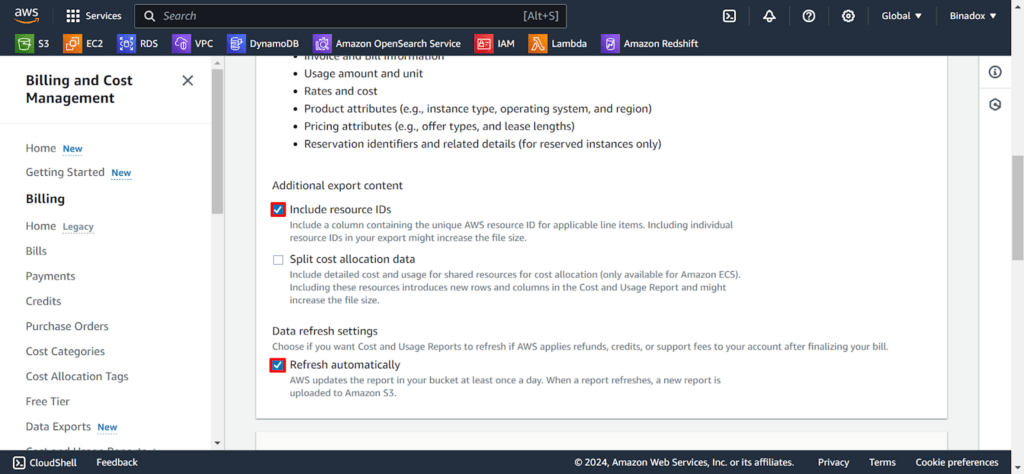
- Select the Include resource IDs checkbox.
- In the Data refresh settings section, select the Refresh automatically checkbox.
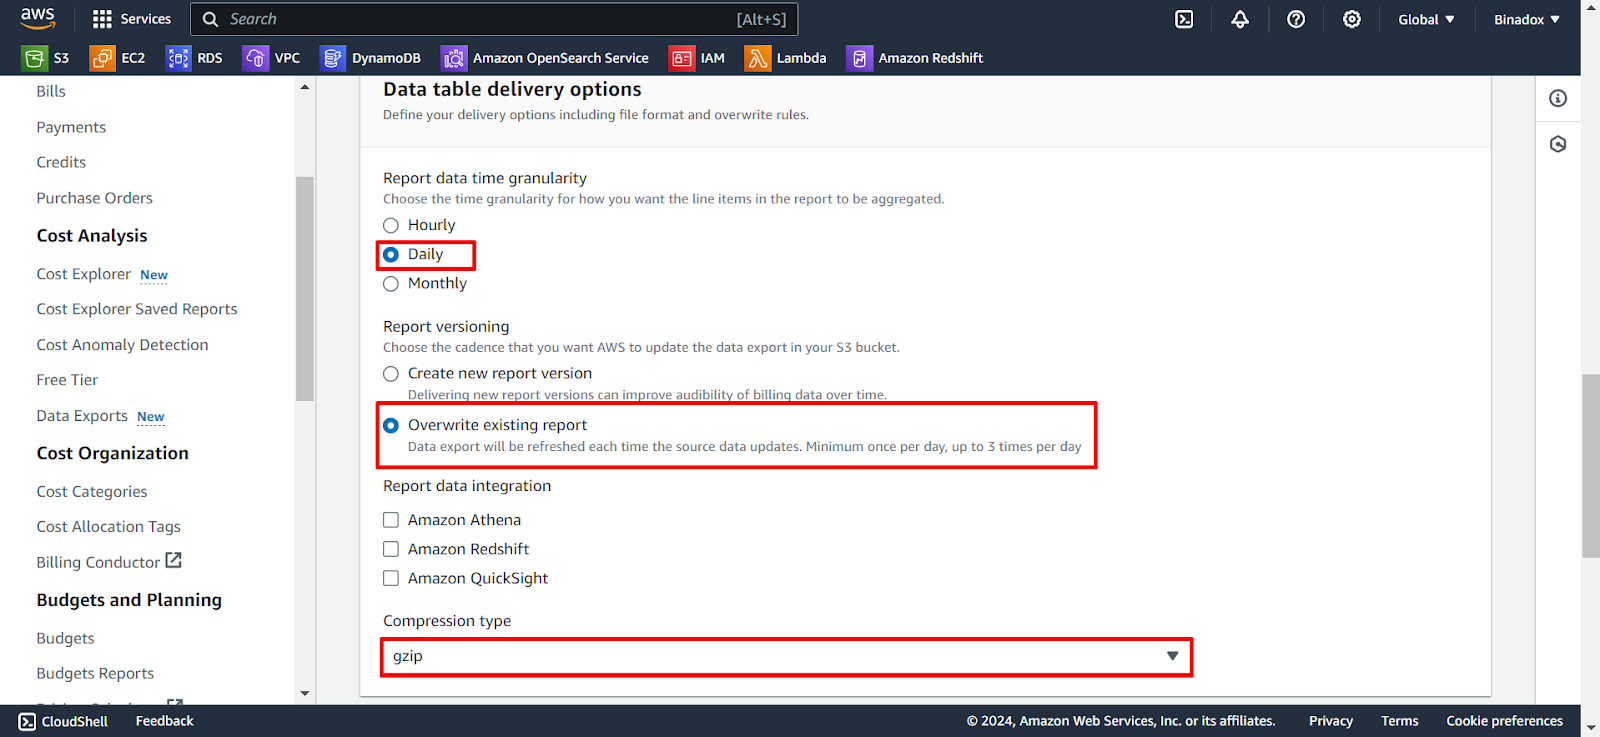
4. In the Data table delivery options section, perform the following actions:
- In the Report data time granularity section, select the Daily radio button.
- In the Report versioning section, select the Overwrite existing report radio button.
- Leave Report data integration not selected.
- Select the GZIP format in the Compression type drop-down list.
5. In the Data export storage settings section, click Configure.
6. In the Configure S3 Bucket dialogue box, proceed with the following actions:
- Select Create a bucket.
- Enter a bucket name into the S3 bucket name field.
- Select the US East (N. Virginia) region in the Region drop-down list.
- Click Create bucket.
7. Click the Create report button.
3. Add a New IAM User
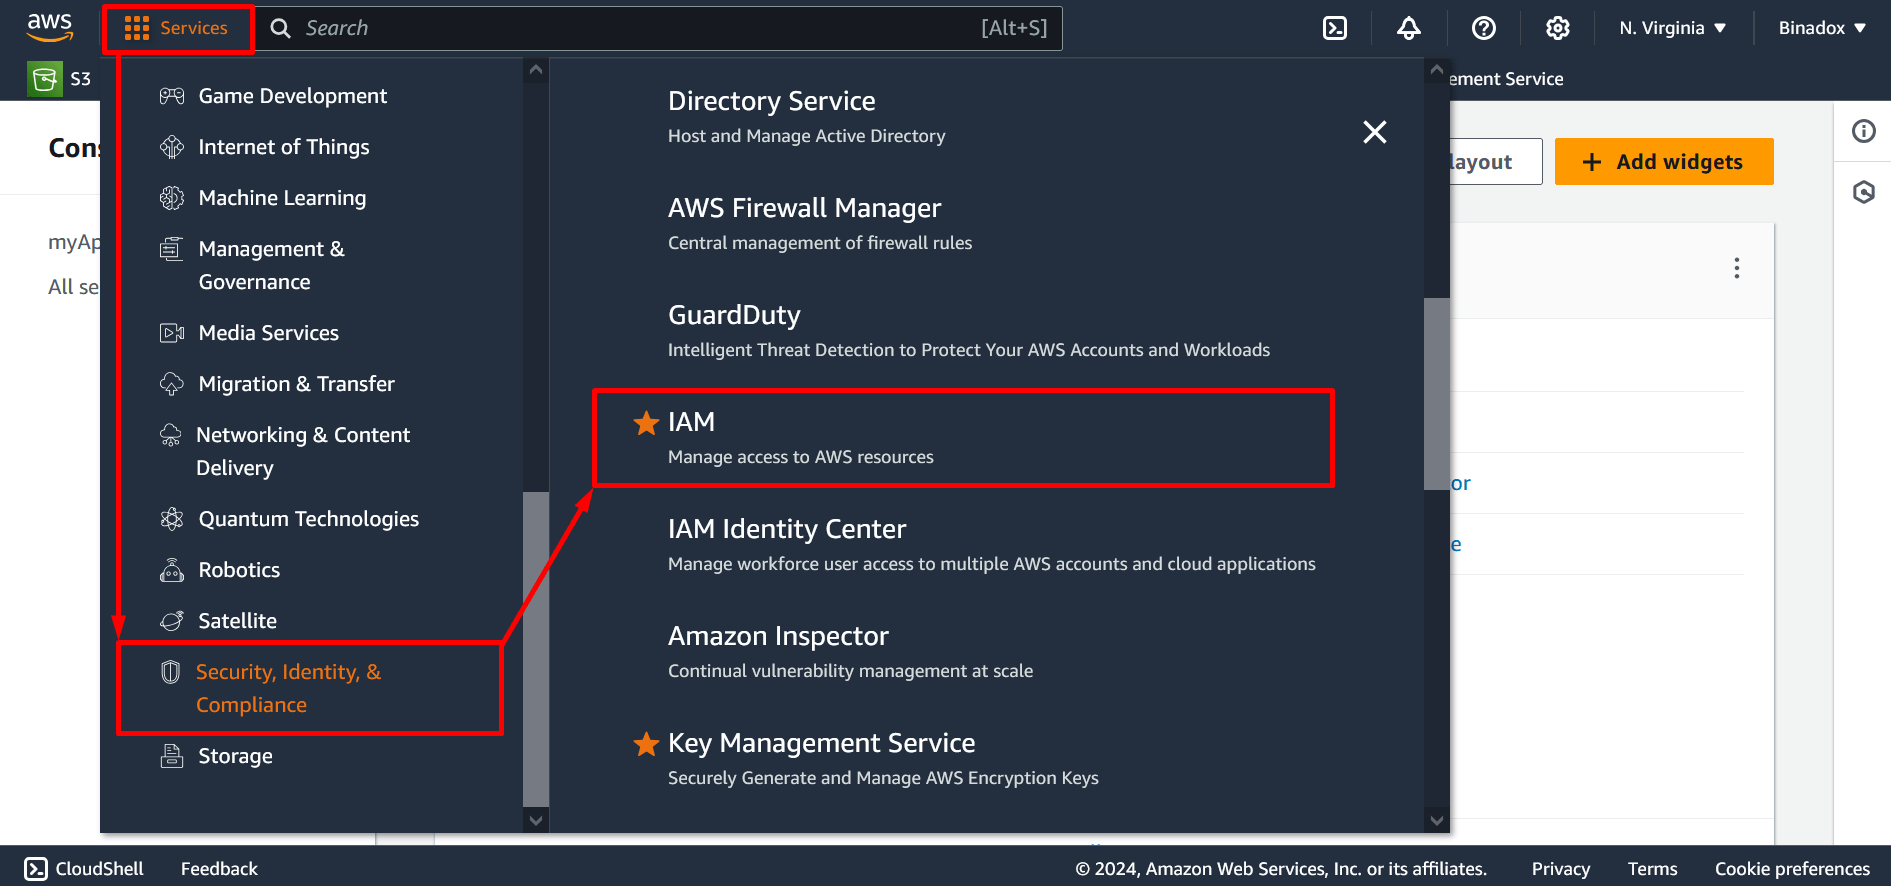
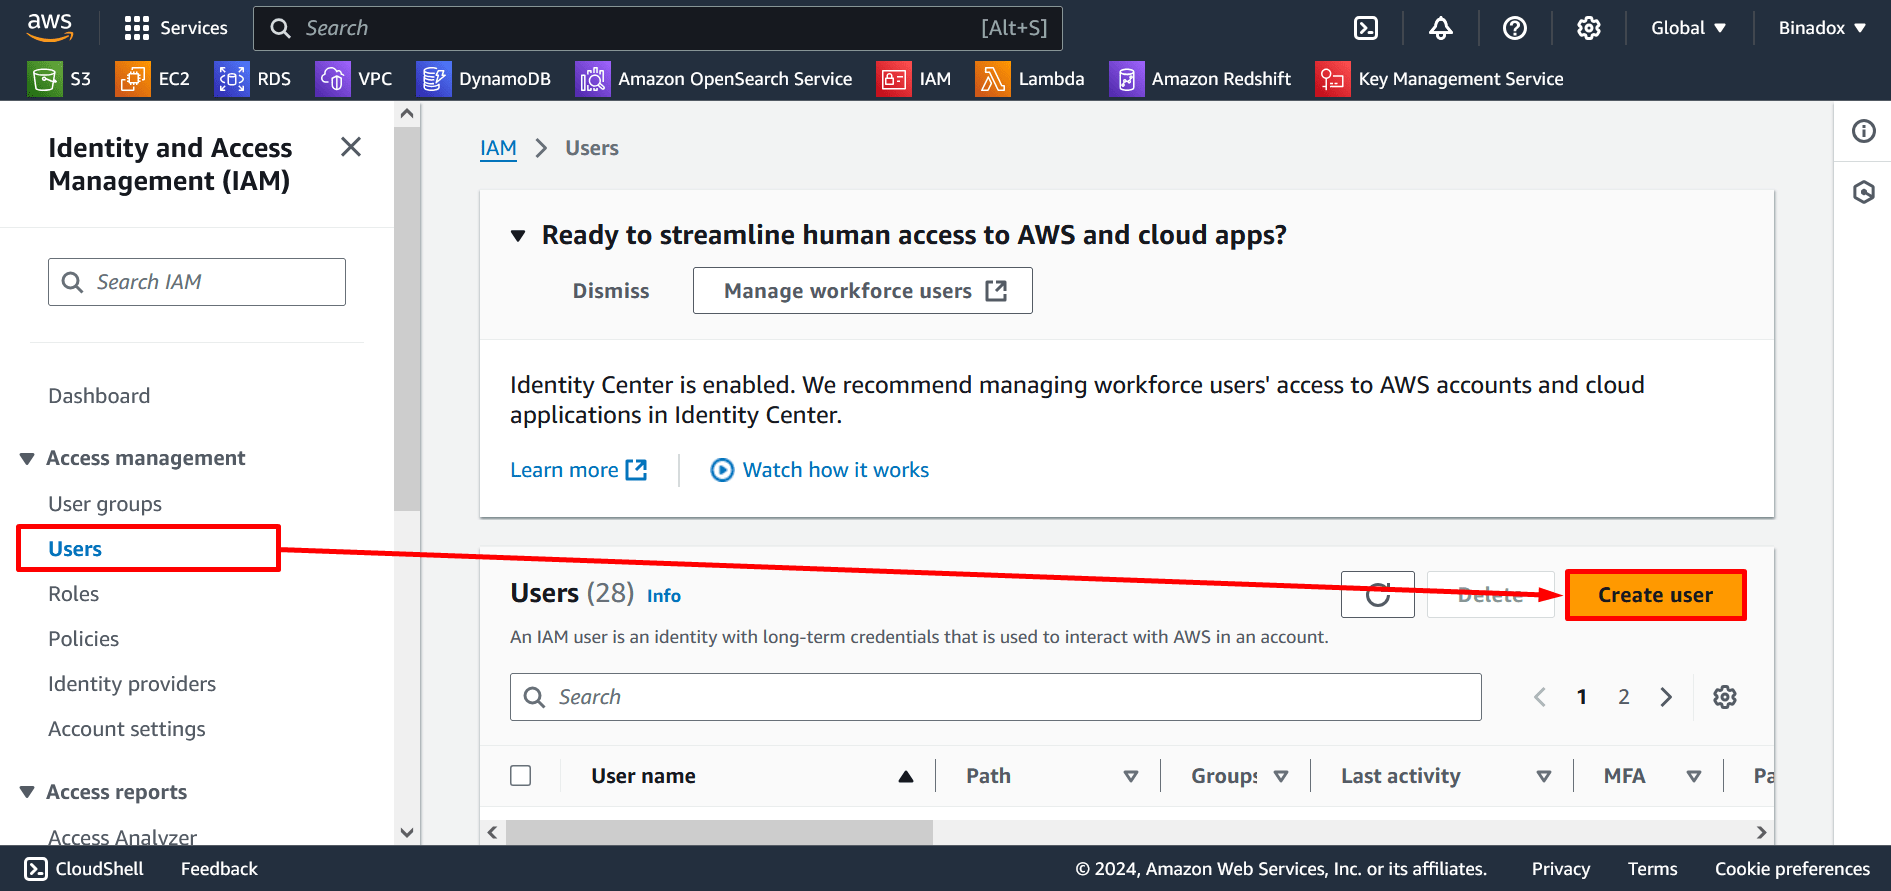
1. Navigate to the IAM Console. In the menu bar at the top, click Services > Security, Identity & Compliance > IAM. Use the search bar, if necessary.
2. You will be redirected to the Identify and Access Management Console. In the navigation pane, select Users in the Access management group and click Create user.
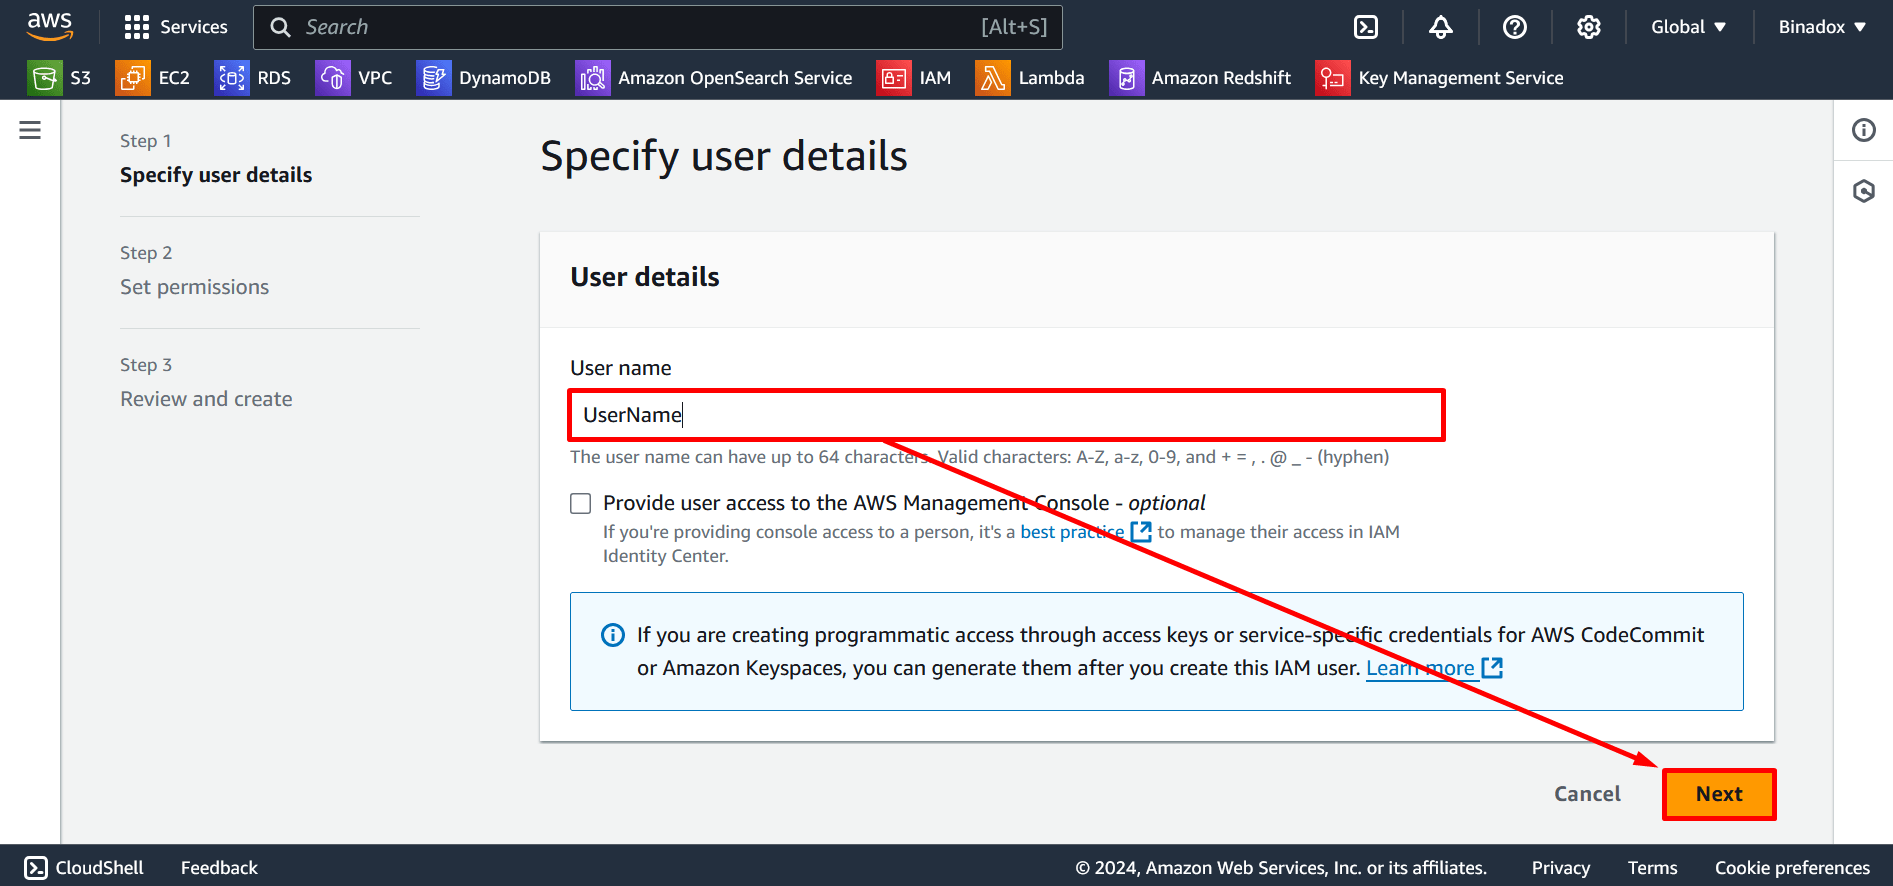
3. Set User name and click the Next button.
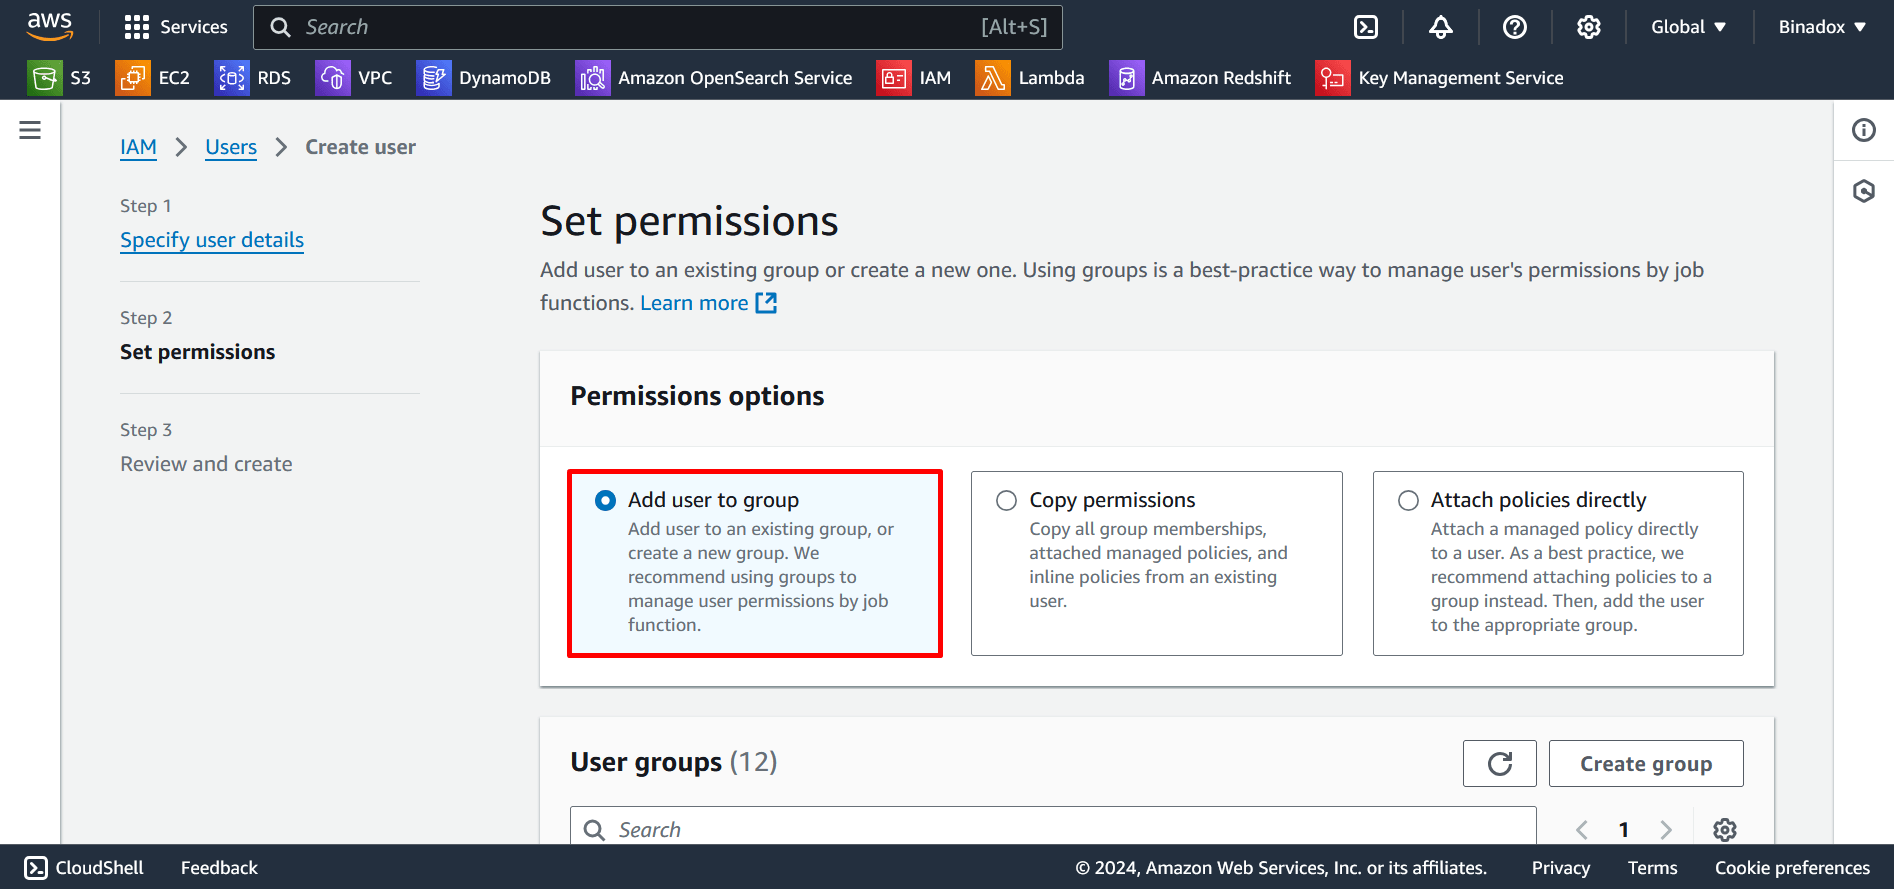
4. Select Add user to group in the Permissions options section and click Next at the bottom of the page.
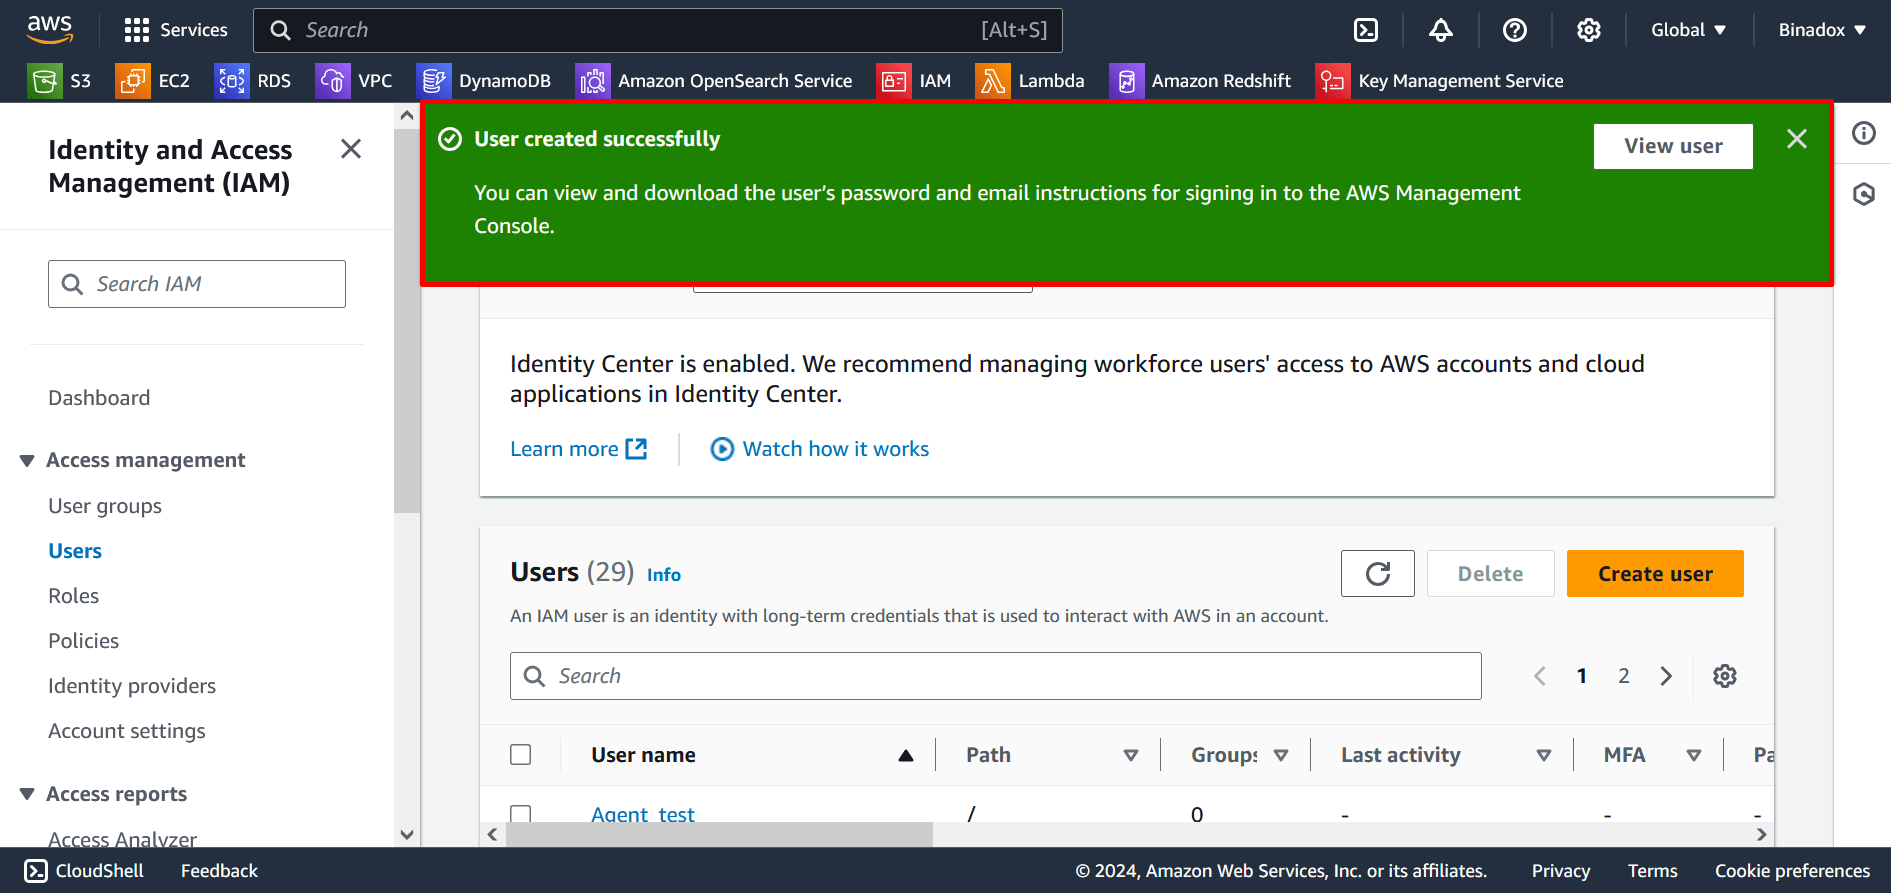
5. On the Review and create page, scroll down and click Create user. If all conditions are met, you will get an alert “User created successfully”.
4. Add a Policy
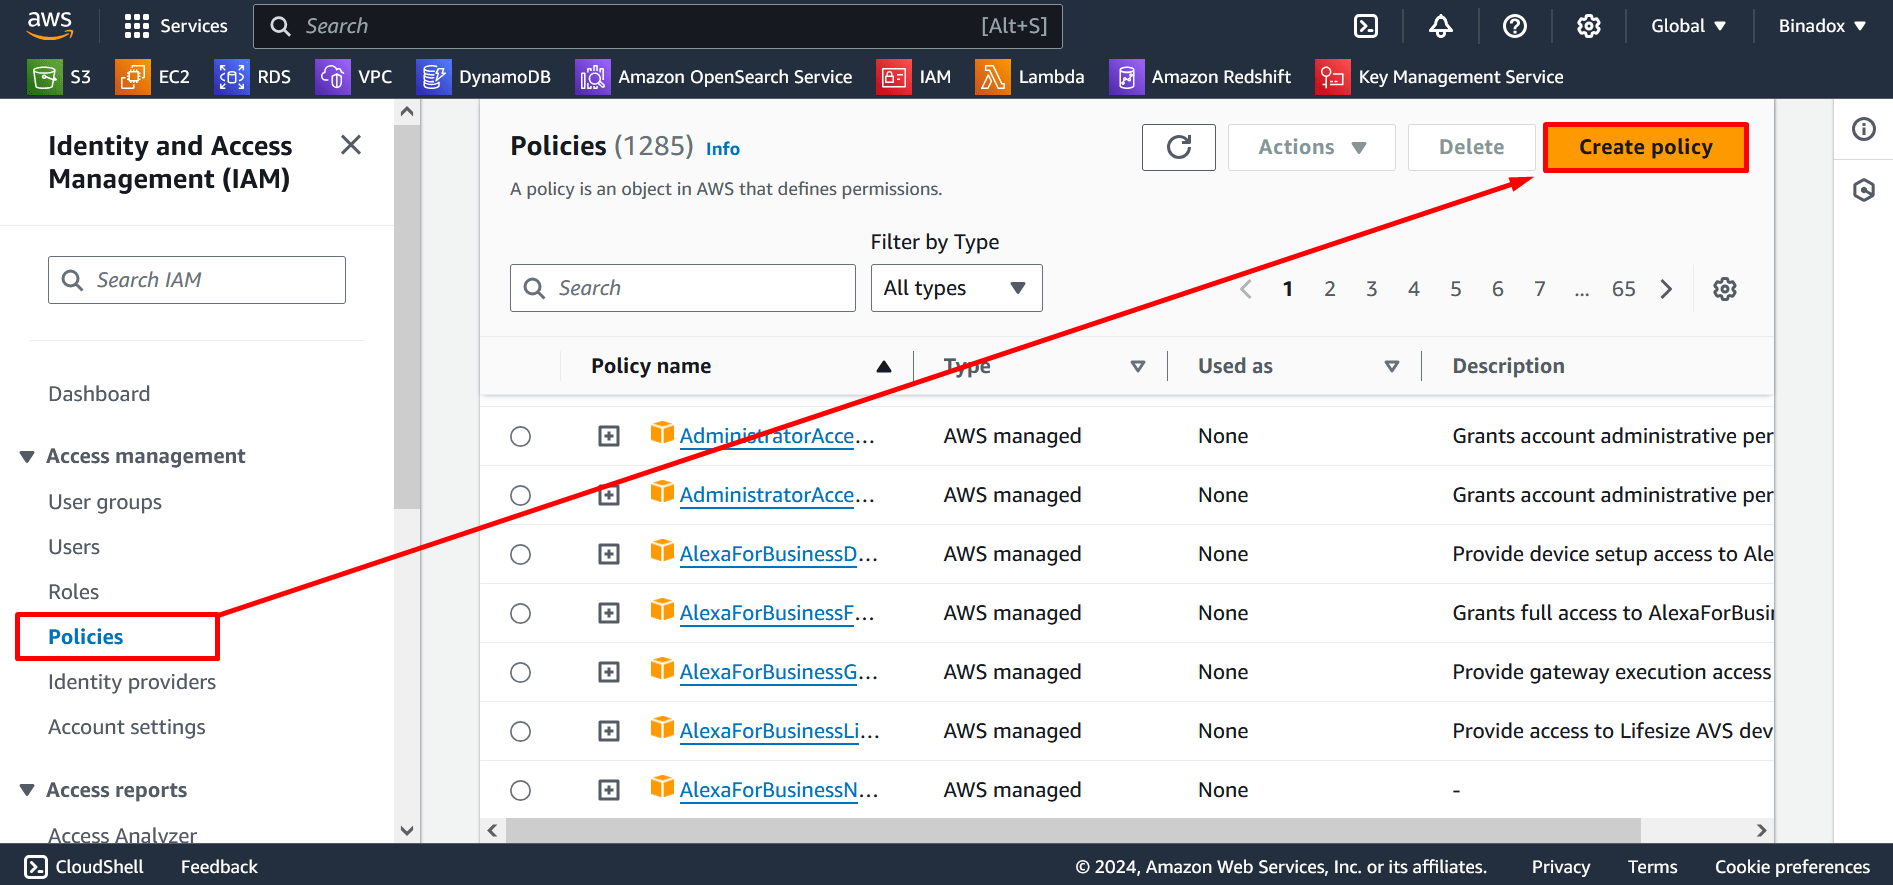
1. In the navigation pane, choose Policies. Click the Create policy button at the top of the page.
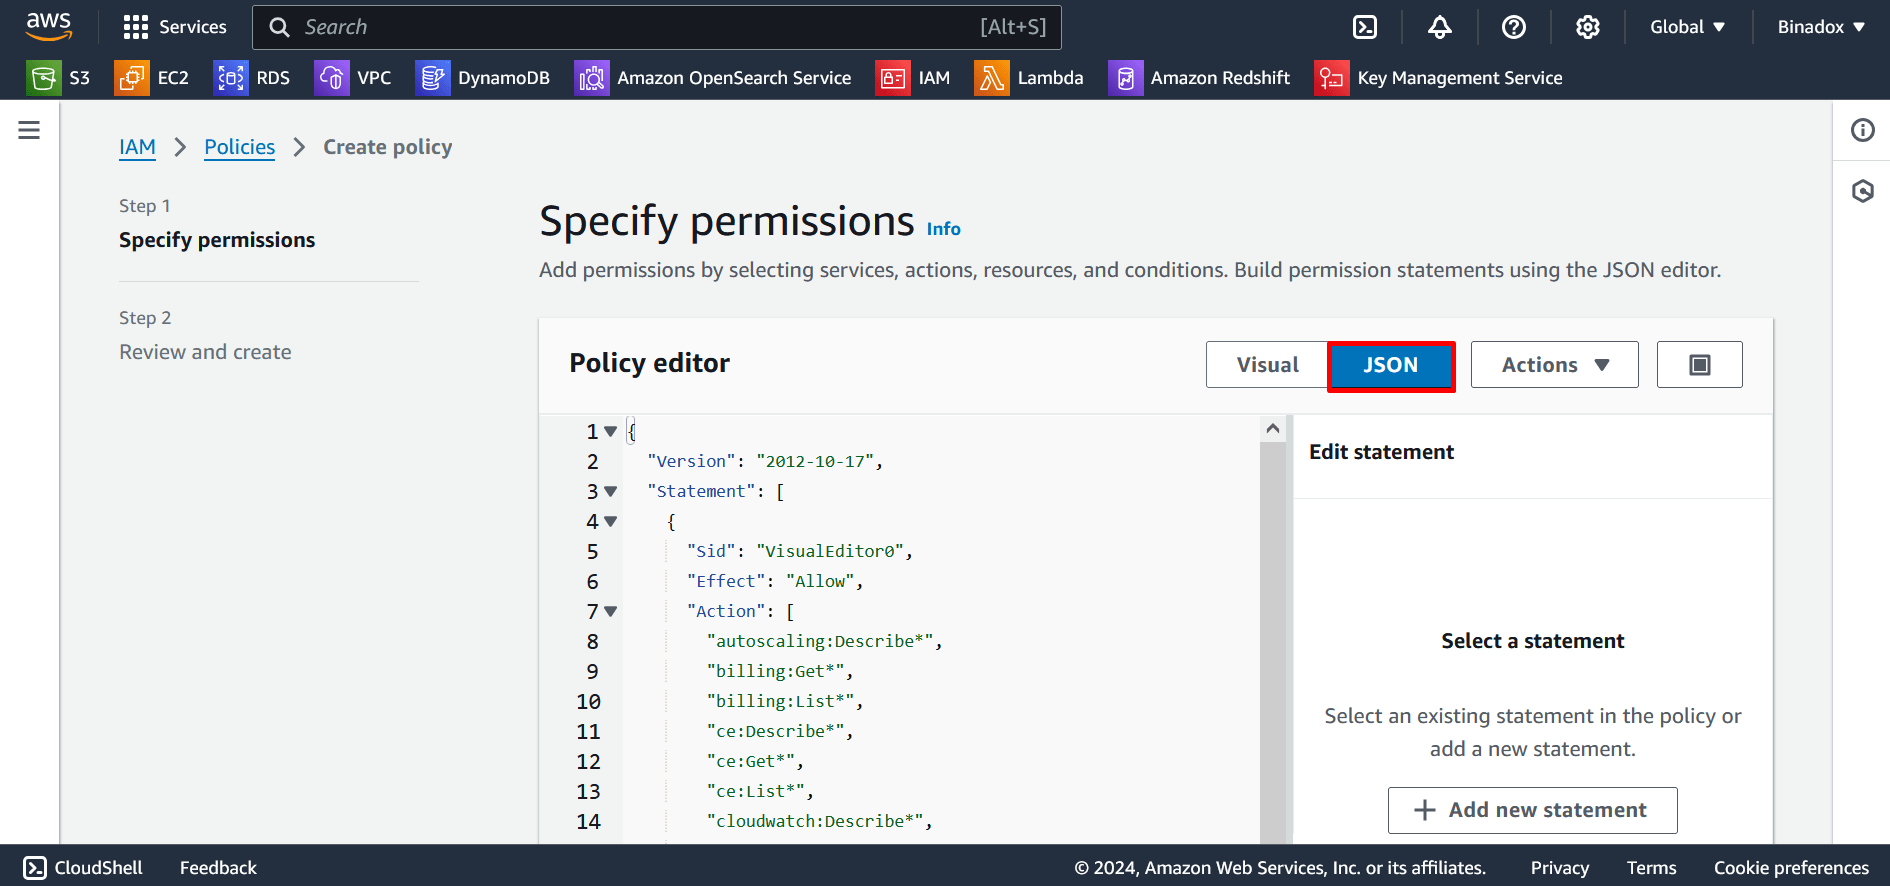
2. You will be redirected to the Create Policy view. On the JSON tab, insert the following file in the Policy editor. Click the Next button at the bottom of the page.
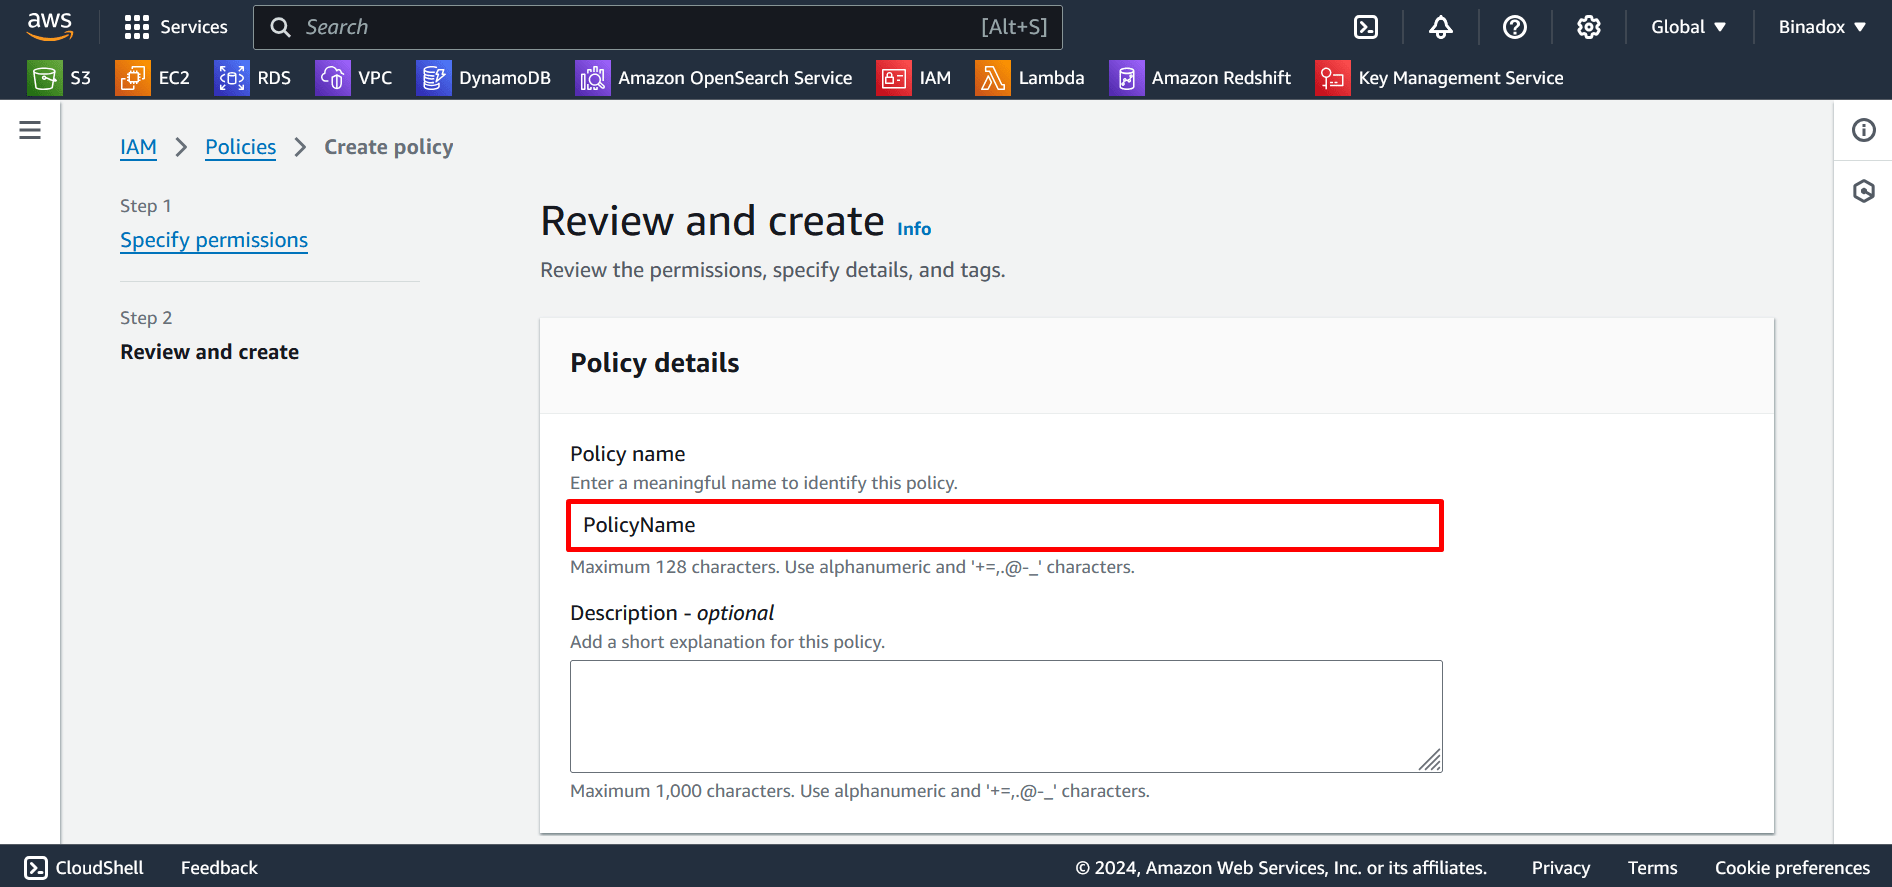
3. Provide the Policy name and Description(optional) in the fields of Policy details form. Click the Create policy button at the bottom of the page.
4. Repeat steps 1-3 to create Write Permissions and insert the following file.
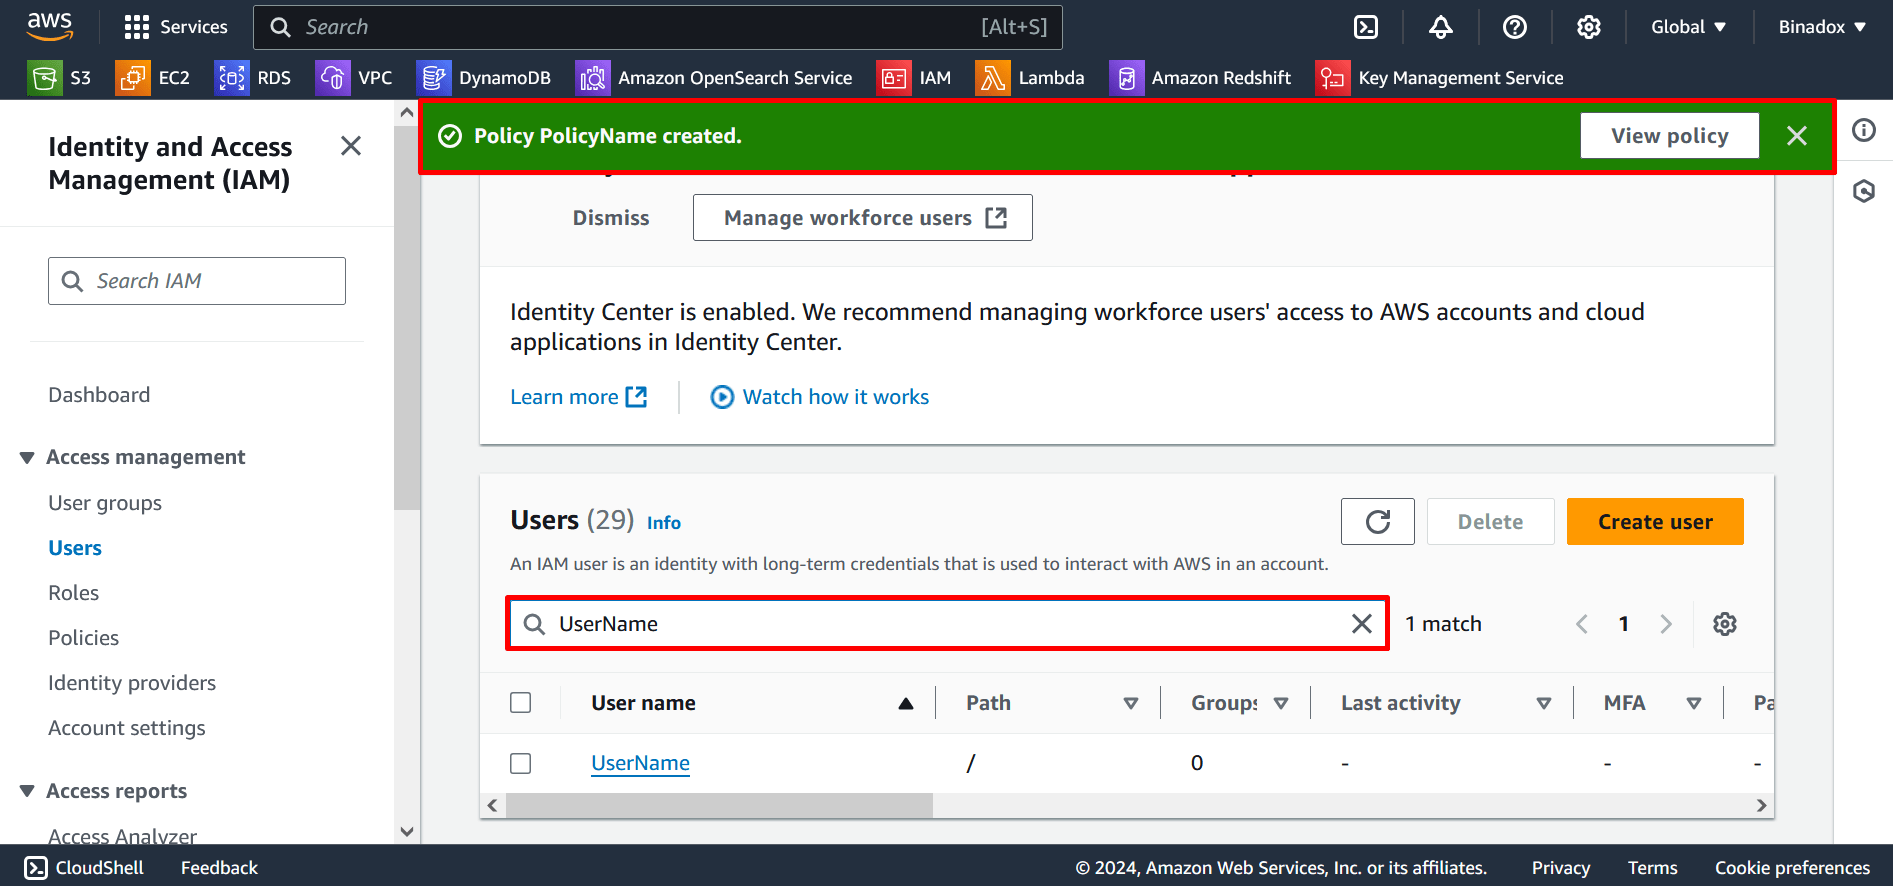
5. If all conditions are met, you will get an alert “Policy created”. Select the Users section and search for your new user. Click on it.
6. You will be redirected to the user page. On the Permissions tab, click Add permissions.
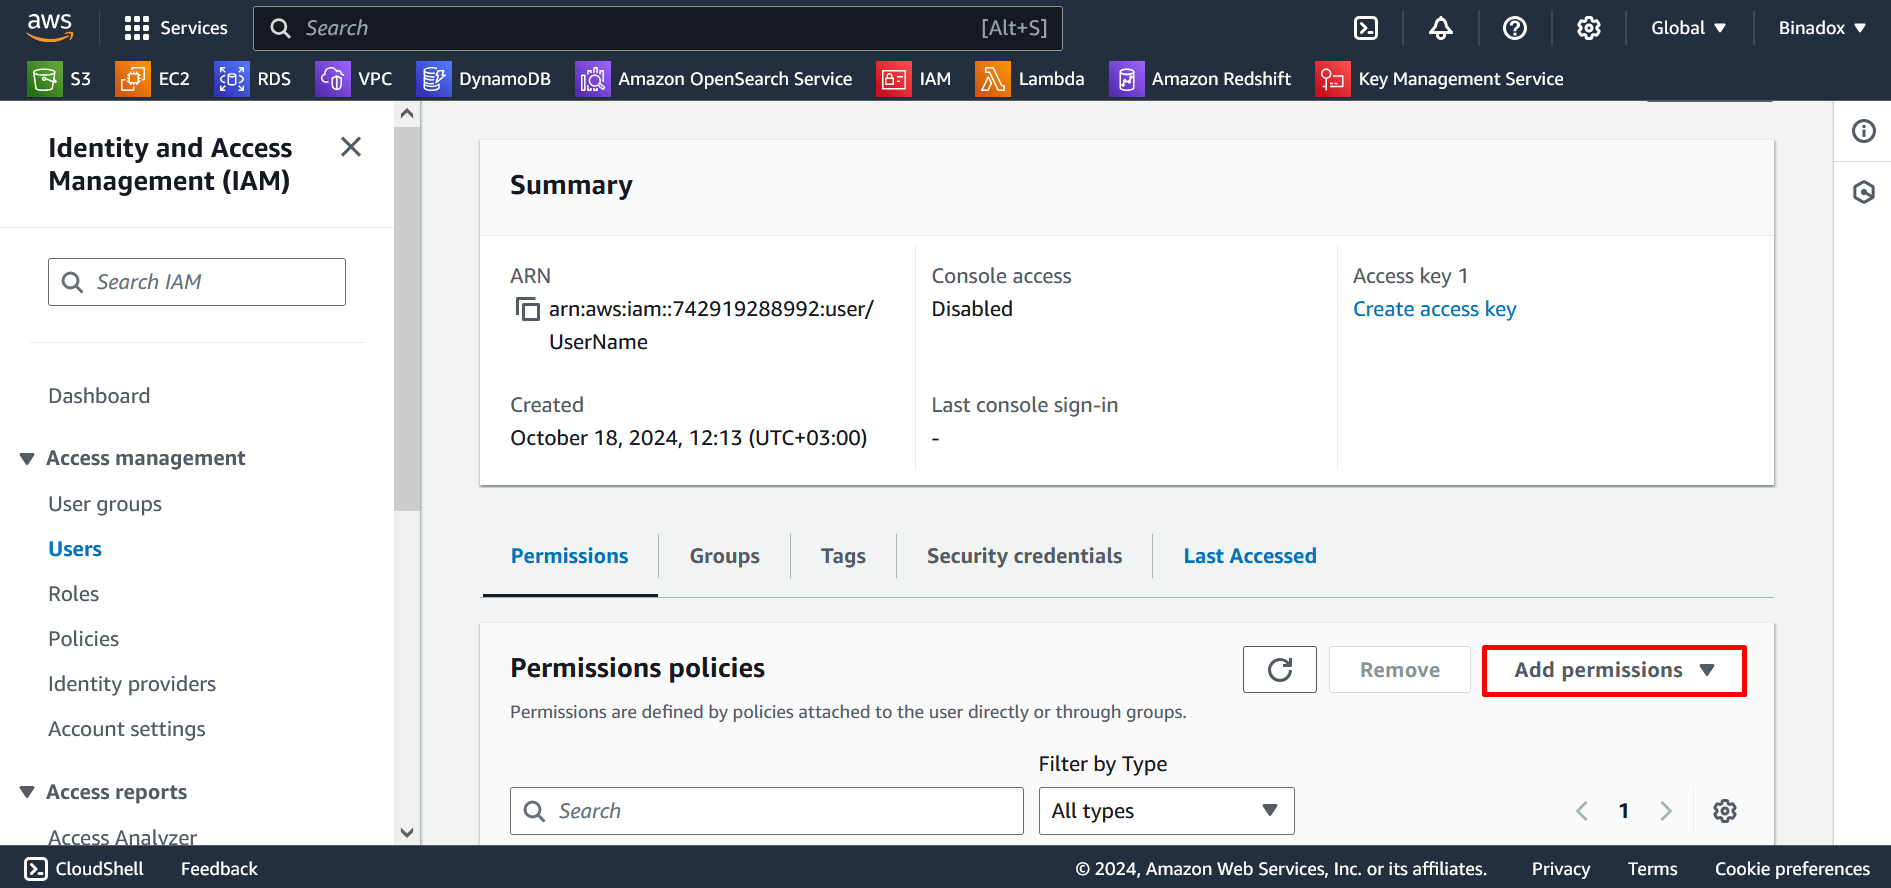
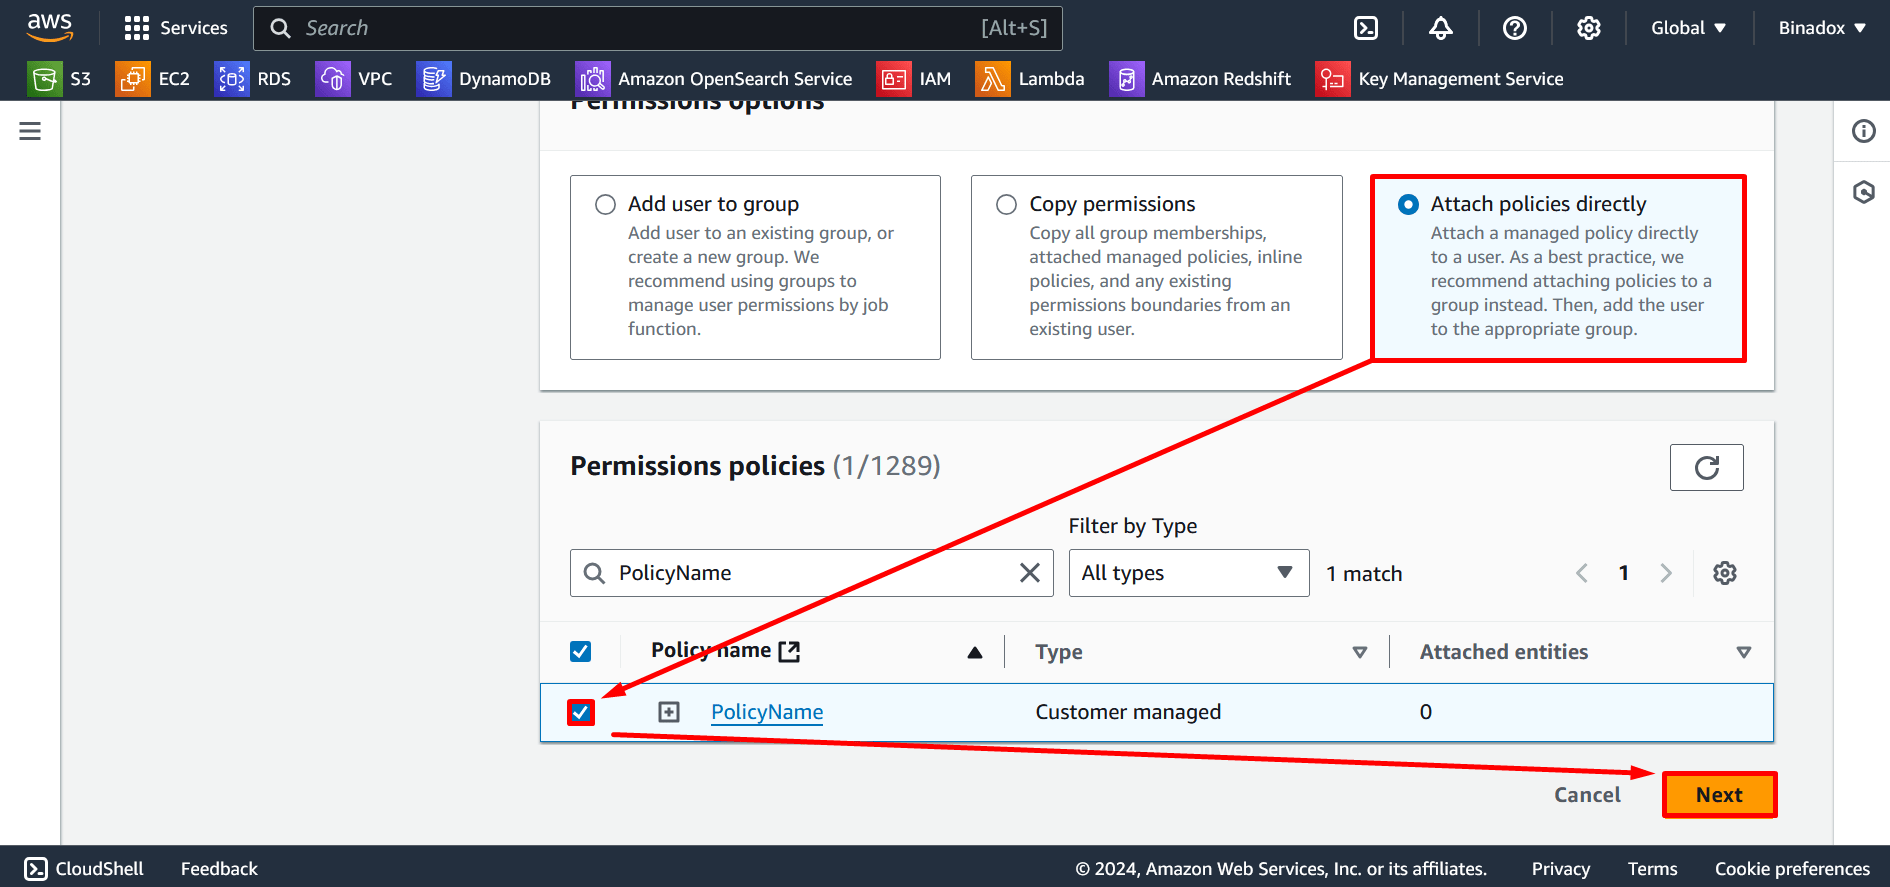
7. On the Add permissions page, select Attach policies directly in Permissions options. Search for new permissions in the search bar and put a tick mark against it. Click Next.
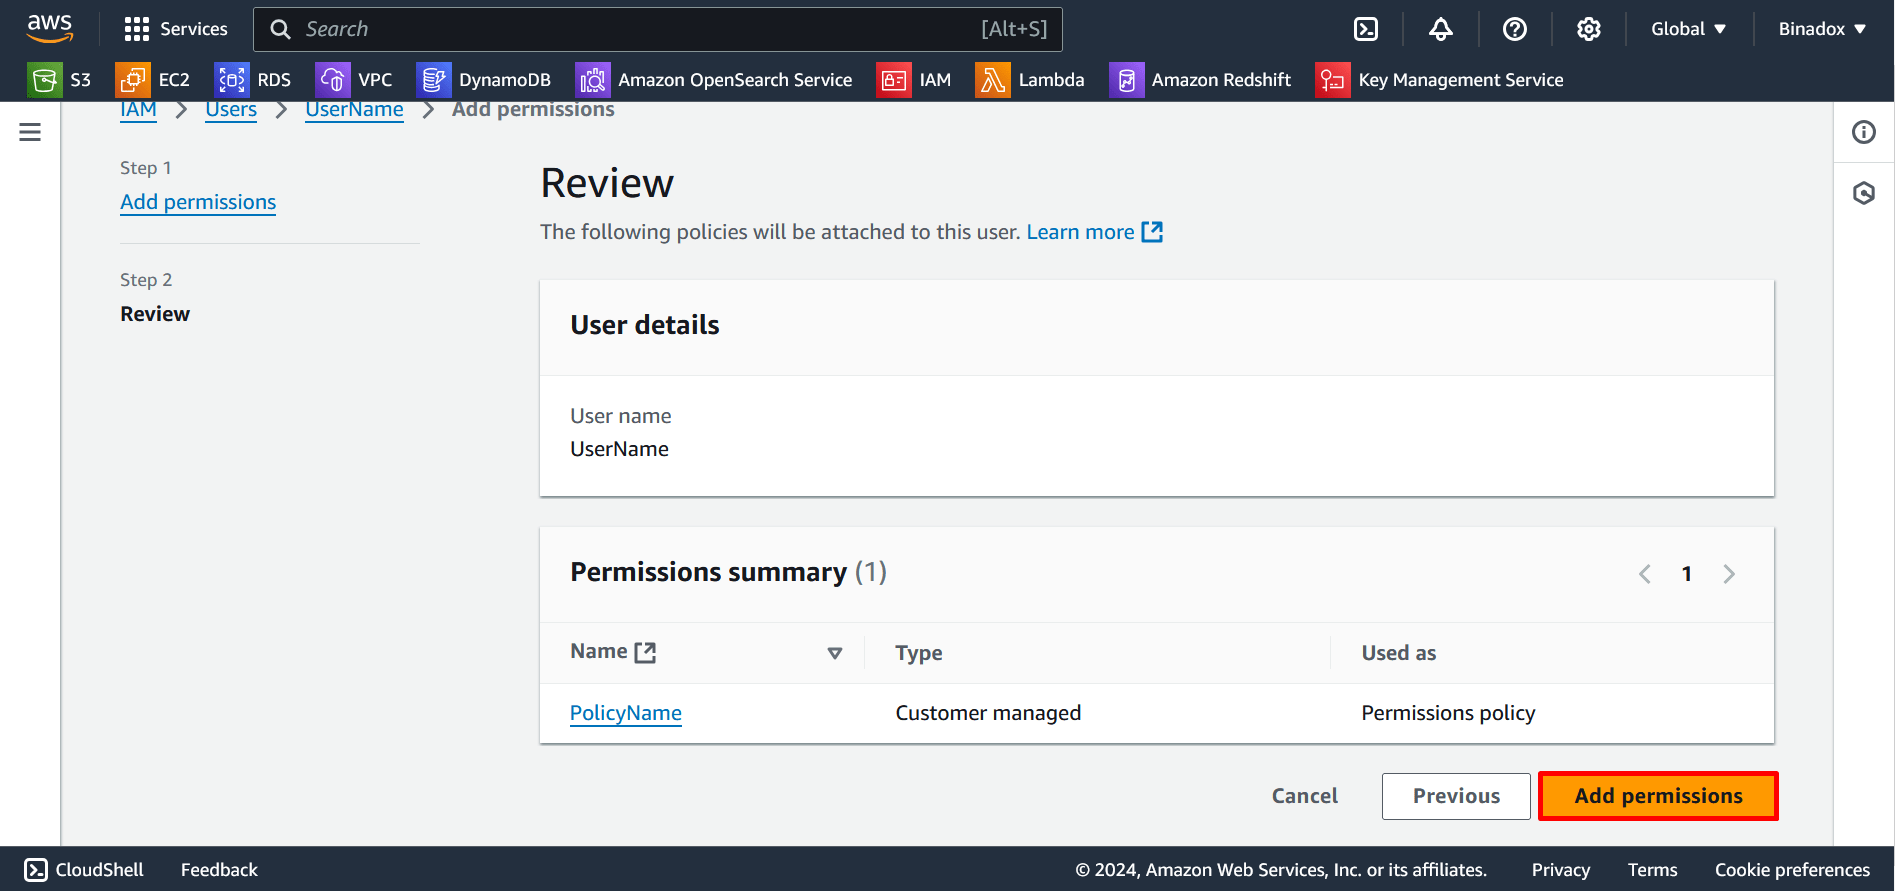
8. On the Review page, click Add permissions. If all conditions are met, you will get an alert “2 policies added”.
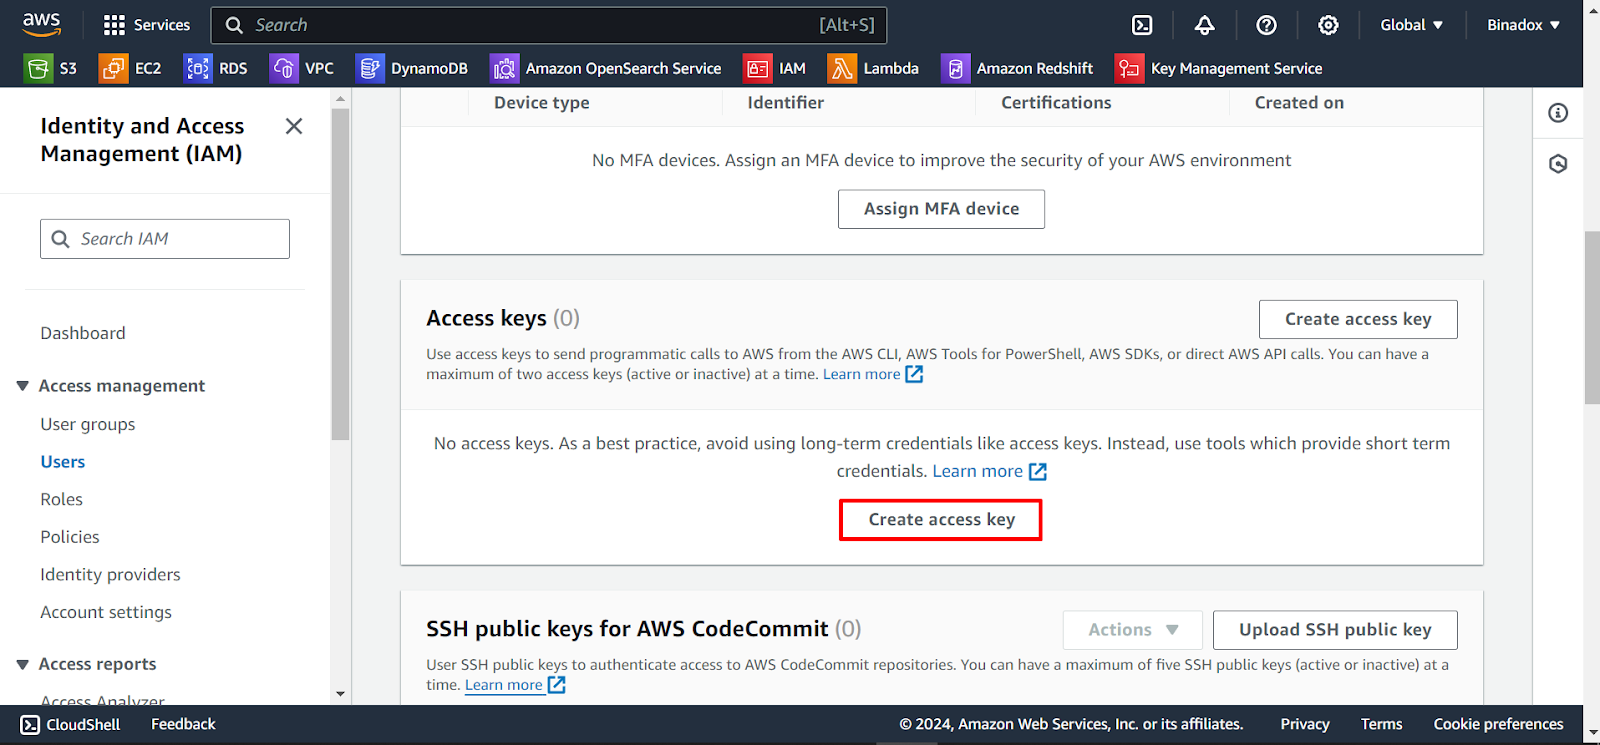
5. Create an Access Key
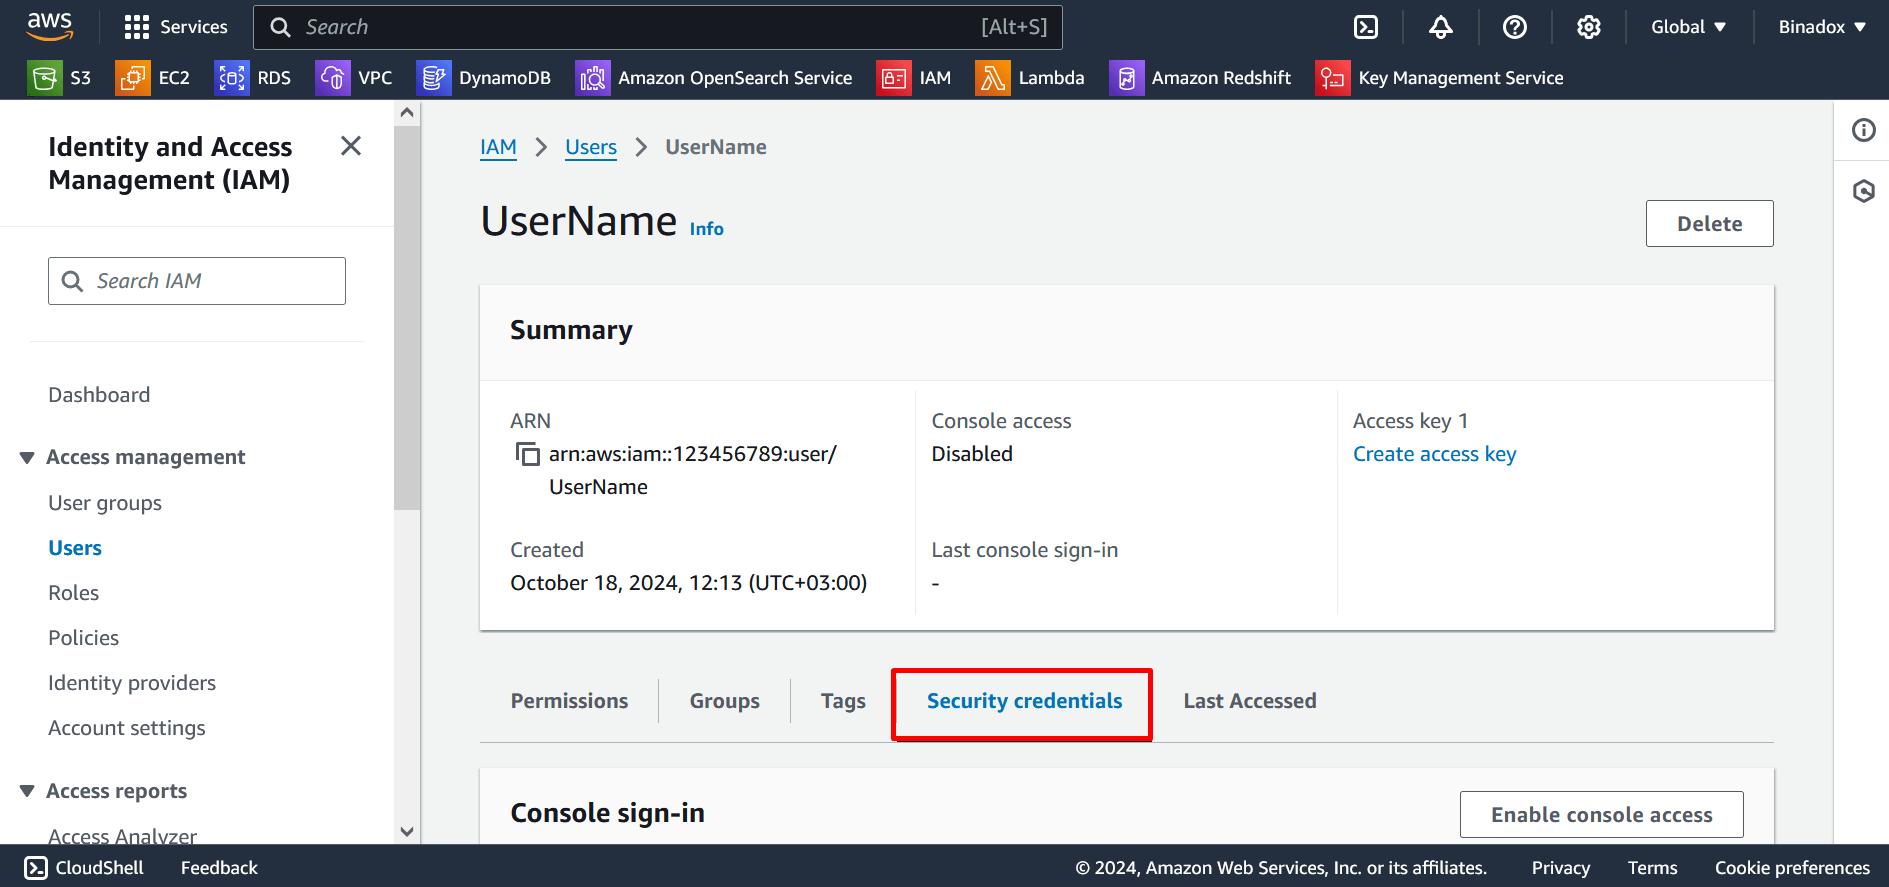
1. Go to the Security credentials tab.
2. Scroll down and click the Create access key button in the Access keys section.
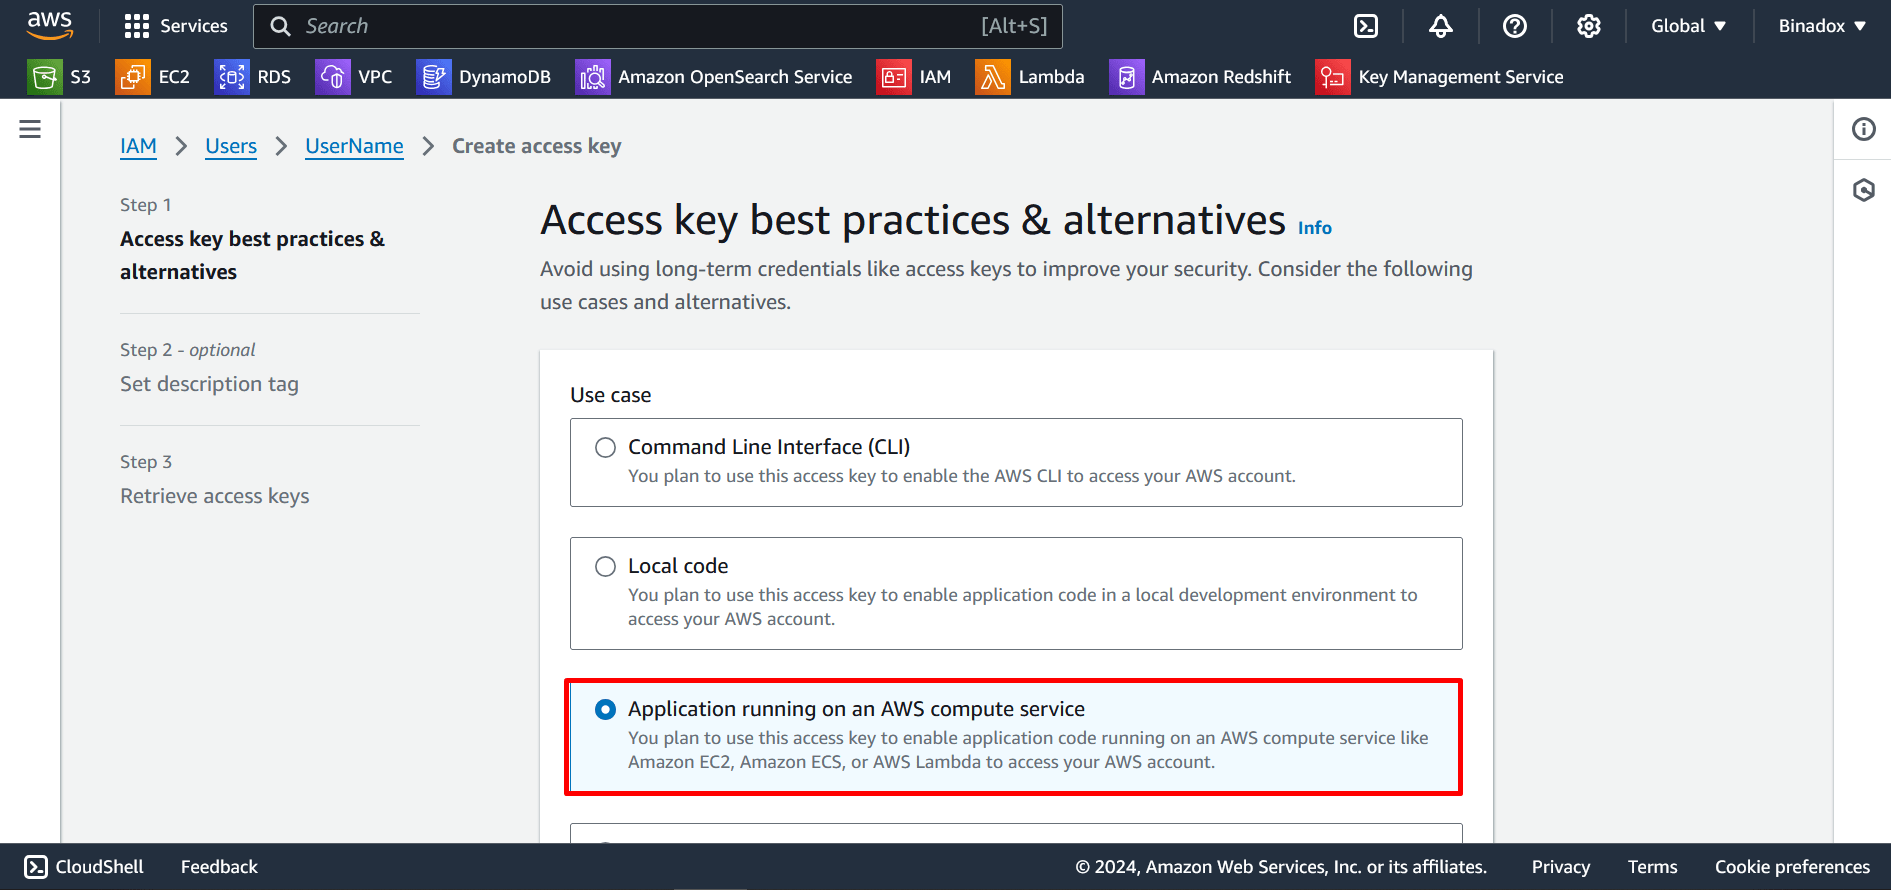
3. On the Access key best practices & alternatives page, select Application running outside AWS, check the box in the Сonfirmation section and click Next in the lower right corner of the page.
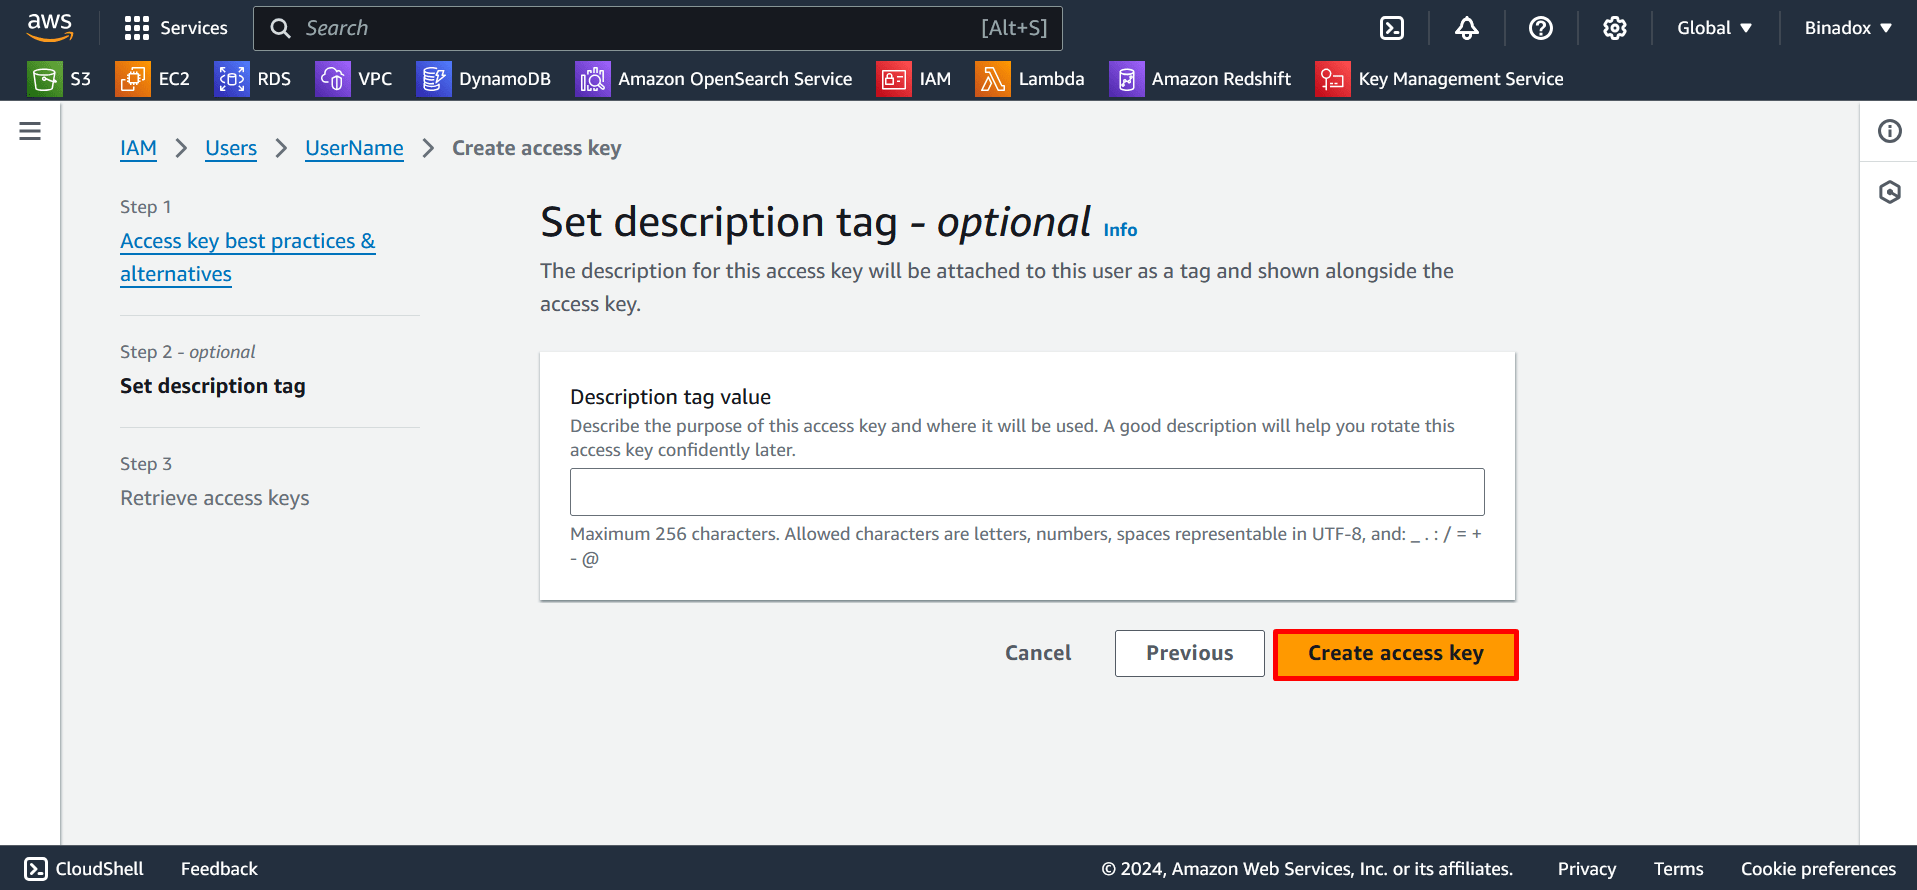
4. Click the Create access key button.
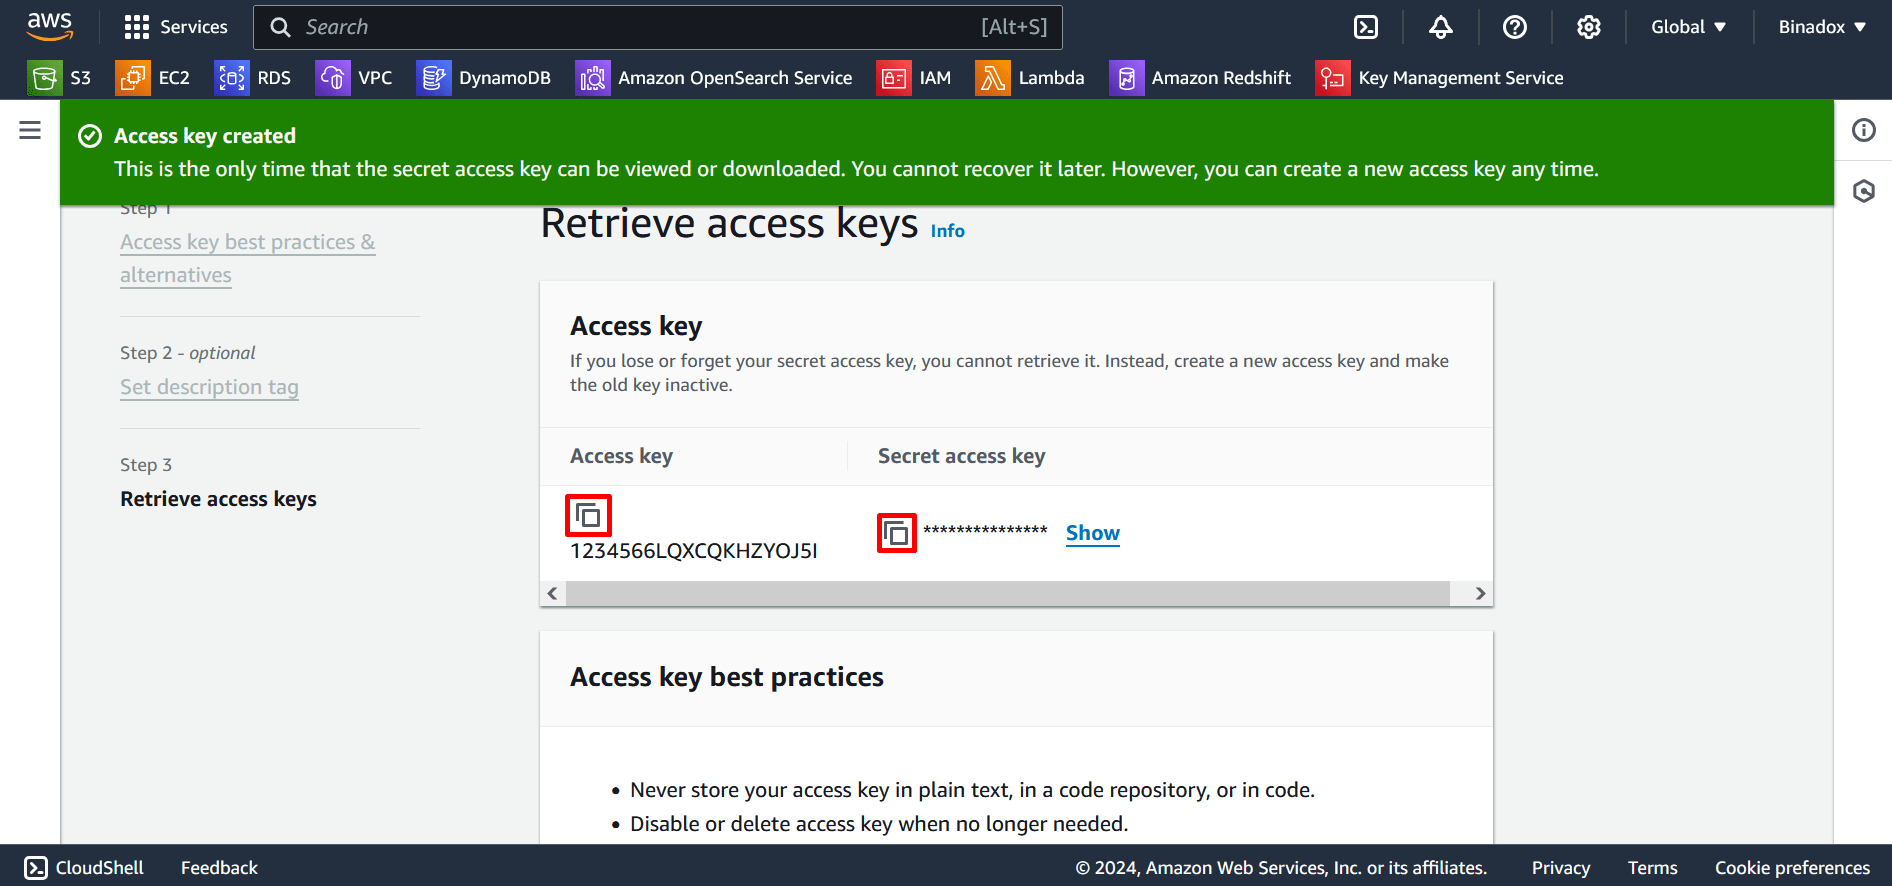
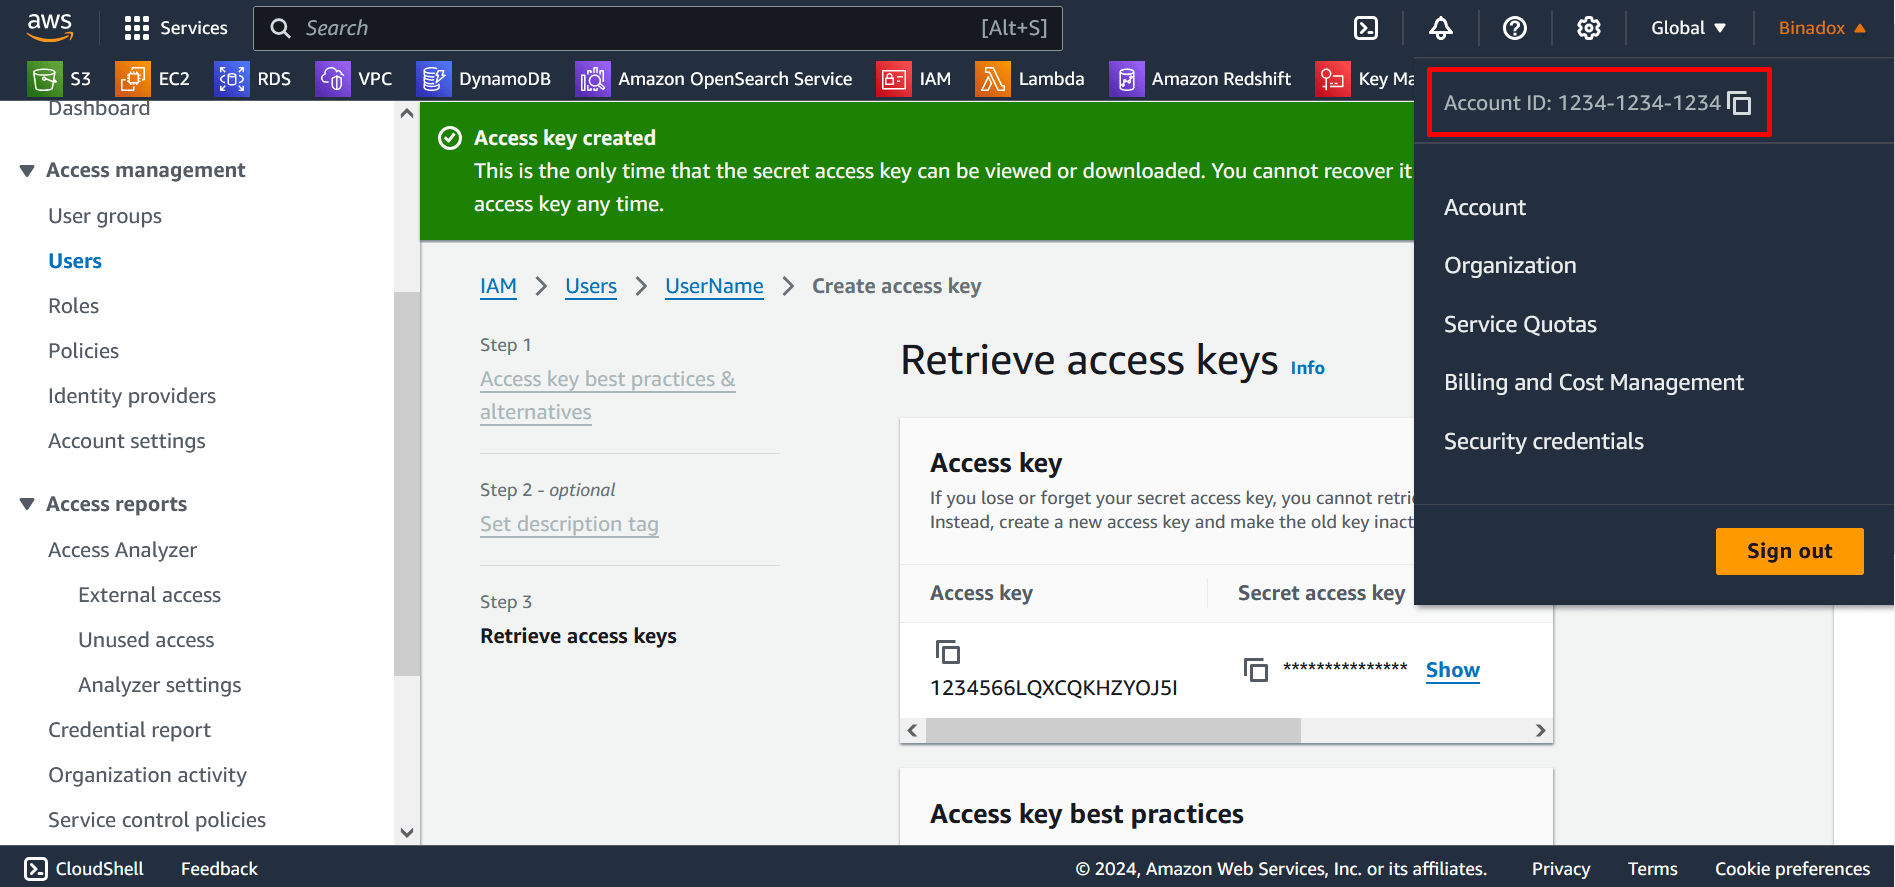
5. On the Retrieve access keys page, click on the Add to clipboard icon and save keys.
Note:
This is the only time that the secret access key can be viewed or downloaded. You cannot recover it later. However, you can create a new access key any time.
6. Locate an AWS Account ID
To integrate an AWS account with Binadox, it is required to specify an AWS account ID. An AWS account ID is located in the navigation bar on the upper right. Click on the account name and copy the Account ID to the clipboard.
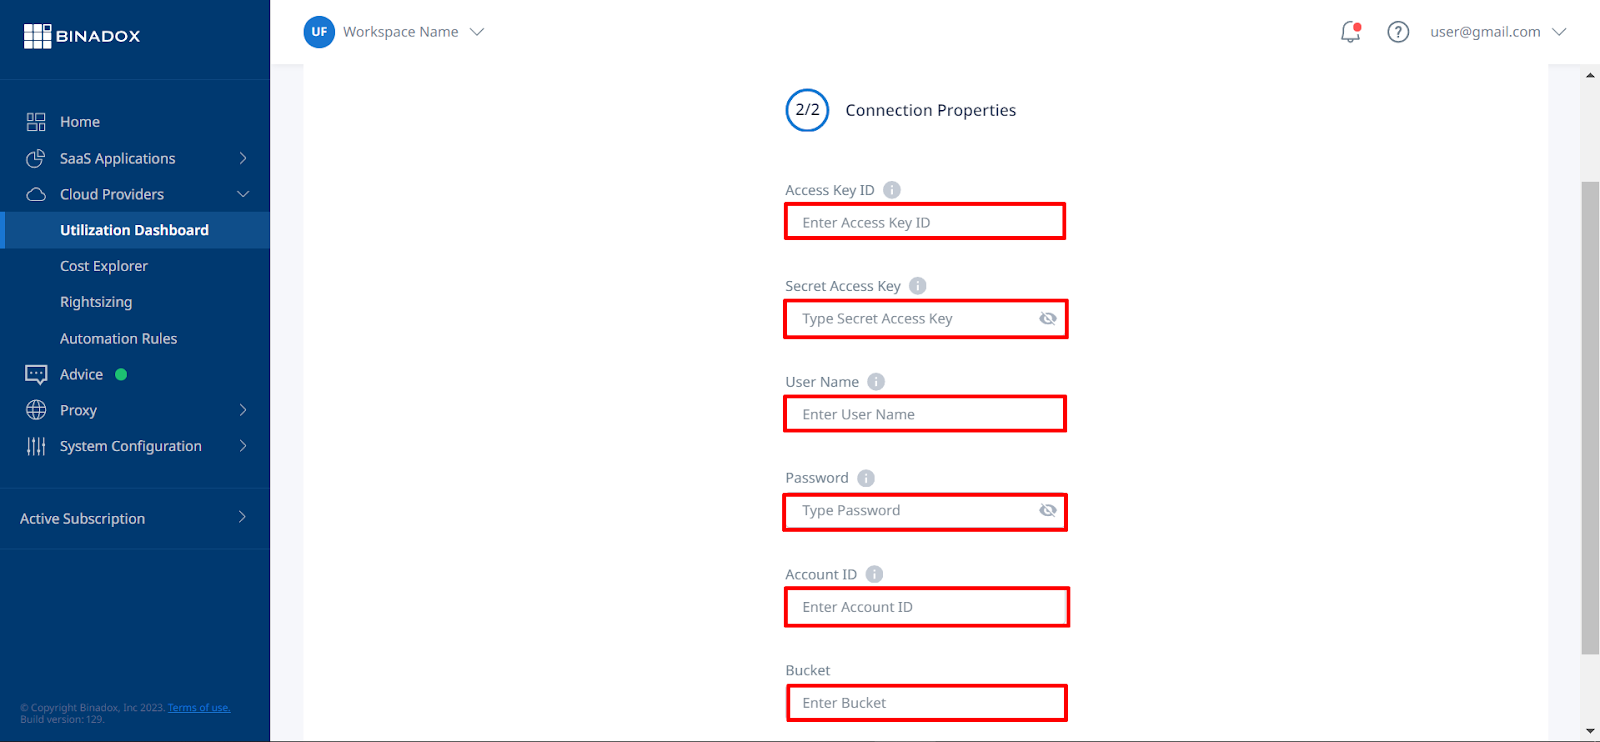
7. Create New Connection for AWS in Binadox
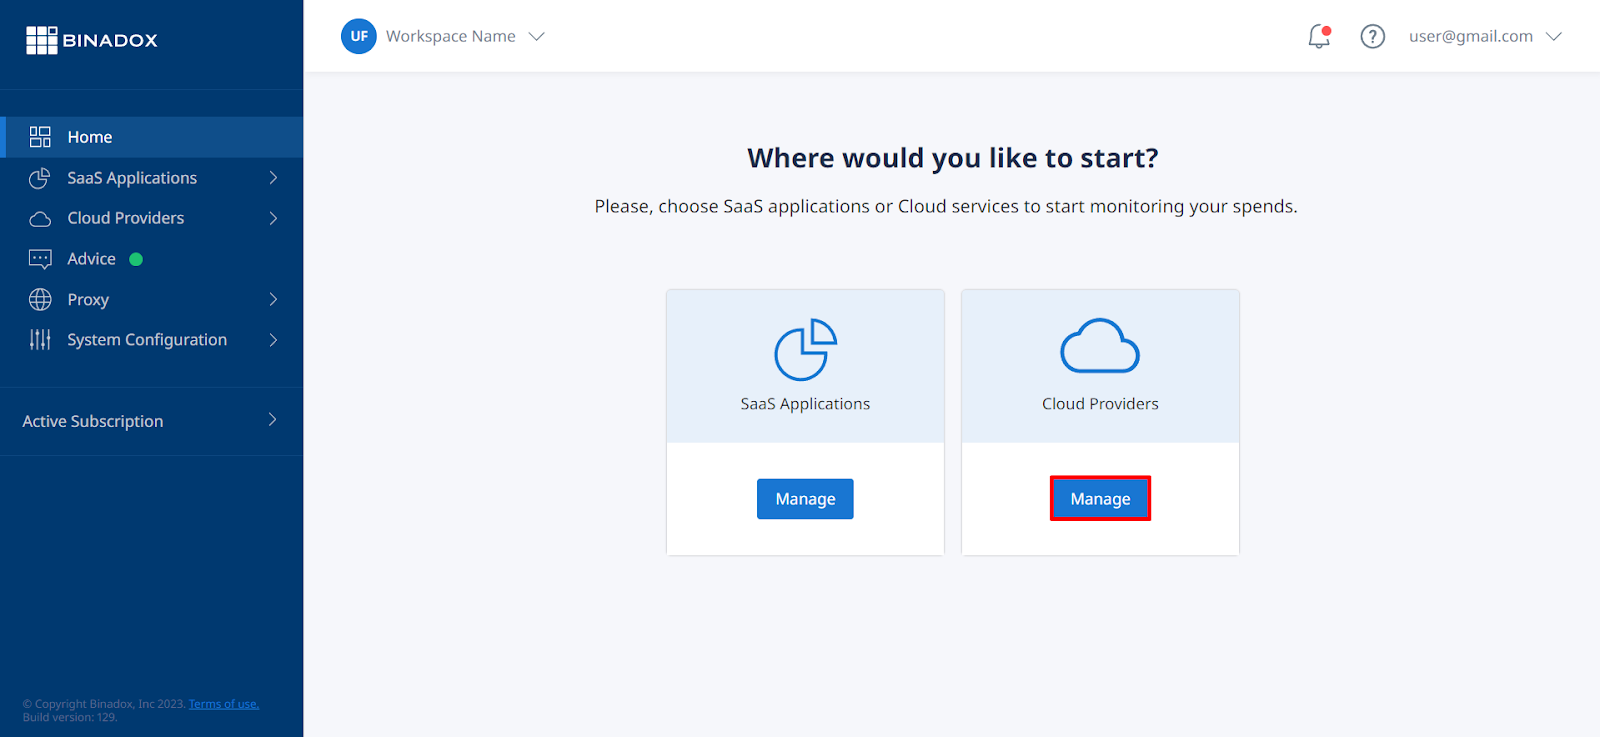
1. Log into your Binadox account.
2. Click Home in the navigation pane on the left. Select the Cloud Providers card and click Manage.
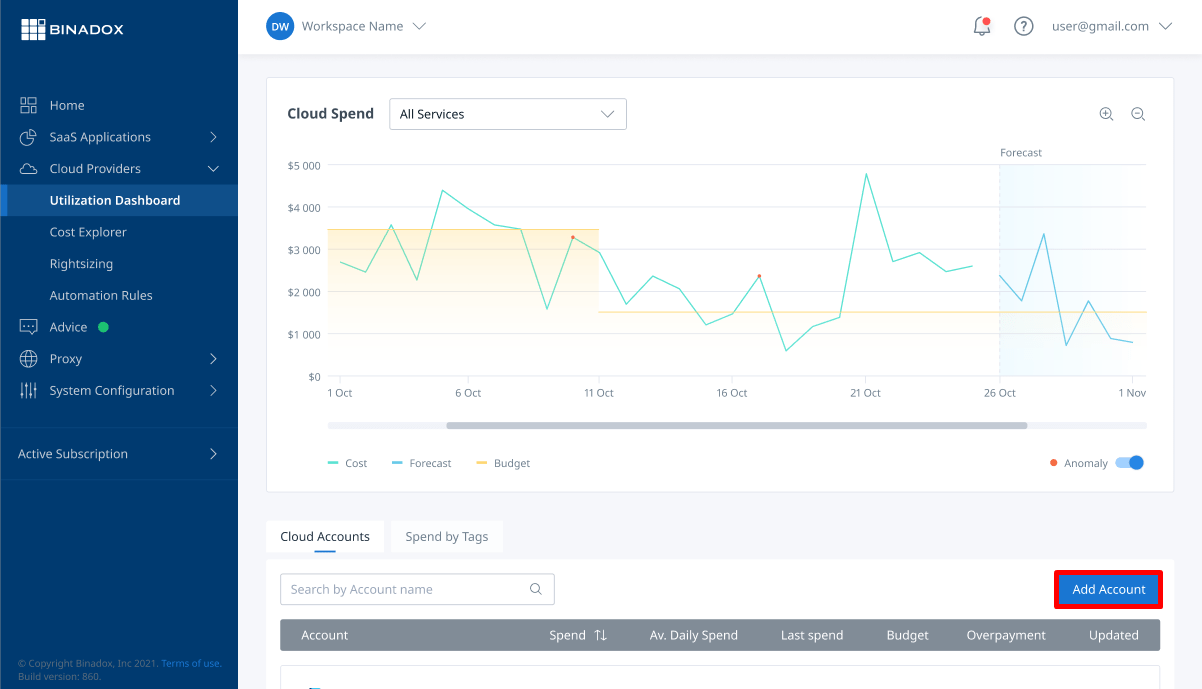
3. You will be redirected to the Utilization Dashboard page. Scroll down and click the Add account button.
4. In the dialogue box click on the Amazon Web Services icon.

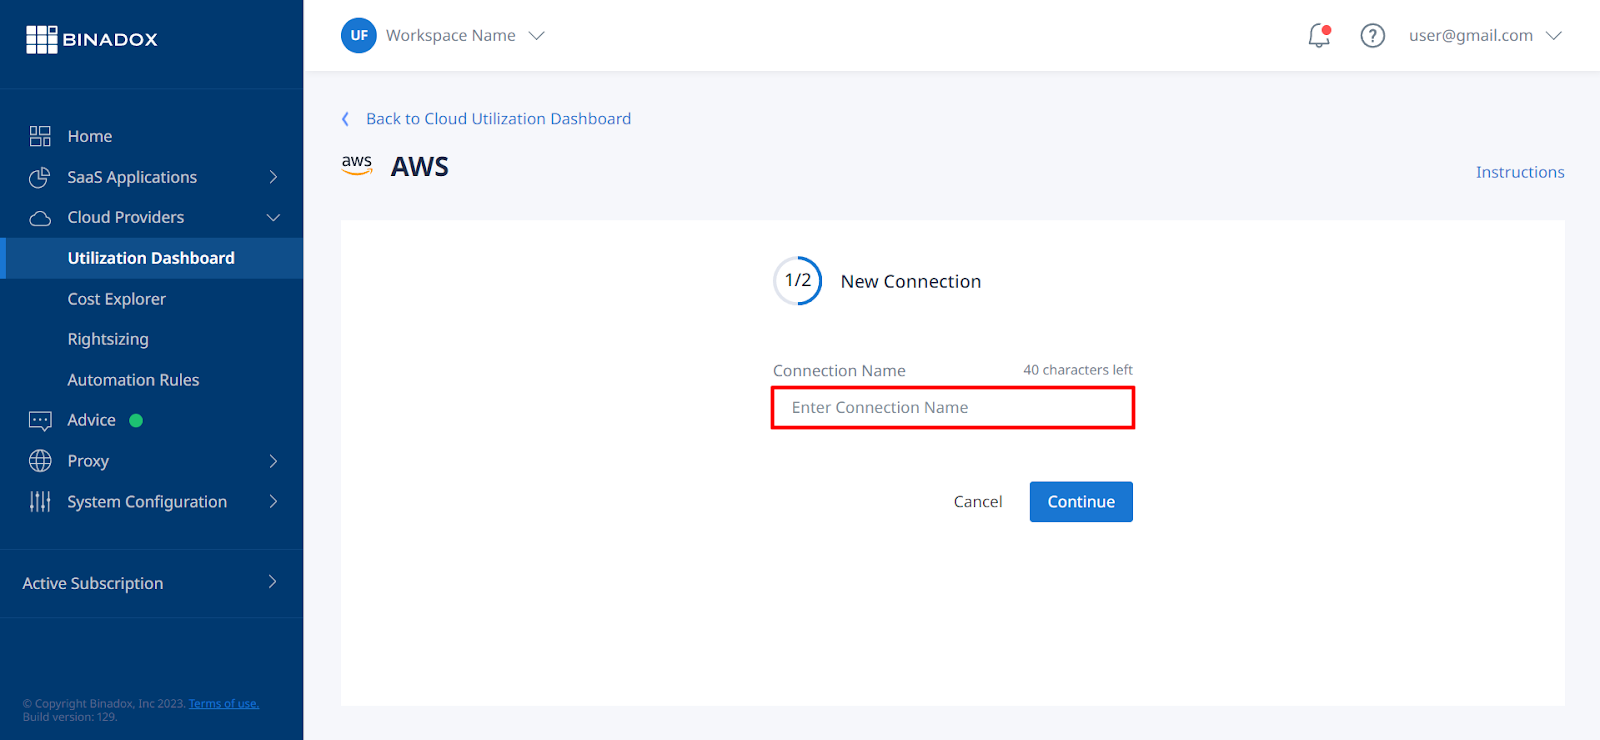
5. You will be redirected to the Connection page. Enter the Connection Name.
6. Enter security credentials:
- Access Key ID (see Clause 5)
- Secret Access Key (see Clause 5)
- User Name
- Password
- Account ID (see Clause 6)
- Bucket (see Clause 2)
Click Connect.
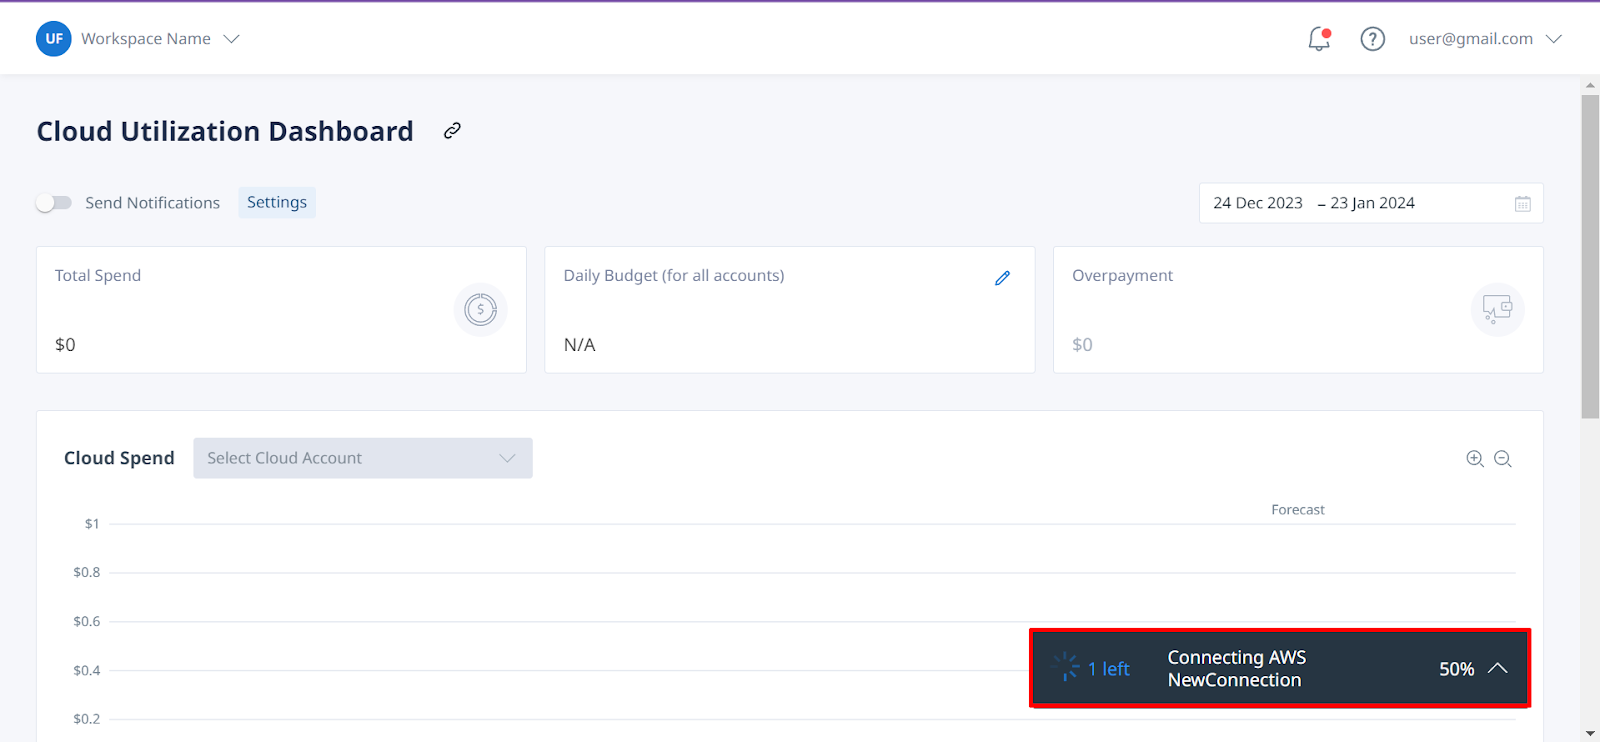
6. Note that a brief processing period will be required. If all conditions are met, you will get an alert “Completed Successfully”.