Modern cloud bills are driven far more by how you run workloads than where you run them. On Kubernetes you already pay for the underlying instances, EKS/GKE/AKS control‑plane fees, load‑balancers, storage and data transfer. Add a few over‑provisioned Deployments and suddenly “cloud‑native” means “cloud‑expensive.”
This guide shows you how to rein in that spend with two complementary tactics:
- Autoscaling – automatically adding or removing capacity in response to real‑time demand.
- Rightsizing – continuously tuning request/limit values (and the nodes that back them) so you never pay for idle head‑room.
You’ll see practical tips, sample thresholds, and links to free Binadox tools you can try in your own cluster. If you’re after even more cloud cost optimization best practices, check out our deeper dive on the Binadox blog.
Why Kubernetes Workloads Drift Into Waste
| Common Cause | Hidden Cost | Quick Fix |
|---|---|---|
| Static CPU/MiB requests set “just in case” | Unused reservation keeps nodes artificially large | Lower requests by 20‑30 % and watch Pod health |
| Business‑hours traffic runs 24 × 7 | Nodes idle all night | Schedule down‑scaling with KEDA triggers |
| No upper limits | Spikes trigger extra nodes, then stay under‑utilised | Set limits ≈ 2× request + burst margin |
Rightsizing these parameters first lets autoscalers react accurately; otherwise they compensate for mis‑configuration, not real demand.
Autoscaling Options at a Glance
| Layer | Kubernetes Object | Scales | When to Use |
|---|---|---|---|
| Application | Horizontal Pod Autoscaler (HPA) | # Pods | Variable request/response traffic |
| Application | Vertical Pod Autoscaler (VPA) | Pod resources | Long‑running jobs, ML training |
| Cluster | Cluster Autoscaler (CA) | Nodes | Whenever HPA/VPA can’t fit on current pool |
| Cloud | Managed node‑pool provisioners (AWS Karpenter, GKE Autopilot) | Instance types | Spot & heterogeneous workloads |
Pro‑tip: Start with HPA so you can shrink to zero overnight. Add CA once you have at least two HPA‑enabled Deployments; otherwise the cluster can oscillate.
Rightsizing: Turning Guesswork into Metrics
- Collect container‑level CPU & memory utilisation for two weeks via Prometheus.
- Discard outliers (deploy bursts, probes).
- Set requests at the 90th percentile and limits at 150 % of request.
- Review every sprint—or automate with a rightsizing tool.
In Binadox you can create a Rightsizing policy that does exactly that. The platform shows the “current vs. recommended” instance size, expected new monthly cost and confidence score.
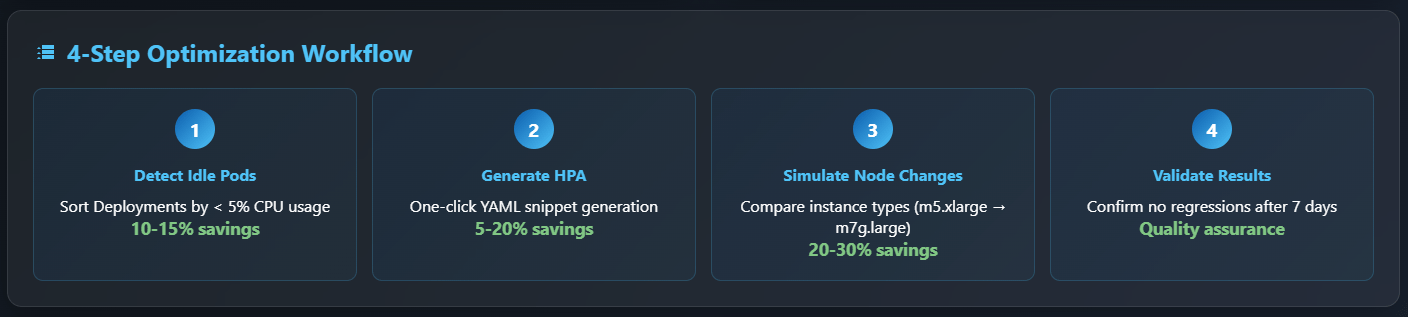
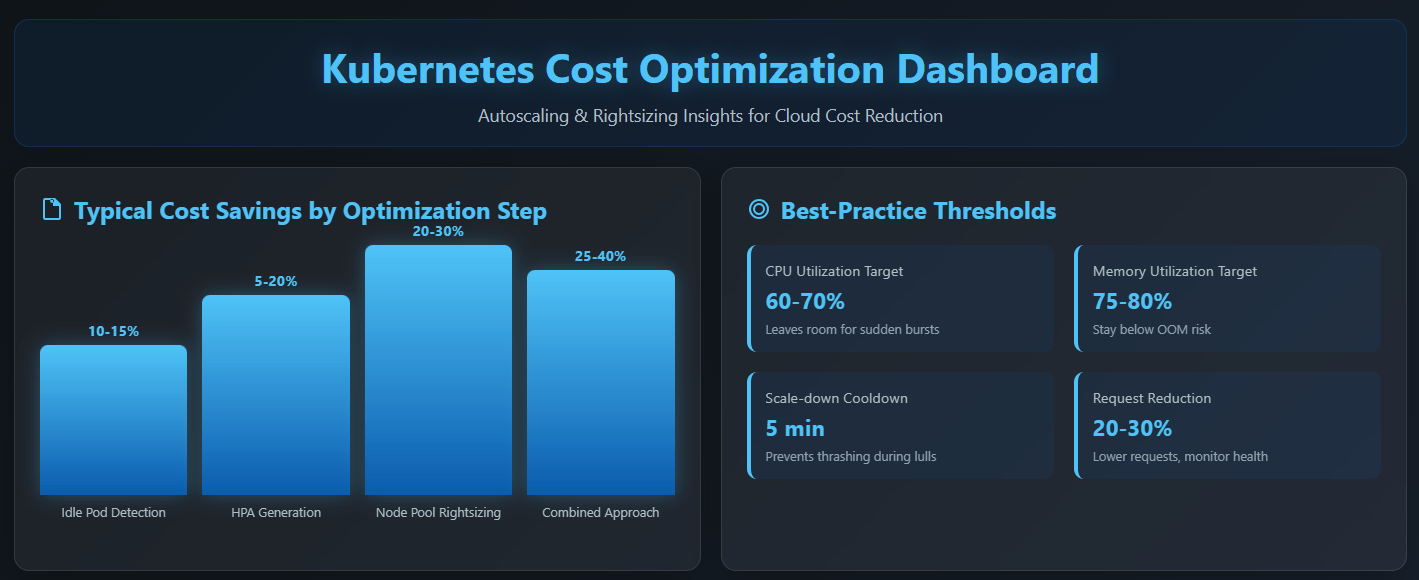
Step‑by‑Step Optimisation Workflow
| Step | Binadox Feature | What you do | Typical Saving |
|---|---|---|---|
| 1. Detect idle Pods | Cloud Utilisation Dashboard | Sort Deployments by < 5 % CPU | 10‑15 % |
| 2. Generate HPA | Additional Advice wizard | One‑click YAML snippet | 5‑20 % |
| 3. Simulate node‑pool change | Rightsizing panel | Compare m5.xlarge → m7g.large | 20‑30 % |
| 4. Validate after 7 days | Cost Explorer spike filter | Confirm no regressions | — |
Because Binadox pulls billing APIs from AWS/Azure/GCP and the Kubernetes metrics‑server, you get a single timeline that overlays dollar costs with pod‑level utilisation.
Best‑Practice Thresholds for HPA/VPA
| Metric | Target | Rationale |
|---|---|---|
| CPU utilisation | 60 – 70 % | Leaves room for sudden bursts without over‑scaling |
| Memory utilisation | 75 – 80 % | Memory isn’t compressible; stay below OOM risk |
| Scale‑down cooldown | 5 min | Prevents thrashing during brief lulls |
| VPA update mode | Initial for stateless,Auto for batch | Avoids live restarts of web front‑ends |
Linking Autoscaling to Cloud‑Cost Budgets
Autoscaling only pays off if the cluster itself can shrink. Couple CA with multiple, heterogeneous node groups—on‑demand, spot, Arm64—to give the scheduler freedom to pick the cheapest capacity.
Under the hood Binadox tags new nodes with B‑Tags so you can attribute spend per team or project. Combine that with Automation Rules to send Slack alerts whenever daily costs exceed a threshold after an HPA scale‑out event.
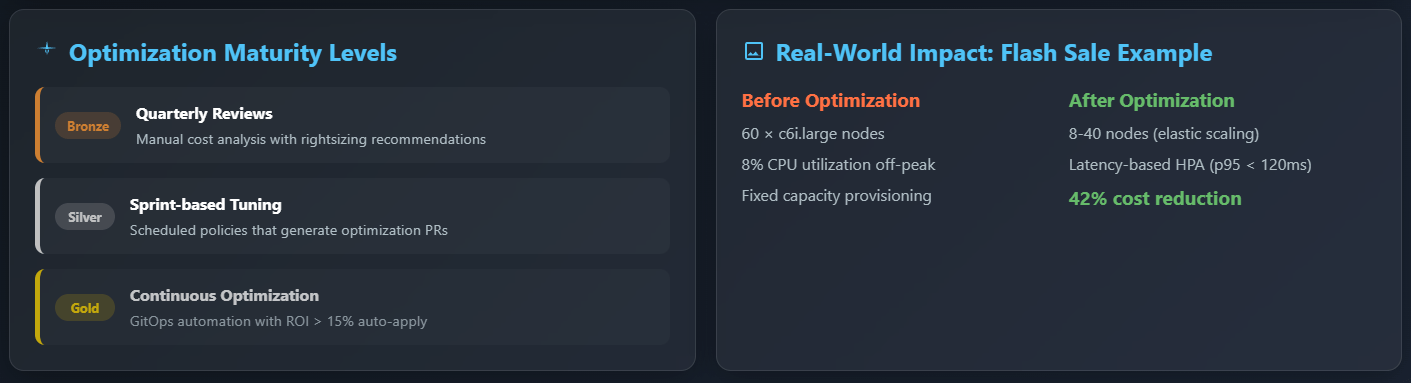
From Manual Reviews to Continuous Optimisation
| Maturity Level | Manual Effort | Binadox Automation |
|---|---|---|
| Bronze | Quarterly cost review | Rightsizing recommendations report |
| Silver | Sprint‑based param tuning | Scheduled policy that opens PRs |
| Gold | Continuous | GitOps webhook: applies Binadox‑generated YAML when projected ROI > 15 % |
Try It Yourself
Spin up the Binadox Cloud Utilisation Dashboard in read‑only mode—no agents required. Import your Prometheus endpoint to unlock Pod‑level metrics in under five minutes. Launch a 14‑day free trial and enable the Rightsizing module to see projected savings before you apply any change.
Need more context? Our guide on building an effective cloud management strategy walks through governance patterns that pair perfectly with autoscaling.
Real‑World Example: Retail Flash‑Sale Weekend Optimisation
Imagine a fashion e‑commerce company that runs a 48‑hour flash sale every month. Before optimisation they provisioned 60 × c6i.large nodes to survive traffic peaks; the rest of the month those nodes idled at 8 % CPU. After enabling:
- A latency‑based HPA scaling target (p95 < 120 ms),
- Cluster Autoscaler with spot and Arm64 instance types,
- A rightsizing job that lowered container
memoryrequests by 35 %,
the cluster shrank to just eight nodes between campaigns and burst to 40 during the sale—all without a single 503. Net result: 42 % reduction in monthly compute spend and a 9‑point improvement in Google Core Web Vitals.
Integrating Autoscaling Into Your GitOps & FinOps Pipeline
Autoscaling settings drift when every team edits YAML by hand. A cleaner pattern is to store HPA objects alongside application manifests and let a CI pipeline compare them against Binadox recommendations:
kubectl binadox rightsizing --export > patch.yaml
git checkout -b chore/rightsizing-$(date +%Y-%m-%d)
git add patch.yaml && git commit -m "chore: apply autoscaling recommendations"
git push origin HEAD
From here a CI job can run kube-score or kubepug to catch mis‑configurations, while a FinOps stage queries Binadox via API to tag the pull request with predicted monthly savings. If savings exceed your policy threshold, the PR auto‑merges. This “policy‑as‑code” loop keeps both engineers and finance happy and aligns with FinOps best practices.
Common Pitfalls (and How to Avoid Them)
- Per‑Pod volume claims. StatefulSets with 100 GiB PVCs can block scale‑down. Use
Retainreclaim policy or move state to object storage. - CPU‑only metrics. Memory or custom business KPIs (concurrent sessions) often give a more stable scaling signal.
- Un‑tagged burst nodes. Forgetting cost‑allocation tags breaks chargebacks. Add a MutatingAdmissionWebhook to auto‑insert labels.
- Weekend scale‑downs blocked by PDBs. Relax
minAvailableduring low‑traffic windows or adopt FinOps‑aware DevOps playbooks.
Glossary of Cloud & SaaS Cost‑Optimisation Terms
Request (Kubernetes)The guaranteed amount of CPU/Memory a container can use. The scheduler uses this to bin‑pack Pods onto nodes.Limit (Kubernetes)The maximum resource consumption allowed for a container.FinOpsA cultural practice that brings engineering, finance and product together to control cloud spend.B‑TagA Binadox‑specific key‑value tag that maps usage back to cost centres.RightsizingThe process of matching resource allocation to actual utilisation for cloud or SaaS services.
FAQs
Q: Does the Cluster Autoscaler work with spot interruptions?
A: Yes. Use podAntiAffinity to spread replicas and enable Binadox automation rules to alert you when spot interruptions exceed your SLA.
Q: How often should I update HPA target values?
A: Re‑evaluate targets every two sprints, or automatically whenever Binadox rightsizing calculates potential savings > 10 %.
Q: Can I use the same techniques for serverless platforms?
A: Absolutely. Services like Knative or AWS Lambda already autoscale, but you can still apply Binadox insights to adjust memory settings and execution timeouts.
Keywords: cloud cost optimisation, Kubernetes autoscaling, rightsizing, cloud computing, SaaS spend management, FinOps, cluster autoscaler, HPA, VPA.
Next‑Steps Checklist for Your Team
If you want to go from “reading an article” to “shipping savings” in the next 30 days, use this actionable checklist. Each item is sequenced so that the learning curve and required permissions build gradually:
- Day 1‑2: Audit current cluster bill. Export your last full month of AWS Cost & Usage or Azure Cost Management data, filtered by the account that owns your Kubernetes worker nodes.
- Day 3‑5: Install metrics‑server and enable resource requests. Many clusters still run without enforced requests. Add a simple
LimitRangedefault that prevents “limitless” Pods. - Day 6‑8: Deploy Binadox read‑only. Because it authenticates via cloud‑native roles, security reviews are minimal. Expect the first Rightsizing report after 24 hours of metric collection.
- Day 9‑12: Apply low‑risk recommendations. Focus on reducing
cpurequests for stateless services first—if anything breaks you can roll back instantly. - Day 13‑18: Roll out HPA to top 3 Deployments. Pick traffic‑heavy, stateless services so that scaling behaviour is obvious in dashboards.
- Day 19‑22: Enable the Cluster Autoscaler on a new spot‑backed node group. Limit the max price to 60 % of on‑demand. Use Pod Disruption Budgets of
minAvailable: 80 %to balance resilience and savings. - Day 23‑28: Wire FinOps alerts. Create a Binadox Automation Rule that pushes to a #finops Slack channel whenever daily spend deviates by > 15 % from the 30‑day rolling average.
- Day 29‑30: Present results. Export a Binadox Cost Explorer graph and annotate key optimisation milestones. Finance will love the before/after comparison.
Additional Resources & Reading
- How to Detect Cloud Cost Anomalies – a field guide to catching runaway Pods before they blow the budget.
- Native Tools vs. Third‑Party Tools – weighing
kubectl topagainst full‑stack platforms. - Rightsizing Guide – deep dive into the heuristics behind Binadox suggestions.
- FinOps Cost Allocation Strategies – tagging conventions that keep multi‑team clusters civil.
For a broader overview of the SaaS side of optimisation, our piece on SaaS subscription management explains how the same rightsizing mindset applies to license tiers, not just CPU cores.
Performance vs. Cost: Finding the Sweet Spot
Cost optimisation is never a license to degrade user experience. The real art lies in identifying the marginal dollar that produces negligible business value. Follow these heuristics:
- Establish an SLA target first. For customer‑facing APIs, p95 latency usually matters more than average latency. Set a guard‑rail like “p95 < 250 ms 99 % of the time.” Autoscaling policies can then work backwards from that constraint.
- Use load‑tests that mimic bursty traffic. Linear ramps hide concurrency bottlenecks. A spiky pattern uncovers the true head‑room required.
- Model incremental revenue curves. Marketing knows the conversion drop if checkout latency increases by 100 ms. Plot that against infra cost to visualise the trade‑off.
- Re‑evaluate quarterly. As instance types evolve (think AWS Graviton4 or GCP C3 machines) the same performance may become 20 % cheaper.
Teams that bake these principles into sprint retrospectives rarely need big‑bang “cost crusades.” Instead, savings accrue continuously and sustainably—exactly the promise of cloud.
Remember: you can always earn back seconds, but you can never refund wasted dollars.
Conclusion
Kubernetes makes deployment easy, but cost control hard. Pairing Autoscaling with disciplined Rightsizing converts unpredictable bills into a pay‑for‑what‑you‑use model:
- HPA + CA turns fixed capacity into elastic capacity.
- VPA + Binadox Rightsizing keeps each Pod’s share lean without risking outages.
- Automation Rules & B‑Tags close the loop by catching regressions and attributing every dollar to the right team.
Deploy these patterns today and you can realistically trim 25–40 % off your cluster bill—often in the very first sprint. Ready to see your own numbers? Start a free trial or schedule a tailored walkthrough with a Binadox engineer.