



As a DevOps engineer, you’re on the hook for infrastructure performance, reliability, and, increasingly, its cost. When your monthly AWS bill unexpectedly spikes, you’re the first one asked to explain the variance and fix the underlying issue. You need more than just a billing summary; you need a practical, granular aws cost analysis tool that connects spend to specific resources, services, and deployments. The right tool doesn’t just show you what you spent—it shows you why you spent it and how to spend less next month without compromising performance.
Key takeaways
- Native AWS tools like Cost Explorer and Trusted Advisor provide a solid, no-cost foundation for cost analysis, but often require manual intervention.
- Effective cost allocation hinges on a disciplined tagging strategy; without it, attributing costs to the correct team or project is nearly impossible.
- For dynamic or containerized environments like Kubernetes, specialized third-party tools are often necessary to achieve granular, pod-level cost visibility.
- Automating anomaly detection is critical; a simple 3-step setup in AWS Cost Anomaly Detection can prevent budget overruns by flagging unusual spend in near real-time.
Native AWS Tools: Your First Line of Defense
Before looking at third-party solutions, it’s essential to master the tools already at your disposal within the AWS ecosystem. These services are the foundation of any cost management strategy and provide the authoritative data all other tools build upon. The primary native services for cost analysis are AWS Cost Explorer, AWS Trusted Advisor, and the underlying Cost and Usage Report (CUR).
AWS Cost Explorer
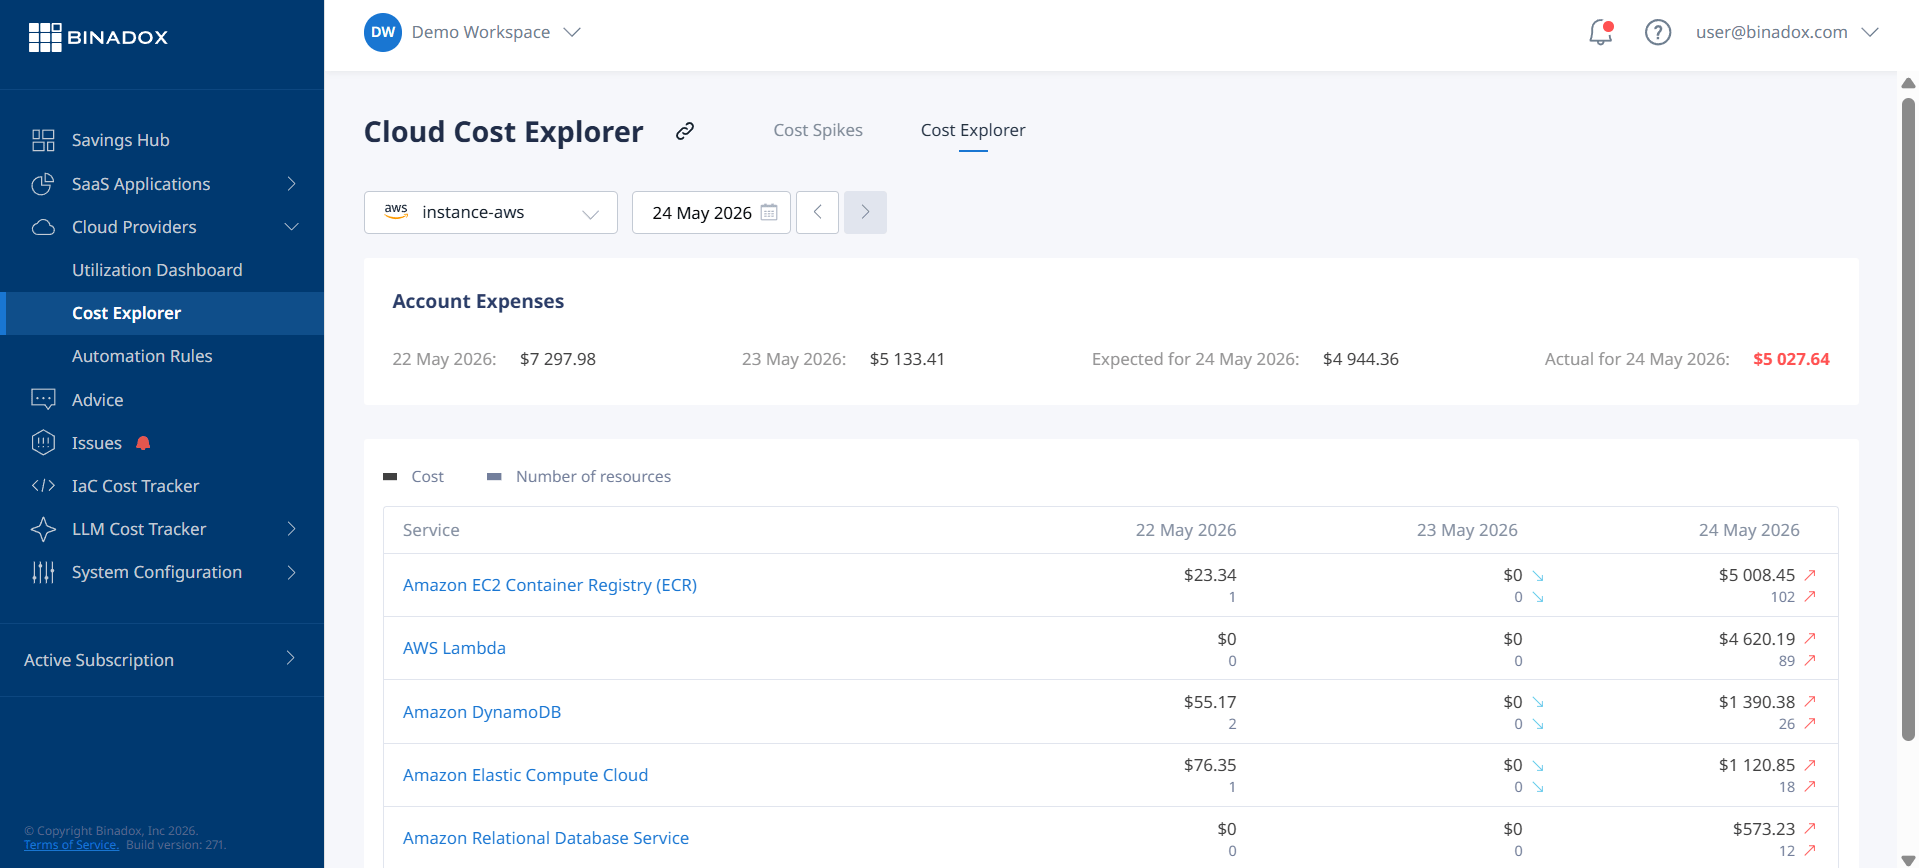
AWS Cost Explorer is an interactive interface that lets you visualize, understand, and manage your AWS costs and usage over time. For a DevOps practitioner, its main value lies in its ability to filter and group data, transforming a monolithic bill into an actionable report. You can view data for the last 13 months and forecast spending for the next 12.
First, you must enable Cost Explorer in the AWS Billing and Cost Management console. Data will begin to populate within about 24 hours. From there, you can:
- Filter by Service, Region, or Linked Account: This helps you quickly isolate costs from a specific microservice, a new regional deployment, or a particular team’s sandbox account.
- Group by Cost Allocation Tags: This is the most critical feature for attributing costs. By tagging resources with identifiers like
project,team, orenvironment, you can directly map infrastructure spend to business units. - Analyze Reserved Instance (RI) and Savings Plans: Cost Explorer provides reports on your RI utilization and coverage, helping you see if your commitments are actually saving money or if you have underutilized reservations. It also provides recommendations for new purchases based on historical usage.
AWS Trusted Advisor
While Cost Explorer shows you where the money is going, AWS Trusted Advisor tells you how to spend less. It acts as an automated consultant, continuously evaluating your environment against AWS best practices across six categories, including cost optimization.
However, there’s a catch: full access to the cost optimization checks requires an AWS Business Support plan or higher. With the requisite support plan, Trusted Advisor can identify specific, actionable savings opportunities, such as:
- Low Utilization Amazon EC2 Instances: Finds instances with consistently low CPU usage that are candidates for downsizing.
- Idle Load Balancers: Flags load balancers with no associated backend instances.
- Unassociated Elastic IP Addresses: Identifies EIPs that are allocated but not attached to a running instance, which incur a small but unnecessary charge.
- Underutilized Amazon EBS Volumes: Detects EBS volumes that are detached or have very low activity.
Recently, Trusted Advisor has integrated with Cost Optimization Hub and Compute Optimizer to provide more accurate and contextual recommendations, factoring in your existing Savings Plans and RIs.
The Critical Role of Cost Allocation and Tagging
You cannot optimize what you cannot measure. Without a clear understanding of which teams, applications, or environments are driving costs, any optimization effort is just guesswork. This is where a disciplined cost allocation strategy, built on resource tagging, becomes the most important prerequisite for using any aws cost analysis tool effectively.
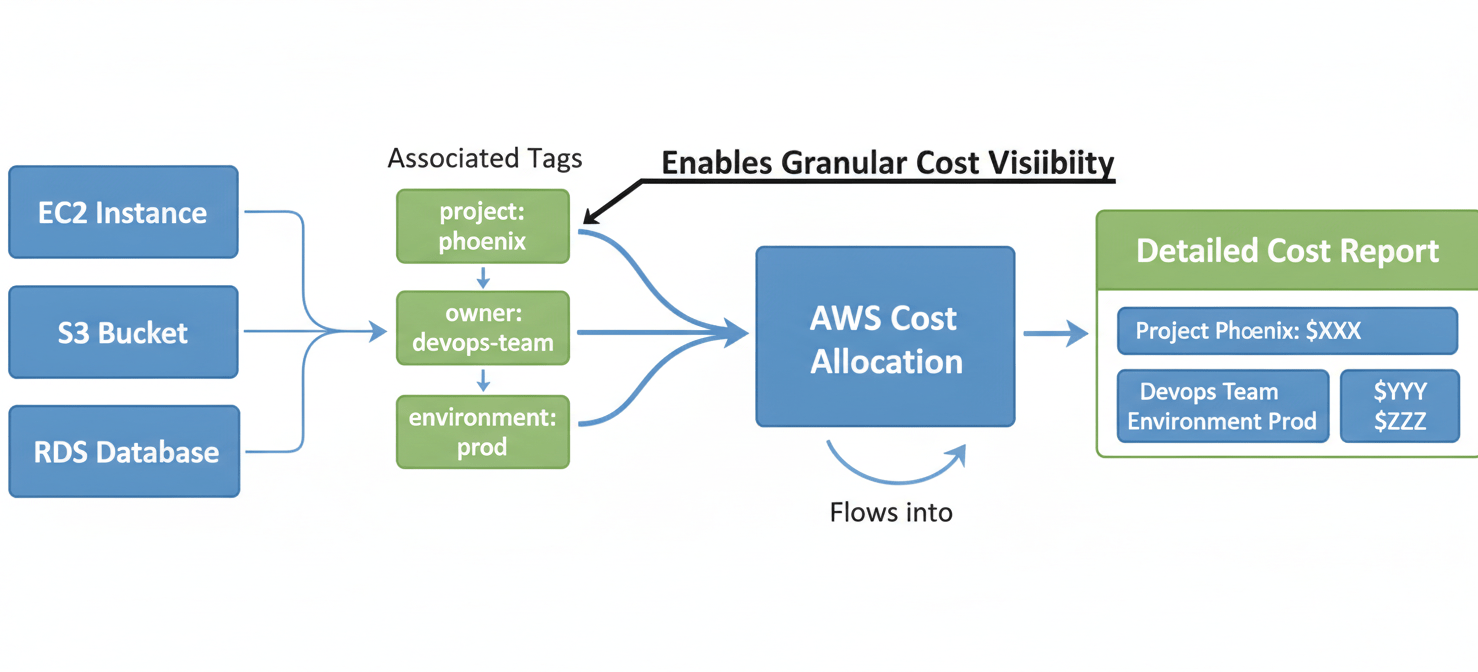
Cost allocation tags are simple key-value pairs that you attach to AWS resources. When you activate these tags in the AWS Billing and Cost Management console, they appear as filterable dimensions in Cost Explorer and the CUR.
Best Practices for Tagging
A successful tagging strategy requires consistency and automation.
- Standardize Your Tag Keys: Agree on a standard set of keys across the organization. Common and effective tags include
owner,cost-center,project,application, andenvironment(e.g., prod, dev, test). - Enforce Tagging at Creation: The best way to ensure compliance is to make tagging mandatory. Use AWS Tag Policies within AWS Organizations to enforce standards across accounts. Furthermore, you can leverage Infrastructure as Code (IaC) tools like Terraform and CloudFormation to apply tags automatically upon resource provisioning.
- Activate Tags for Cost Allocation: Creating a tag is not enough. You must explicitly activate it as a cost allocation tag in the billing console before it will appear in your cost reports. Keep in mind that tags only start appearing in cost data from the point of activation forward; they are not applied retroactively.
A well-implemented tagging system transforms your cost data from an opaque list of charges into a transparent ledger, enabling showback and chargeback models that hold teams accountable for their consumption.
Automated Anomaly Detection: Your Early Warning System
One of the biggest fears for a DevOps team is the “surprise” bill, where a misconfiguration or runaway process leads to a massive cost overrun that isn’t discovered until the end of the month. AWS Cost Anomaly Detection is designed to prevent this. It uses machine learning to analyze your historical spending patterns and identify unusual spikes in near real-time.
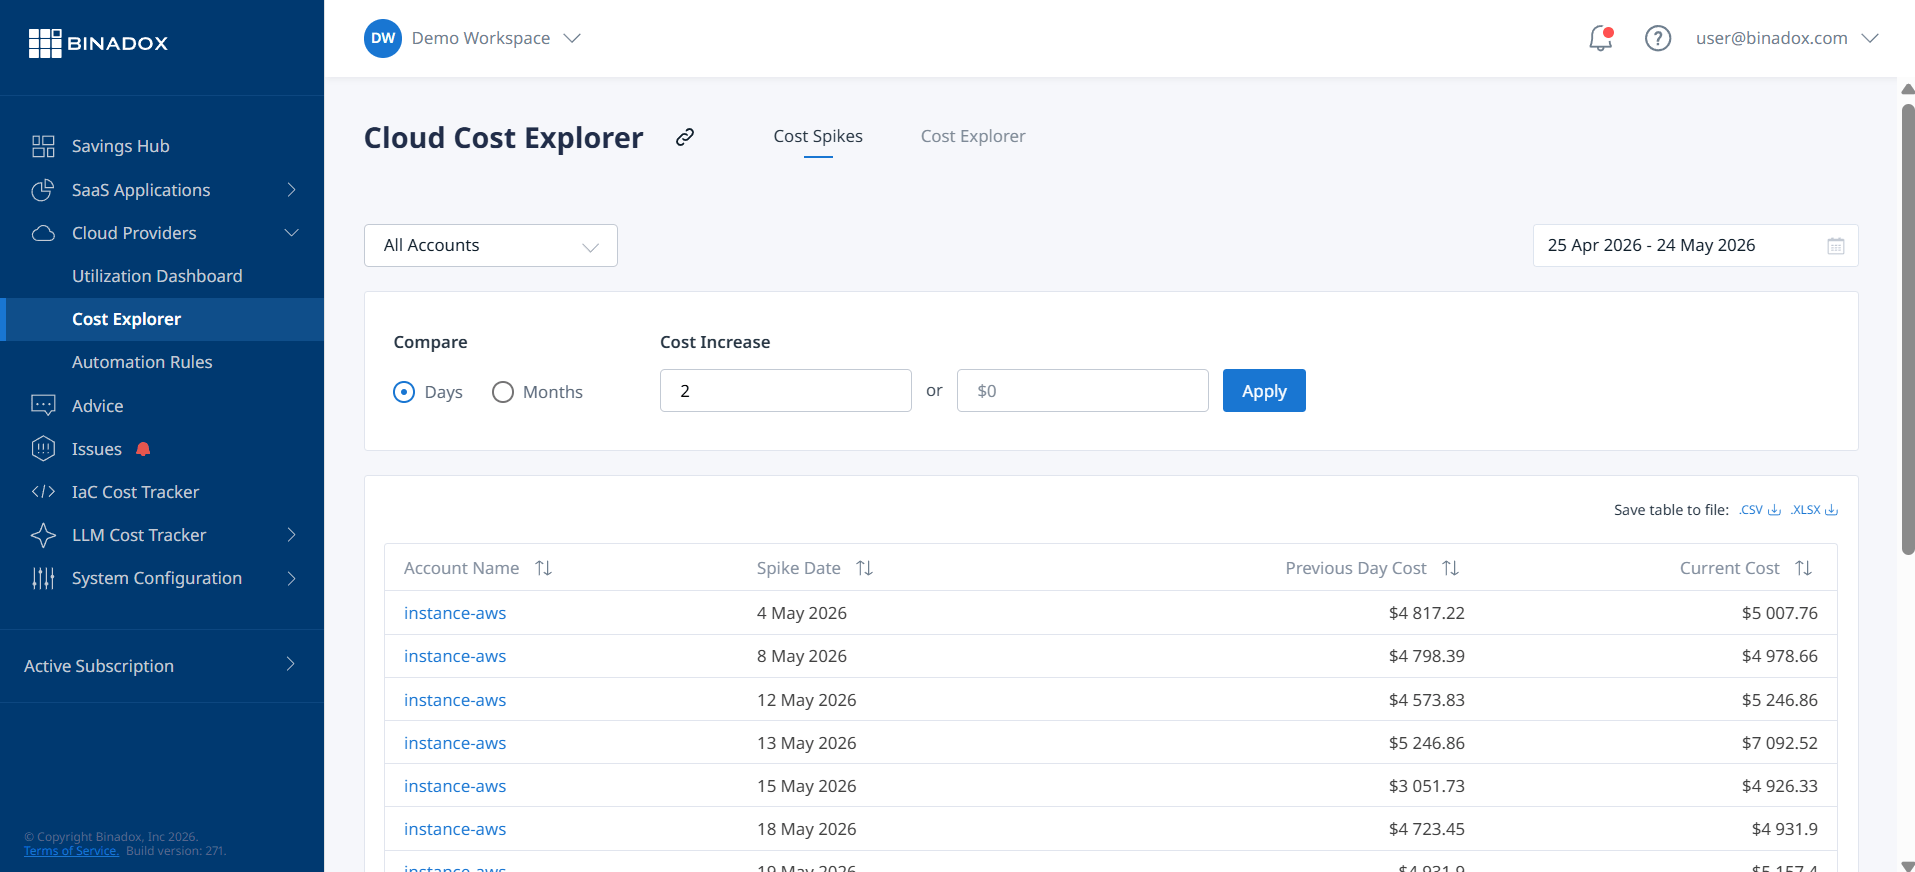
Setting it up is straightforward and can be done in three main steps:
- Create a Cost Monitor: In the Cost Management console, you define what you want to monitor. This can be broad (e.g., your entire linked account) or granular (e.g., costs for a specific service like Amazon EC2, or costs associated with a particular cost allocation tag).
- Set an Alert Threshold: You define a dollar amount that an anomaly’s impact must exceed to trigger a notification. This helps reduce noise from minor fluctuations.
- Configure Notifications: Choose how you want to be alerted. You can receive an email digest or, more powerfully, send notifications to an Amazon SNS topic. From SNS, you can easily integrate with tools like Slack or PagerDuty to ensure the on-call engineer is notified immediately.
This service is reactive, unlike AWS Budgets, which is proactive. A budget alerts you when you are about to exceed a planned amount, while anomaly detection alerts you when spending patterns become abnormal, regardless of the budget.
When to Use a Third-Party AWS Cost Analysis Tool
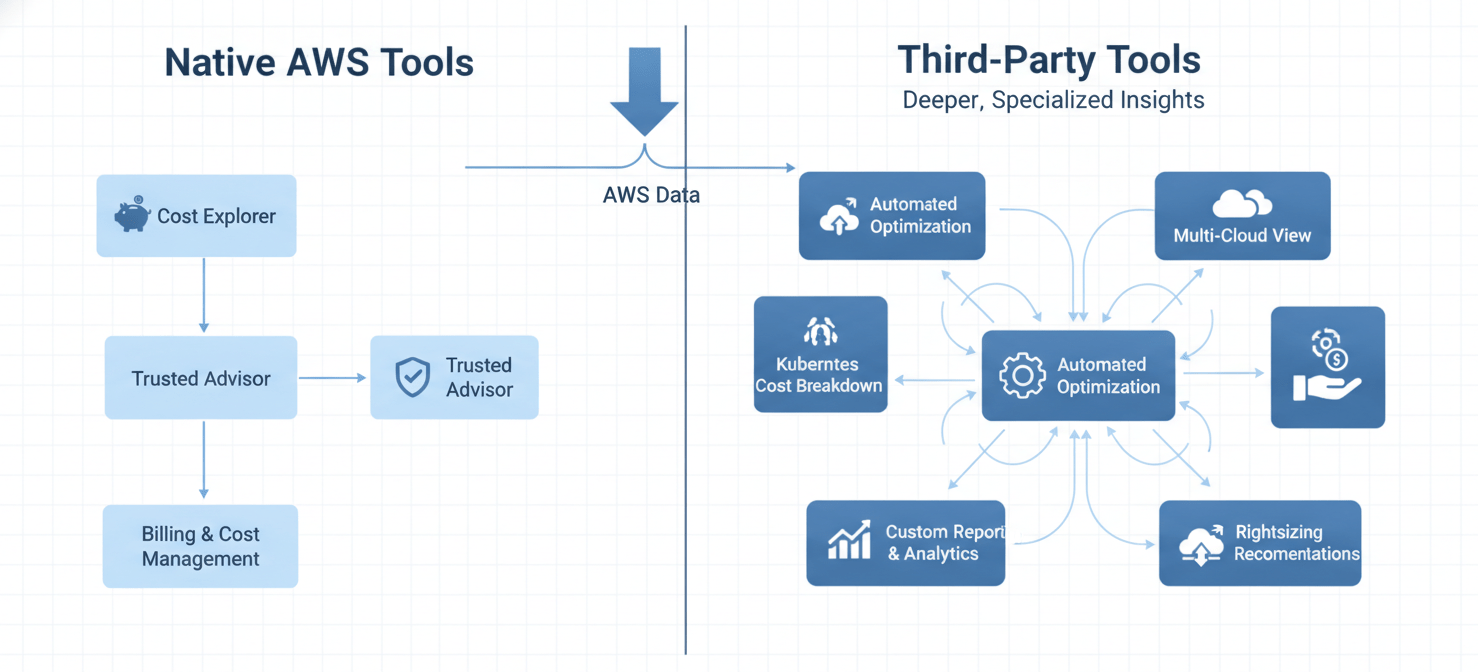
While native tools are powerful, they have limitations. They often require manual analysis, struggle with complex cost allocation scenarios (like shared Kubernetes clusters), and may lack the automation features needed to manage costs at scale. This is where third-party amazon cloud cost estimator and optimization platforms come in.
Granular Kubernetes Cost Analysis
This is one of the most common reasons to look beyond native tools. In a shared Amazon EKS cluster, the EC2 instances running the pods show up as a single line item in Cost Explorer. It’s nearly impossible to determine how much of that cost should be allocated to the different applications, namespaces, or teams using the cluster.
Tools like Kubecost and CAST AI are purpose-built to solve this problem. They integrate directly with your Kubernetes clusters to provide pod-level cost breakdowns, attributing expenses based on actual resource consumption (CPU and memory requests). This allows you to accurately charge back costs and identify inefficient workloads within your clusters.
Automated and Continuous Optimization
While Trusted Advisor provides recommendations, it’s up to you to implement them. Third-party aws cost optimization tools often take this a step further by automating the optimization process.
- Rightsizing and Idle Resource Management: Platforms like Harness can automatically shut down non-production environments outside of working hours, delivering significant savings.
- Commitment Management: Managing a portfolio of Reserved Instances and Savings Plans can be complex. Tools like ProsperOps and Vantage use automation to manage these commitments for you, buying and selling capacity to maximize your savings without manual intervention.
Multi-Cloud and SaaS Cost Visibility
If your organization operates in a multi-cloud environment (e.g., using both AWS and Azure), native tools won’t give you a consolidated view. Platforms like CloudZero and Cloudability are designed to ingest billing data from multiple providers, giving you a single pane of glass for all your cloud and even SaaS spending.
Conclusion
For the modern DevOps engineer, cost management is no longer a secondary concern—it’s a core competency. The ultimate aws cost analysis tool is not a single product but a combination of practices and platforms. It starts with the foundational, no-cost services provided by AWS: Cost Explorer for visibility and Trusted Advisor for actionable recommendations. Building on that foundation requires a rigorous, automated tagging strategy to ensure every dollar of spend can be attributed to its owner. Finally, for complex environments like Kubernetes or for teams seeking to automate optimization at scale, investing in a specialized third-party tool becomes a logical and necessary step. The goal isn’t just to see the bill, but to understand it, control it, and ultimately, to deliver business value at the lowest possible price point. After all, an infinitely scalable infrastructure is only useful if you can afford to pay for it.
If you’re ready to move beyond basic visibility and gain granular control over your AWS costs, you might consider starting your free Binadox trial to experience a comprehensive solution, or book a demo to explore how it can specifically address your team’s challenges.
 7-day free trial