



For any FinOps lead, the monthly AWS bill should hold no surprises. Your role is to foster a culture of cost accountability, where every team understands its contribution to cloud spend. However, in complex, dynamic environments, unexpected costs are inevitable. A forgotten test environment, a misconfigured autoscaling group, or a buggy application can silently generate thousands in charges. This is precisely where a robust aws cost anomaly detection strategy moves from a nice-to-have to a core component of your cost governance framework. It’s about shifting from reactive budget cleanups to proactive financial control, ensuring that cloud spend remains aligned with business value.
This guide provides a FinOps perspective on using AWS’s native tools to detect, investigate, and prevent cost overruns. We will focus on the mechanisms that matter for cost allocation, chargeback/showback models, and maintaining the financial predictability your stakeholders demand.
Key takeaways:
- AWS Cost Anomaly Detection is a free, machine learning-powered feature that automatically monitors your spending patterns to flag unusual spikes, often within 24 hours of occurrence.
- Effective setup involves creating monitors based on cost allocation tags, linked accounts, or services to align alerts with your business structure (e.g., by team, project, or environment).
- Integrating alerts with tools like Slack or Microsoft Teams via AWS Chatbot ensures that notifications reach the right engineering teams immediately, shortening the feedback loop from detection to resolution.
- A mature FinOps practice combines automated detection with proactive controls, such as establishing clear tagging policies, scheduling non-production resources, and regularly rightsizing instances.
What is AWS Cost Anomaly Detection and How Does It Work?
AWS Cost Anomaly Detection is a feature within AWS Cost Management that uses machine learning to analyze your historical cost and usage data. It establishes a baseline of your normal spending patterns and then continuously monitors for deviations. When it identifies a spend pattern that falls outside this baseline, it flags it as an anomaly.
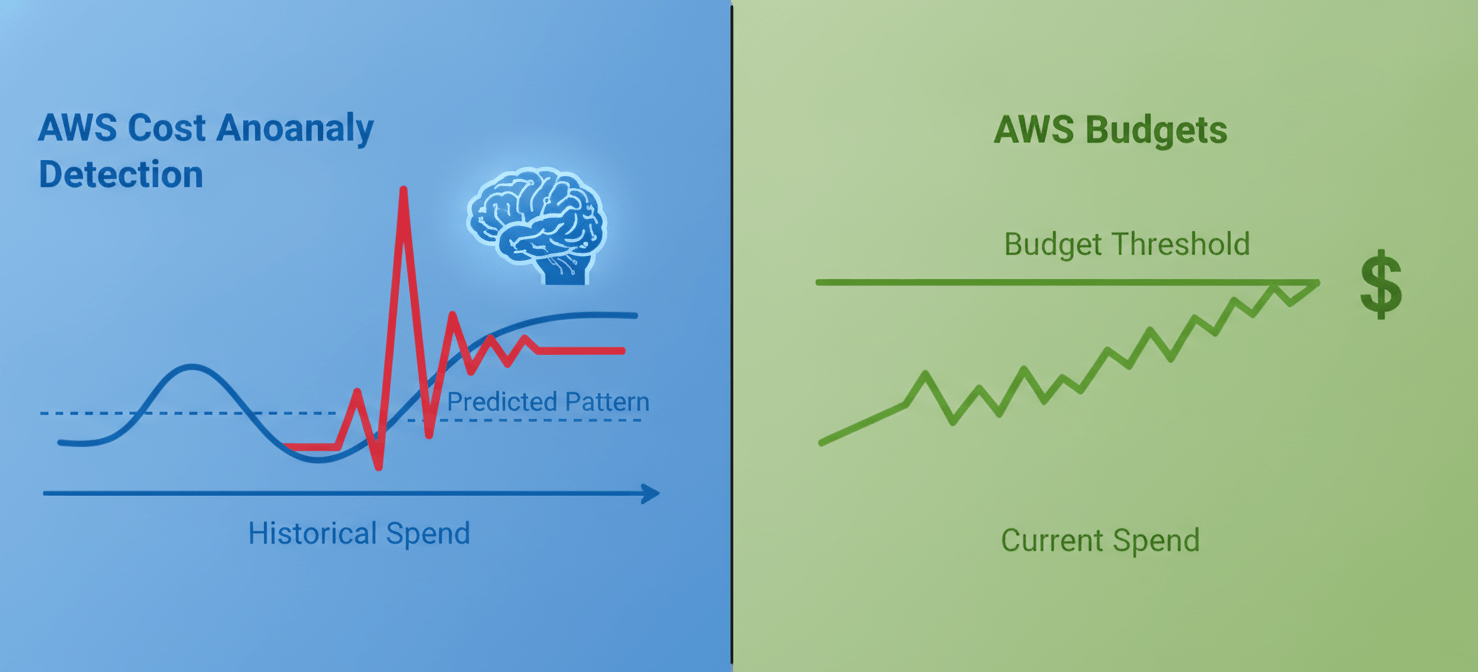
For a FinOps analyst, this is fundamentally different from a simple budget alert. While AWS Budgets are crucial for tracking spend against a fixed or forecasted threshold, they are reactive to predefined limits. Anomaly detection, in contrast, is dynamic. It can catch unexpected spikes even if the total spend is still well within your monthly budget. For example, a 300% increase in data transfer costs for a specific product team might be a small fraction of the total AWS bill but a critical indicator of a misconfiguration.
The service works by evaluating your spending across dimensions like AWS services, linked accounts, cost allocation tags, or cost categories. This granularity is key for attribution. When an anomaly is detected, the service provides a root-cause analysis, highlighting the specific service, account, and usage type responsible for the cost increase.
AWS Cost Anomaly Detection vs. AWS Budgets
| Feature | AWS Cost Anomaly Detection | AWS Budgets |
|---|---|---|
| Mechanism | Machine learning-based, detects deviations from historical patterns. | Rule-based, triggers alerts when spend exceeds a set threshold. |
| Nature | Reactive to unexpected patterns. | Proactive against predefined limits. |
| Best For | Catching unknown unknowns: configuration errors, bugs, sudden usage spikes. | Enforcing known spending limits and financial guardrails. |
| Cost | Free to use. | Free, with potential minor costs for notifications beyond the free tier. |
Setting Up and Configuring AWS Cost Anomaly Detection
Effective configuration is not just about turning the service on; it’s about aligning it with your FinOps reporting structure. The goal is to create monitors that map directly to your cost allocation strategy, whether you use showback or chargeback models.
First, ensure you have AWS Cost Explorer enabled, as Cost Anomaly Detection is a feature within it. Once enabled, you can create “cost monitors.” These are the configurations that define what segments of your spend you want to evaluate.
Choosing the Right Monitor Type
You have several options for creating a monitor, each serving a different allocation need:
- AWS Services Monitor: This is the broadest type, evaluating your entire usage for a service like Amazon EC2 or S3. It’s a good starting point but lacks the granularity needed for chargeback.
- Linked Account Monitor: If your organization uses a multi-account strategy where each account maps to a business unit, product, or environment (dev, prod), this monitor is ideal. It allows you to attribute anomalies directly to the account owner.
- Cost Allocation Tag Monitor: This is the most granular and powerful option for FinOps. By monitoring a specific tag key-value pair (e.g.,
team:backendorproject:data-pipeline), you can align anomaly alerts with the same logic you use for your cost dashboards and chargeback reports. - Cost Category Monitor: If you use AWS Cost Categories to group costs using complex rules, you can create monitors based on those categories.
Configuring Alert Subscriptions and Thresholds
Once you’ve created a monitor, you must configure an alert subscription. This determines when and how you are notified. You can set a threshold based on an absolute dollar amount (e.g., alert when an anomaly’s impact is greater than $100) and/or a percentage increase.
For a FinOps team, setting a reasonable absolute threshold is critical to avoid alert fatigue. A 500% increase on a service that normally costs $1 is not actionable. A better approach is to set a combined threshold, such as alerting only when an anomaly is both over $100 and represents a 50% increase from the baseline.
Notifications are sent via Amazon Simple Notification Service (SNS). This allows you to route alerts to an email distribution list, a messaging application like Slack, or even trigger an automated remediation workflow with AWS Lambda.
Integrating Anomaly Alerts into Your FinOps Workflow
Detection is only half the battle. The true value comes from integrating these alerts into your team’s daily workflow to drive accountability. The goal is to shorten the time between detection and resolution.
Automated Notifications in Slack or Microsoft Teams
The most effective way to ensure alerts are seen is to send them where your engineering teams already are: Slack or Microsoft Teams. You can achieve this by integrating your SNS topic with AWS Chatbot.
When an anomaly alert fires, AWS Chatbot can post a formatted, detailed message directly to a specific channel (e.g., #finops-alerts or #backend-team-alerts). This message should include the key details: the monitor that triggered the alert, the financial impact, and the root cause analysis identifying the service and usage type. This immediate visibility empowers the responsible team to investigate without delay.
Building Cost Attribution Dashboards
While alerts are for immediate action, dashboards provide the long-term view. You can use the AWS Cost Explorer API to pull anomaly data and integrate it into your custom FinOps dashboards built with tools like Amazon QuickSight or Grafana.
By visualizing anomaly frequency and impact alongside your regular cost allocation data, you can identify trends. For example, if a particular team consistently generates cost anomalies, it may signal a need for additional training on AWS cost control best practices. These dashboards are invaluable for your showback or chargeback conversations, providing concrete data points to discuss with engineering leads.
Beyond Detection: Proactive AWS Cost Control Best Practices
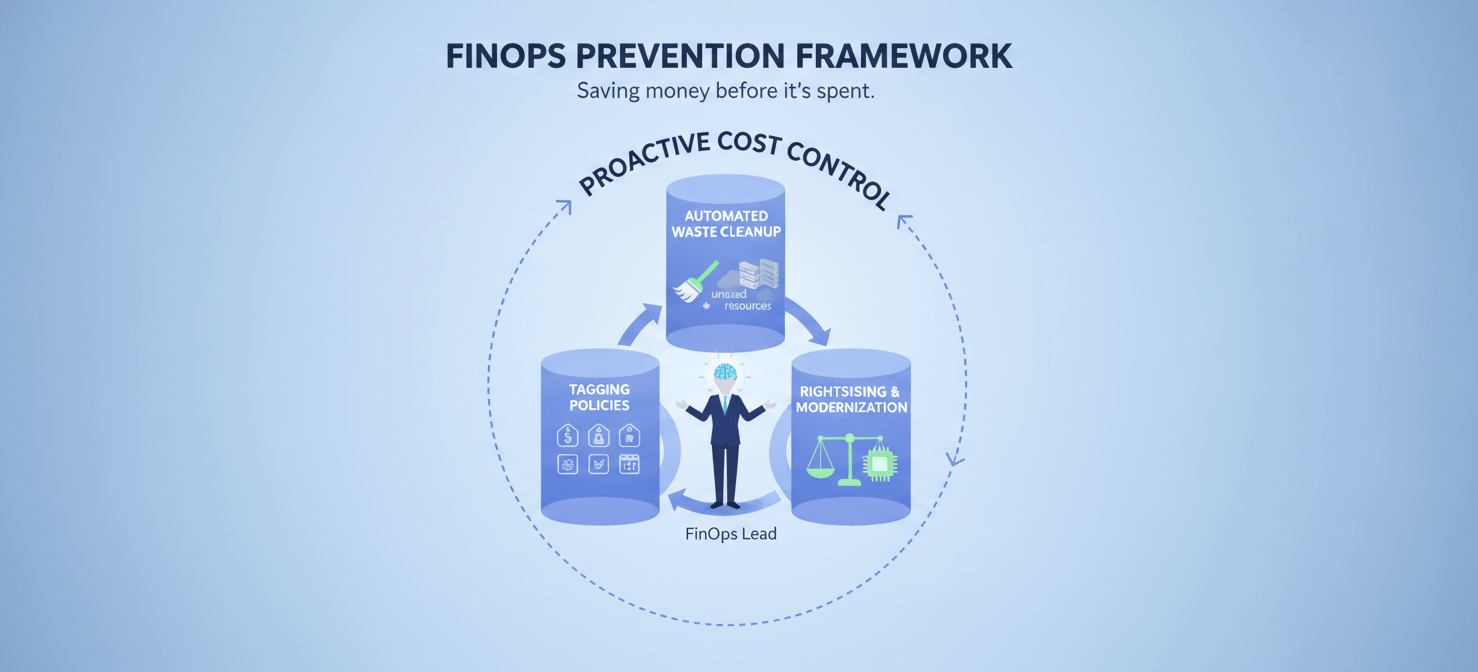
Anomaly detection is a reactive control. A mature FinOps practice pairs it with proactive measures to prevent overspending in the first place. This is where AWS cost governance becomes essential.
Establish and Enforce Tagging Policies
Accurate cost allocation, and therefore accurate anomaly detection, depends entirely on a disciplined tagging strategy. Work with engineering leadership to define a mandatory set of tags for all deployable resources. Common and effective tags include:
ownerorteamprojectorservicecost-centerenvironment(e.g., prod, dev, test)
Use AWS Organizations and Service Control Policies (SCPs) to enforce your tagging policy, for instance, by preventing the launch of untagged EC2 instances.
Automate Waste Cleanup
Many cost anomalies stem from resources that are no longer in use but were never decommissioned. These include unattached EBS volumes, idle load balancers, and old snapshots. Implement automated processes to identify and remove this waste.
- Schedule Non-Production Resources: Use tools like AWS Instance Scheduler to automatically stop development and testing environments outside of business hours. This can reduce non-production compute costs by over 65%.
- Lifecycle Policies: For services like Amazon S3, implement lifecycle policies to automatically transition data to cheaper storage tiers (like S3 Glacier) or delete it after a certain period.
Promote Rightsizing and Modernization
Over-provisioning is another common source of unnecessary spend. Encourage teams to use tools like AWS Compute Optimizer, which provides recommendations for rightsizing EC2 instances and other resources based on their actual utilization. Furthermore, migrating workloads to newer, more cost-efficient instance types (like AWS Graviton processors) can significantly improve price-performance.
Investigating Anomalies: A FinOps Checklist
When an alert arrives, a systematic investigation is crucial to not only fix the immediate issue but also prevent it from recurring.
- Assess the Impact: First, use AWS Cost Explorer to understand the financial blast radius. Is this a one-time spike or a new, higher run rate? This context determines the urgency of the response.
- Identify the Resource: The anomaly alert will point to the service, region, and usage type. Drill down in Cost Explorer to find the specific resource(s) responsible. The anomaly details page often provides the Amazon Resource Name (ARN) of the culprit.
- Trace the Change: Once you have the resource ARN, pivot to AWS CloudTrail. CloudTrail provides a log of all API activity in your account. By filtering for the identified resource, you can see who or what made a change that corresponds with the cost spike. This helps you determine if the cause was a manual user action, a CI/CD deployment, or an automated process.
- Attribute Ownership: Using your tagging data, identify the team or individual responsible for the resource. This is a critical step for accountability. Your alert notification in Slack should ideally tag the relevant team lead directly.
- Remediate and Document: Work with the engineering team to resolve the issue. This could involve terminating a forgotten instance, fixing a buggy script, or rightsizing a database. Finally, document the incident, its root cause, and the resolution. This documentation feeds back into your proactive controls and team education efforts.
Conclusion
For a FinOps practitioner, AWS cost anomaly detection is more than just a safety net; it’s a data-driven tool for enforcing financial accountability. It transforms abstract cost governance policies into concrete, actionable alerts that can be routed directly to the teams who can fix them. By integrating this service into a broader framework of proactive controls—disciplined tagging, automated hygiene, and continuous rightsizing—you can move your organization from a reactive stance on cloud costs to one of predictive, intentional financial management. The goal isn’t to prevent all spending, but to ensure every dollar spent is deliberate and delivers value. After all, the most expensive resource is the one you didn’t know you were paying for.
To truly move from reactive cost cleanups to proactive, value-driven cloud financial management, discover how Binadox can empower your FinOps team; you can easily pick a time to see our platform in action or start your free Binadox trial to experience its full capabilities.
 7-day free trial