Getting Started with Binadox
This guide explains how to set up and start working with Binadox from a technical perspective. The onboarding process consists of account setup, data source connections (Cloud and SaaS), and working with analytics and optimization tools.
1. Create a Binadox account
To start using Binadox, create your account and confirm your email address.
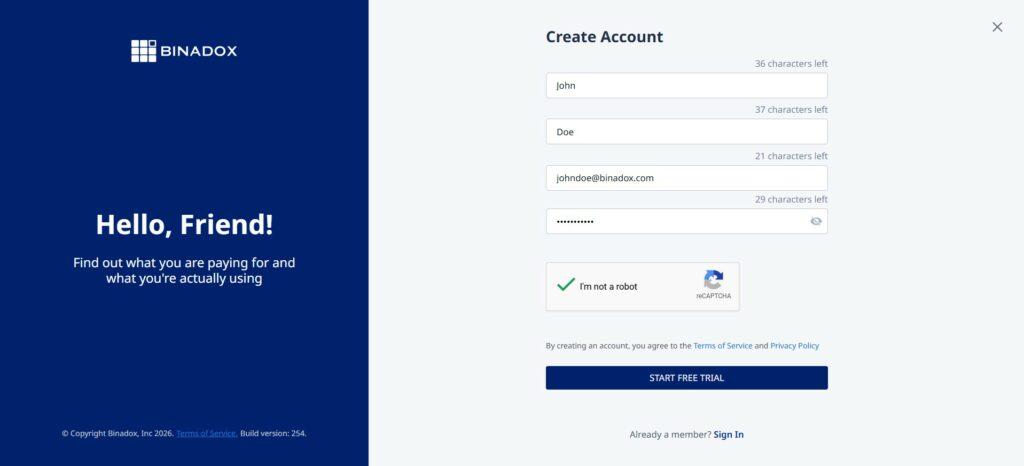
1.1 Open the sign-up form
On the Create Account screen, fill in the required fields: first name, last name, email and password.
Then complete the I’m not a robot check and click Start free trial.
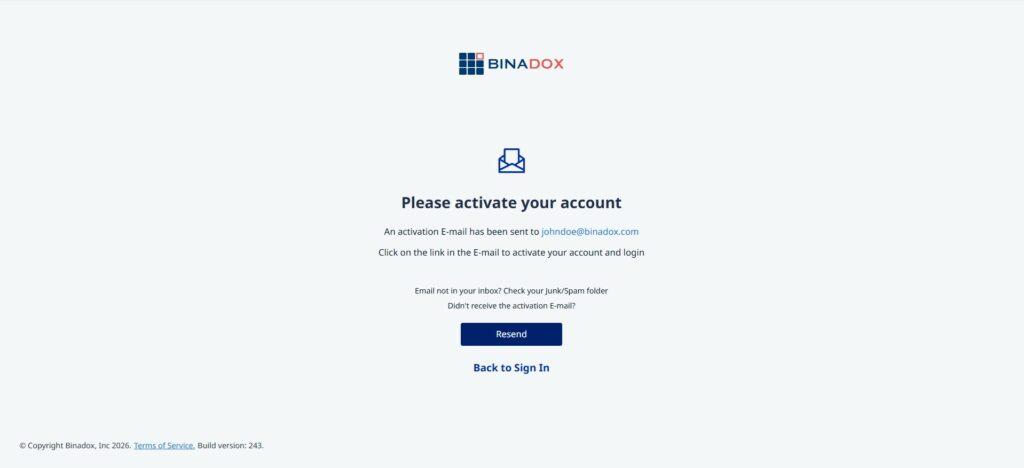
1.2 Check the activation page
After registration, you will be redirected to the Please activate your account page.
At this stage, Binadox shows a message confirming that an activation email has been sent to your email address.
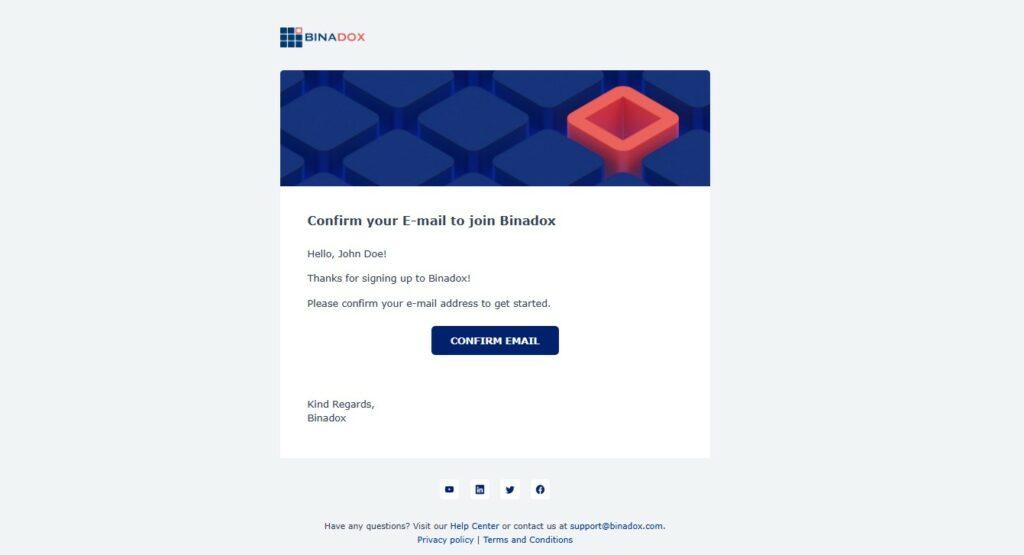
1.3 Open the confirmation email
Find the email with the subject Binadox – Confirm your email. Click Confirm Email to verify your email address and activate your Binadox account.
Note:
If you cannot find the email with the subject Binadox – Confirm your email, check your Spam or Junk folder.
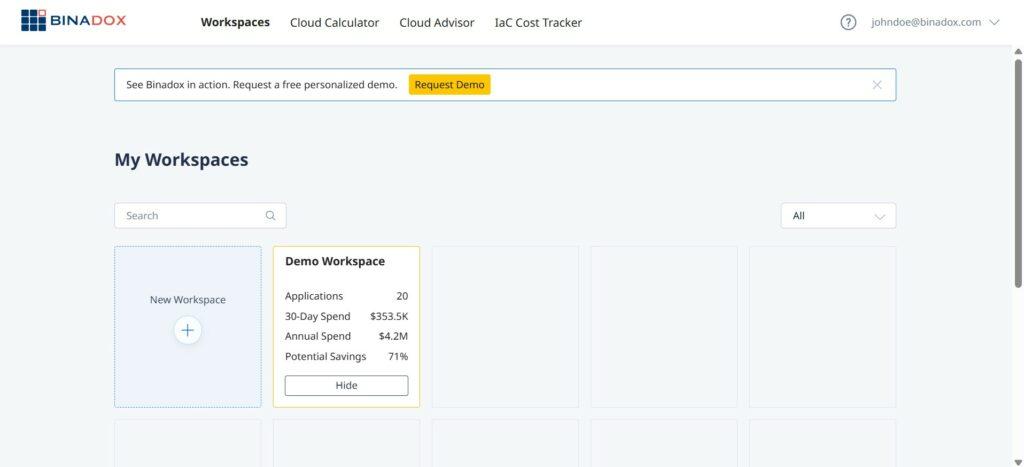
2. Access your workspace
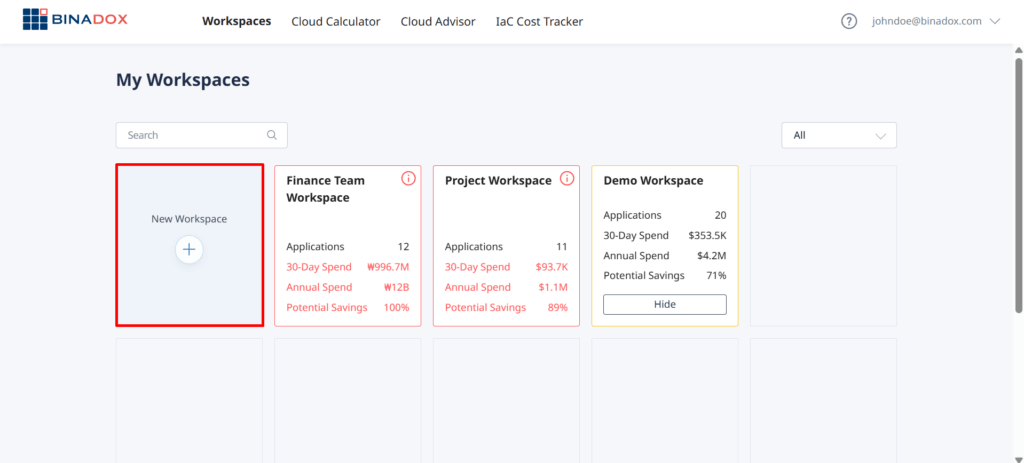
After logging in, you will be redirected to the My Workspaces page.
A workspace is the main environment in Binadox where you manage your data and integrations. It defines what resources you work with and who has access to them.
Inside a workspace, you can connect cloud accounts and SaaS applications, manage users and their roles, and analyze cost and usage data.
2.1 Demo workspace
Demo workspace already contains sample data and is designed to help you understand how Binadox works without connecting your own cloud accounts or SaaS applications. You can open it and explore dashboards, costs, and recommendations to get familiar with the platform before setting up your own workspace.
2.2 Freemium
The freemium tier is the part of Binadox that is available for free at all times, with no time limit and without a paid subscription. It includes three tools that you can use outside any workspace: Cloud Calculator, Cloud Advisor, and IaC Cost Tracker.
To open any of these tools, click its name in the top navigation bar after you sign in. No cloud account connection is required.
Outside a workspace, each tool provides its core functionality with some limits. Inside a workspace — either on a free tier trial or a paid plan — limits are removed and additional features become available.
2.2.1 Cloud Calculator
Cloud Calculator helps you estimate and compare cloud infrastructure costs across providers before deployment. You can configure virtual machines, databases, or complex solutions and compare prices across providers and regions.
| Feature | Without workspace | In workspace |
|---|---|---|
| Configure and compare cloud solutions | ✓ | ✓ |
| Save configurations | ✗ | ✓ |
| Compare with actual cloud spending | ✗ | ✓ |
2.2.2 Cloud Advisor
Cloud Advisor checks a cloud account for best-practice issues related to cost, security, and performance. You can run a check by providing the required credentials and review the list of detected issues with their parameters and risk levels.
| Feature | Without workspace | In workspace |
|---|---|---|
| Run a check and view detected issues | ✓ | ✓ |
| Save check history | ✗ | ✓ |
| Schedule recurring checks | ✗ | ✓ |
| Send issues to ticketing systems | ✗ | ✓ |
2.2.3 IaC Cost Tracker
IaC Cost Tracker analyzes Terraform configurations and estimates their cost before deployment. You can upload a Terraform file or connect a Git repository, view the cost breakdown, and adjust variables to see how changes affect the total.
| Feature | Without workspace | In workspace |
|---|---|---|
| Source | Zip upload | Zip upload + Git repository (VCS) |
| Projects | 1 | Unlimited |
| Recalculations | Up to 25 | Unlimited |
| Columns in the analysis view | 5 | Unlimited |
2.3 Free tier
Free tier allows you to use the platform for free with some limitations. It is a good option if you want to test Binadox with a small environment or evaluate its features before upgrading to a paid plan.
The Free Tier has the following limits:
- Duration: 7 days
- SaaS applications: up to 3 connections
- Cloud accounts: 1 connection
- Administrators: 1
- MCP requests: up to 3 per day
IMPORTANT: No credit card is required to start the Free Tier, and the trial does not convert to a paid plan automatically. To continue using Binadox with your own data after the trial, you need to upgrade to a paid plan manually.
2.4 Paid workspaces
Binadox offers paid plans that allow you to scale your usage as your infrastructure grows. Each plan includes different limits for cloud accounts, SaaS applications, and team seats, so you can choose the option that best fits your needs.
The table below shows the available plans and their limits.
| Plan | Cloud accounts | SaaS applications | Administrators (team seats) | MCP requests / day |
|---|---|---|---|---|
| Starter | 3 | 5 | 3 | 5 |
| Professional | 10 | 20 | 10 | 10 |
| Premium | Unlimited | Unlimited | Unlimited | Unlimited |
| Custom | On request | On request | On request | On request |
Note:
If you would like a guided introduction to Binadox, you can book a demo session with our team. During the demo, we will walk you through the platform, explain key features, and tailor the overview to your specific use case and experience level. You can book a demo.
2.5 Add new workspace
To create a new workspace, go to the My Workspaces page and click New Workspace.
In the Create Workspace panel, enter a workspace name and description, select the currency, and choose a subscription plan. You can also configure billing options and review the limits for cloud accounts, applications, and administrators included in the selected plan.
After completing the setup, the new workspace will appear in your workspace list.
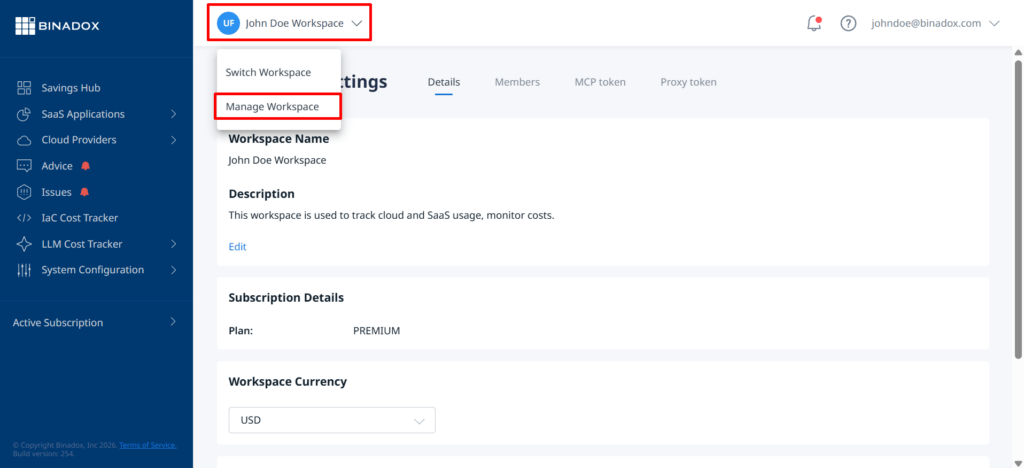
2.6 Workspace settings
Workspace settings allow you to configure and manage your workspace. To open them, click the workspace name in the top panel and select Manage Workspace.
2.6.1 Details
The Details tab contains general workspace information, such as the workspace name and description, subscription plan, currency, and data retention period.
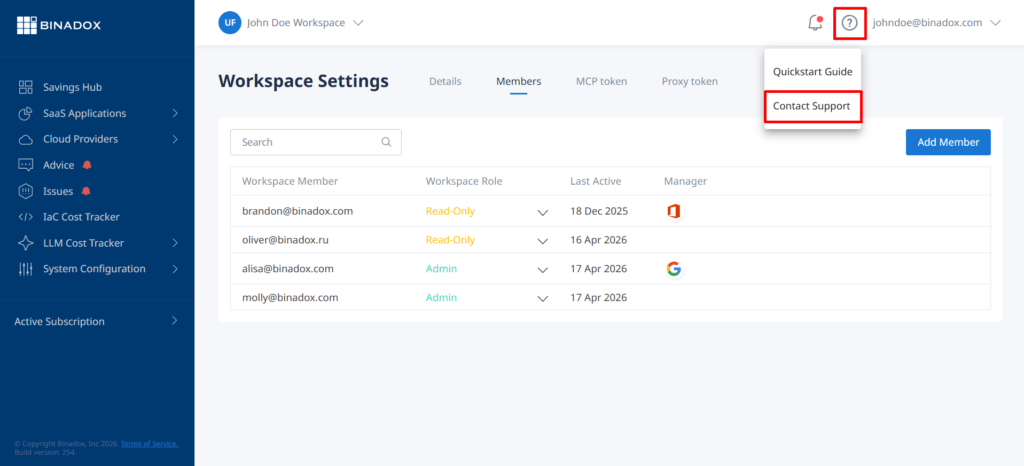
2.6.2 Members
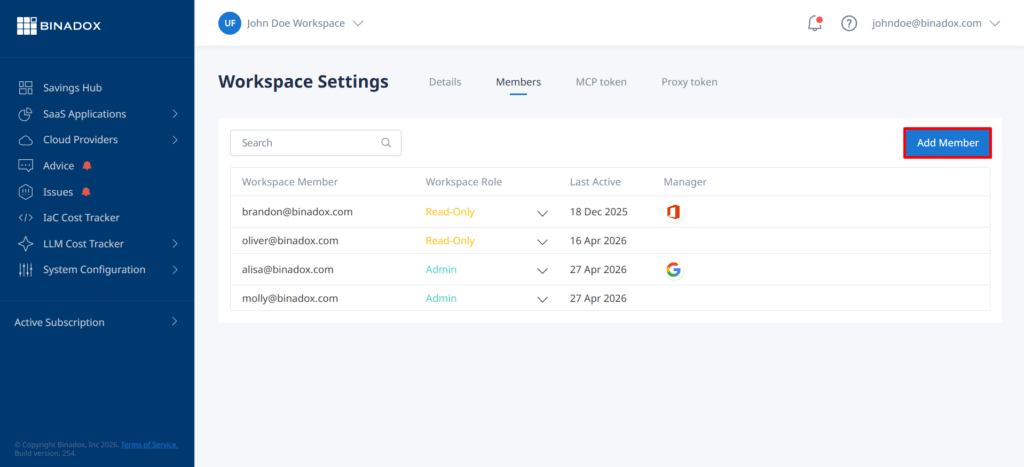
The Members tab allows you to manage users who have access to the workspace.
Here you can see a list of all workspace members, their assigned roles, last activity, and whether they are assigned as managers for specific applications. This helps you understand who has access to the workspace and what level of permissions they have.
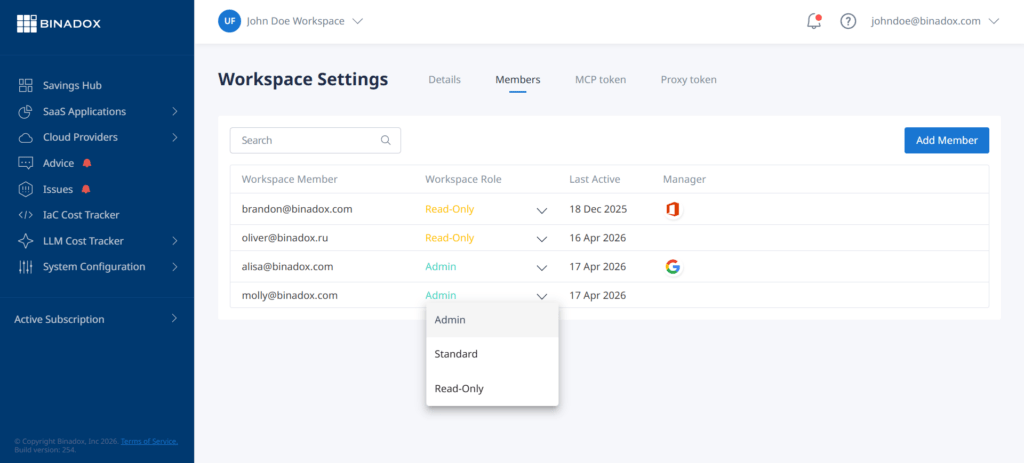
From this section, you can invite new users by clicking Add Member, assign roles such as Read-Only, Standard, or Admin, and update roles for existing members. This allows you to control access levels and distribute responsibilities across your team.
When a user is invited, they will receive an email invitation with a link to join the workspace. To accept the invitation, the user needs to click the Join Now button in the email and follow the link.
Users can also be removed from the workspace. To delete a user, hover over the corresponding row — a delete (trash) icon will appear. Click the icon and confirm the deletion in the dialog window.

Note:
Only users with Admin permissions can add or remove members and change roles.
2.6.3 MCP Token
The MCP token tab is used to generate and manage tokens required for integration with the Binadox Terraform MCP server. These tokens are used to authenticate requests to Binadox when connecting external tools such as the Terraform MCP server. They enable validation, security checks, and cost estimation for Terraform configurations.
2.6.4 Proxy Token
The Proxy token tab provides a token used to securely connect your network proxy to Binadox for Shadow IT detection. This token enables Binadox to analyze web traffic and discover SaaS applications used within your organization without installing software on user devices.
2.7 Workspace roles
Each workspace has three types of user roles: Read-Only, Standard, and Admin.
| Permission | Read-Only | Standard | Admin |
|---|---|---|---|
| View cost data | ✓ | ✓ | ✓ |
| Make configuration changes | ✗ | ✓ | ✓ |
| Manage workspace | ✗ | ✗ | ✓ |
| Update subscription | ✗ | ✗ | ✓ |
2.8 Managers
In addition to roles, Binadox allows you to assign managers to specific applications within a workspace.
Managers are responsible for particular SaaS applications and can monitor usage, costs, and optimization opportunities for those tools. This helps distribute ownership across your team and ensures that each application has someone accountable for its efficiency and spending.
For example, a manager can be assigned to a specific application to track its usage and make decisions about licenses or cost optimization.
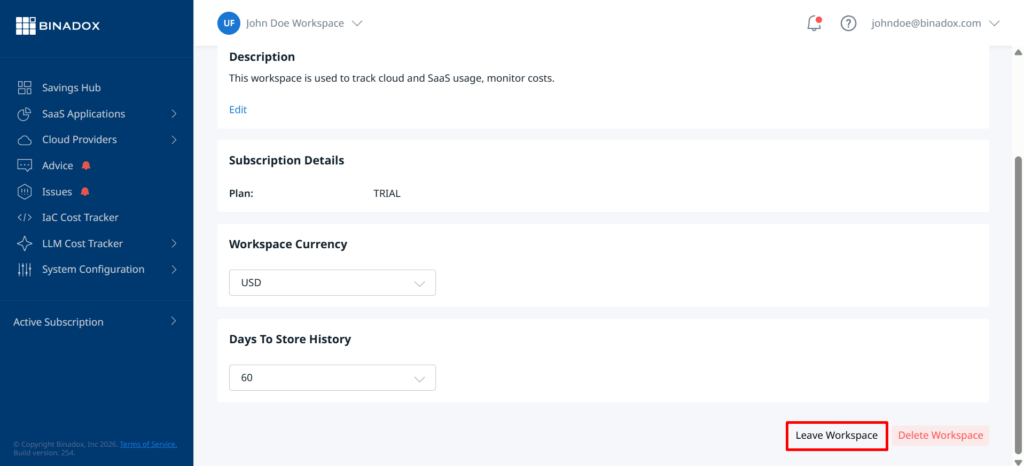
2.9 Leave workspace
If you no longer need access to a workspace, you can leave it.
To do this, open Workspace Settings, scroll down to the bottom of the Details tab, and click Leave Workspace.
After leaving, you will lose access to all data, integrations, and settings within that workspace. You can only rejoin it if you are invited again by an Admin.
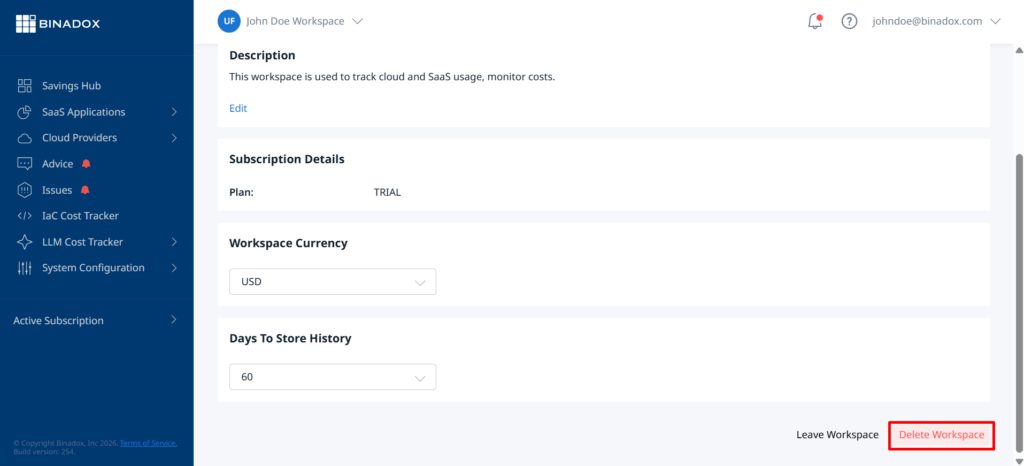
2.10 Delete workspace
If you need to permanently remove a workspace, you can delete it.
Go to Workspace Settings, scroll to the bottom of the Details tab, and click Delete Workspace.
Deleting a workspace will permanently remove all associated data, including connected accounts, applications, users, and analytics. This action cannot be undone.
Note: Only users with Admin permissions can delete a workspace.
3. Connect your first SaaS application
After setting up your workspace, the next step is to connect your SaaS applications.
To do this, go to SaaS Applications → SaaS Connections, find the required application in the list, and follow the integration steps.
Binadox supports a wide range of SaaS applications, including tools like Google Workspace, Salesforce, Zendesk, GitLab, HubSpot, and many others. You can view the full list of supported applications here.
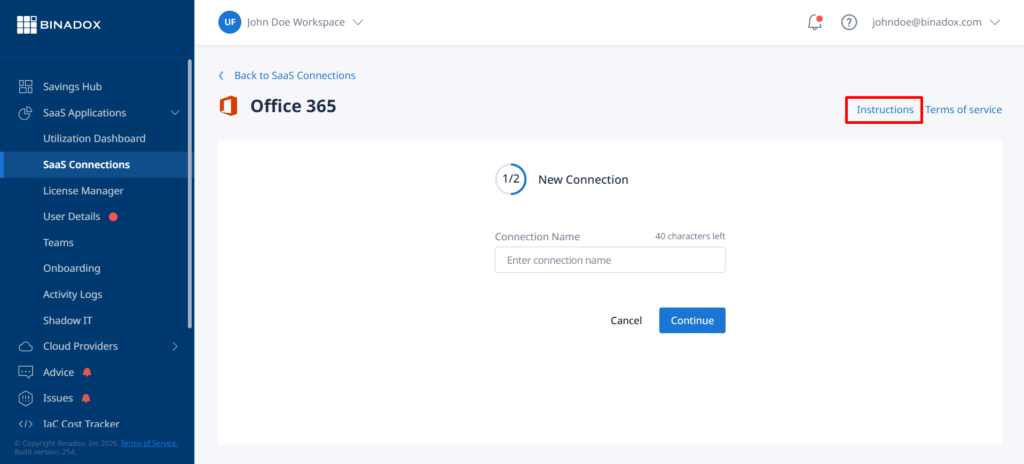
3.1 Connect a SaaS application
Enter a unique connection name for identification, then click Continue.
On the next step, provide the required credentials (such as login, password, API key, or token), depending on the selected application, and complete the connection process.
Each SaaS application has its own specific integration requirements. To see detailed step-by-step instructions, click Instructions in the top right corner or refer to the corresponding integration guide in the documentation.
3.2 Request a new SaaS application
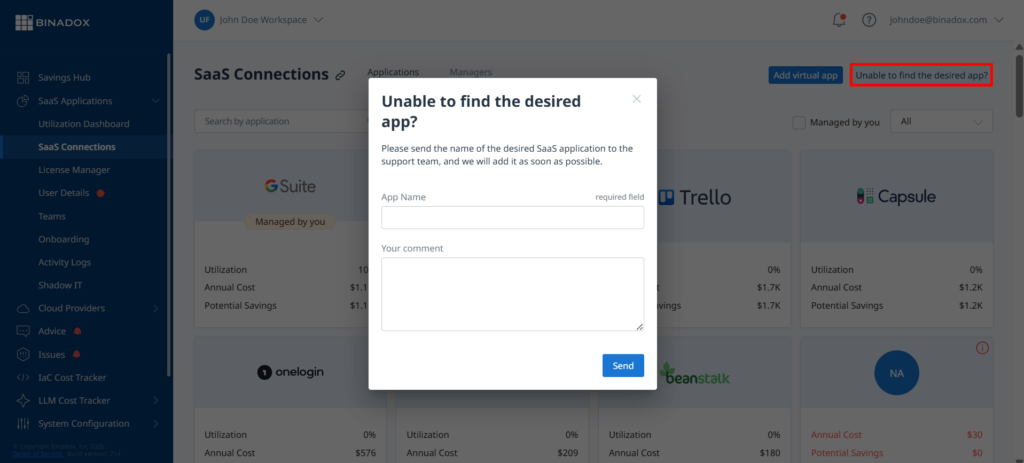
If you cannot find the application you need, click Unable to find the desired app? in the interface, submit the request, and our team will review it. If possible, we will add the integration for you.
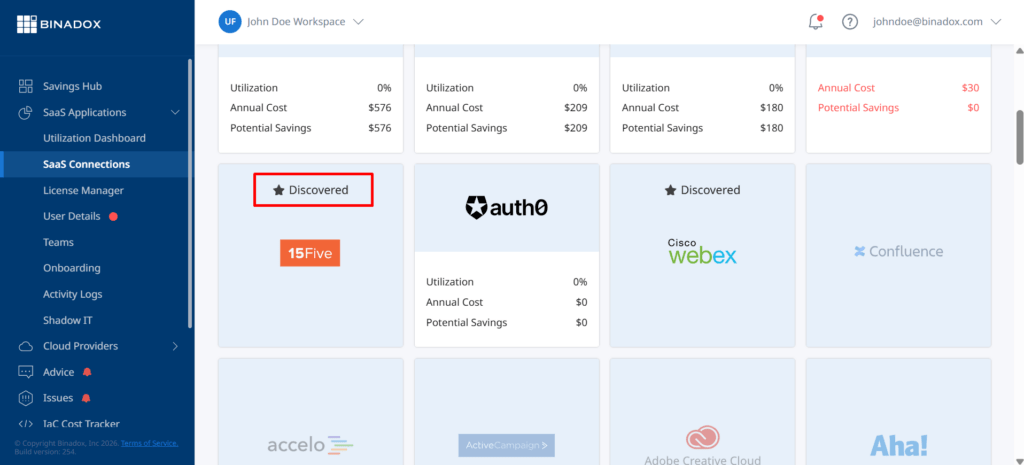
3.3 Discovered applications
The Discovered applications feature automatically detects SaaS applications that were not explicitly connected to Binadox. These applications are identified using multiple data sources, including email invoice scanning, financial systems (such as QuickBooks or Xero), and identity providers like Google Workspace, Office 365, or Okta.
This functionality helps uncover unmanaged or unauthorized SaaS usage (Shadow IT), providing better visibility into your organization’s actual software landscape and enabling improved security and cost control.
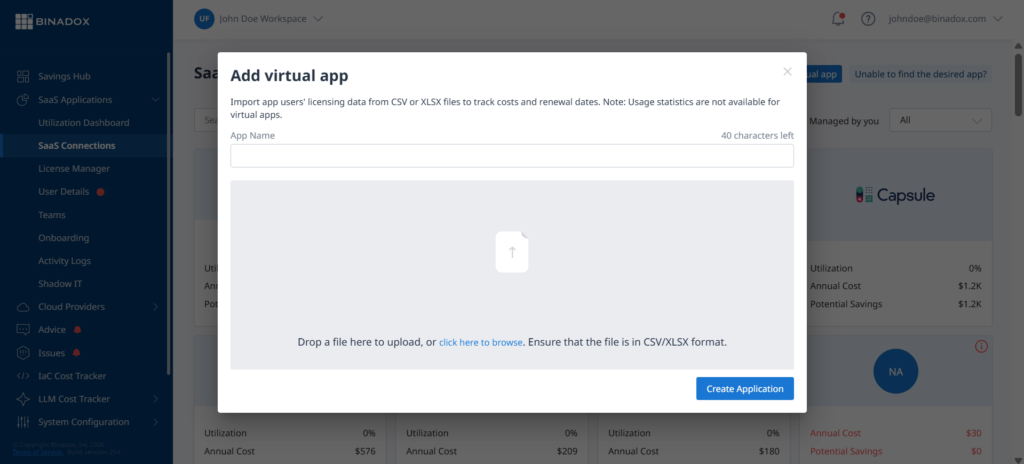
3.4 Add a virtual app
Virtual apps allow you to add and track SaaS applications that cannot be connected via standard integrations. By uploading a CSV or XLSX file with licensing data, you can monitor costs and renewals for these applications.
Note: Virtual apps do not provide usage analytics and require manual updates.
3.5 SaaS functionality overview
After connecting a SaaS application, Binadox provides several tools to help you monitor usage, control costs, and optimize your subscriptions.
3.5.1 Utilization dashboard
The Utilization Dashboard provides a high-level overview of how your SaaS applications are used across the organization. It helps you quickly identify usage trends and detect underutilized or inactive applications.
3.5.2 License manager
The License Manager allows you to analyze license allocation and usage across applications. It helps identify unused or underutilized licenses, enabling you to optimize subscriptions and reduce unnecessary costs.
3.5.3 User details
The User Details section provides insights into how individual users interact with SaaS applications. You can track activity, identify inactive users, and detect inefficient license usage.
3.5.4 Teams
The Teams feature allows you to group users and analyze SaaS usage at the team level. This helps distribute costs, assign responsibility, and better understand how different departments use applications.
3.5.5 Scenarios
The Scenarios tool provides rule-based automation for managing employee access to SaaS applications. It allows you to standardize onboarding and offboarding processes by automatically assigning applications, managing access permissions, and reallocating licenses based on predefined conditions.
3.5.6 Activity logs
Activity Logs track user actions and system events related to SaaS applications. This helps with auditing, monitoring changes, and maintaining transparency across the workspace.
3.5.7 Shadow IT
The Shadow IT feature detects SaaS applications that are used without official approval. This helps improve security and control SaaS spending by identifying unknown or unmanaged tools.
Binadox uses multiple data sources to detect such applications:
- Browser Extension – detects SaaS usage and login activity directly in employee browsers
- Desktop Agent – monitors application usage on employee devices
- Proxy Integration – identifies SaaS applications based on network traffic
- OAuth Integration – analyzes identity provider logs (such as Google, Office 365, or Okta) to discover connected applications
Applications discovered through these methods can then be reviewed and managed within the platform.
By combining these tools, Binadox provides full visibility into all SaaS applications used across the organization, including those not officially connected.
3.5.8 Renewals calendar
The Renewals Calendar provides a centralized view of all upcoming subscription renewals and expiration dates. It allows you to track billing cycles, monitor renewal costs, and receive advance notifications before payments are due. This helps avoid unexpected charges and enables proactive license optimization before renewal.
3.5.9 Usage intensity
The Usage Intensity tool visualizes how frequently each SaaS application is used over time. It helps identify low-usage or inactive applications, allowing you to optimize subscriptions and eliminate unnecessary costs.
3.5.10 Payment history
The Payment History feature provides a detailed view of historical SaaS spending, including billing plans, invoices, and cost trends. This helps you analyze changes over time and make informed decisions about renewals and budgeting.
3.5.11 Invoices
The Invoices tool centralizes billing data from SaaS applications and financial systems. It allows you to track expenses, upload or import invoice data, and gain a complete view of your SaaS spending.
Binadox supports integration with the following financial and data sources:
- Gmail inbox (for invoice detection via email)
- QuickBooks
- Xero
- Zoho Books
These integrations allow automatic collection and processing of invoice data, improving accuracy and reducing manual effort in tracking SaaS expenses.
3.5.12 Documents
The Documents feature allows you to store and manage files related to SaaS applications, such as contracts, invoices, or internal documentation. This provides a centralized location for all application-related information and improves accessibility for your team.
4. Connect your first cloud provider
After setting up your workspace, the next step is to connect your cloud provider accounts.
To do this, go to Cloud Providers, select the required provider, and follow the integration steps.
Binadox supports major cloud providers such as Amazon Web Services (AWS), Google Cloud Platform (GCP), Microsoft Azure, and others. You can view detailed integration guides here.
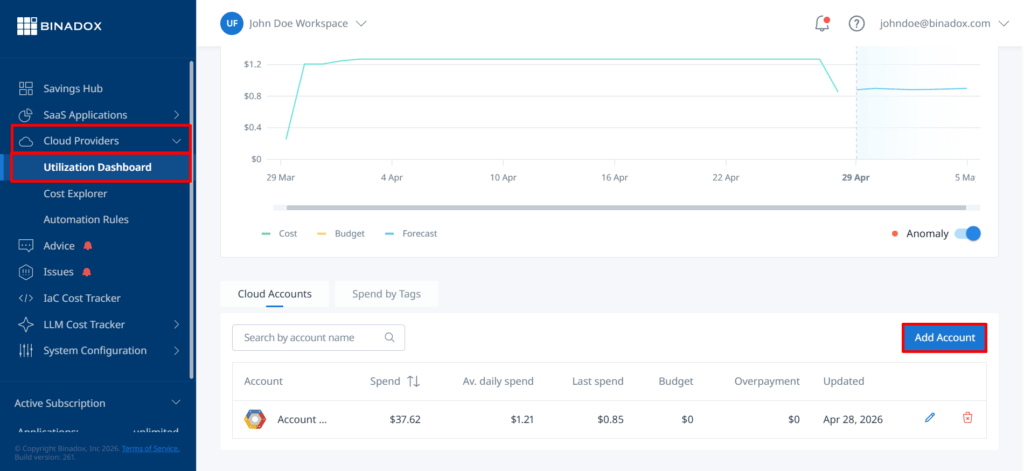
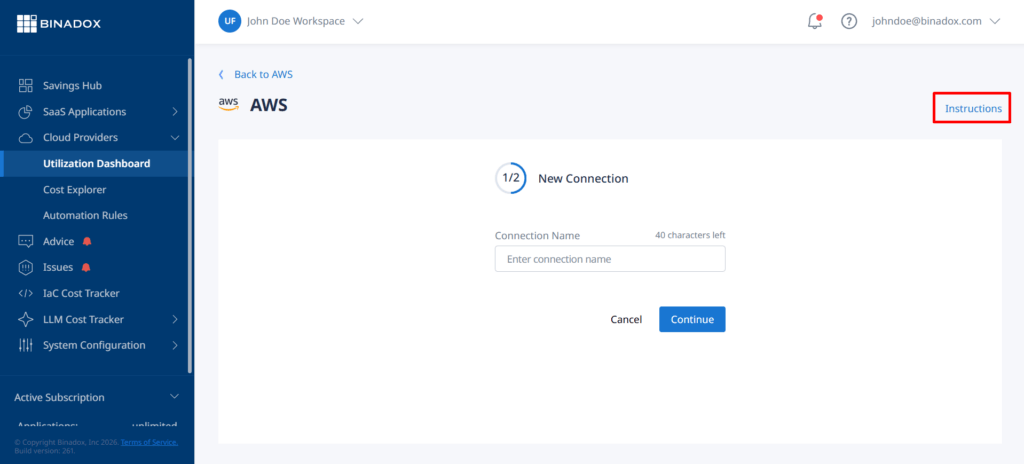
4.1 Connect a cloud provider
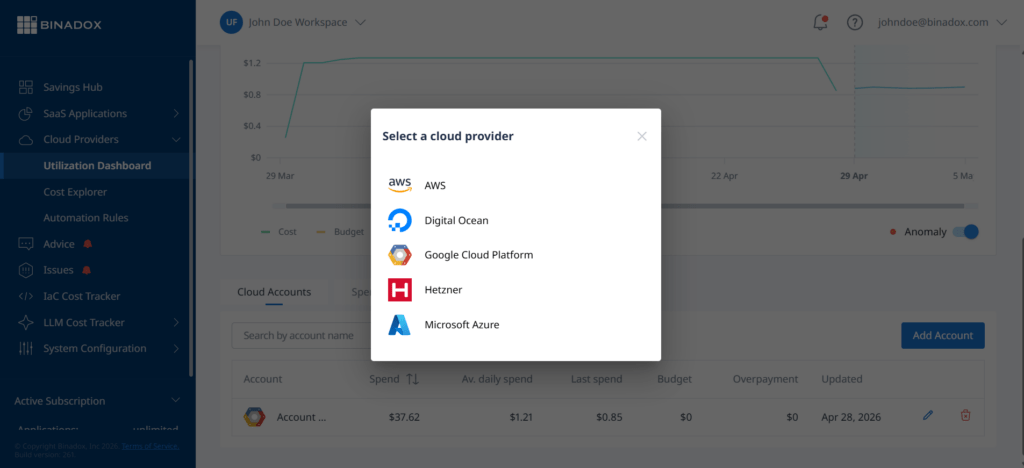
To connect a cloud provider, go to Cloud Providers → Utilization Dashboard and click Add Account.
elect the required provider from the list. Binadox supports the following cloud providers:
- Amazon Web Services
- Google Cloud Platform
- Microsoft Azure
- DigitalOcean
- Hetzner
Enter a unique connection name for identification, then click Continue.
On the next step, provide the required credentials (such as access keys, service accounts, or API credentials), depending on the selected provider, and complete the connection process.
To see detailed step-by-step instructions, click Instructions in the interface or refer to the corresponding integration guide in the documentation.
4.2 Cloud functionality overview
After connecting a cloud provider, Binadox provides a set of tools to help you analyze usage, detect inefficiencies, and optimize infrastructure costs.
4.2.1 Cost Explorer
The Cost Explorer provides a detailed breakdown of cloud expenses across services, resources, and time periods. It allows you to analyze cost trends, compare actual versus expected spending, and identify anomalies in your cloud usage. By drilling down into specific services and time ranges, you can better understand which resources contribute most to your overall costs and take action to optimize them.
4.2.2 Cost Spikes
The Cost Spikes tool detects unusual increases in cloud spending based on predefined thresholds (either percentage-based or absolute values). It highlights sudden changes in costs over selected time periods, helping you quickly identify unexpected spikes and investigate their root causes before they impact your budget.
4.2.3 Rightsizing
The Rightsizing feature analyzes resource usage and provides recommendations for optimizing infrastructure capacity. It identifies overprovisioned or underutilized resources and suggests more efficient configurations, helping reduce costs while maintaining performance.
4.2.4 Tagging
The Tagging tool allows you to organize cloud resources using tags and custom labels. This enables more accurate cost allocation, filtering, and analysis across projects, teams, or departments, and helps improve visibility into how resources are used within your organization.
4.2.5 Cloud Advisor (Issues)
Cloud Advisor identifies security, performance, and cost optimization issues in your cloud environment. It continuously analyzes your infrastructure and provides actionable recommendations to improve efficiency, reduce risks, and ensure best practices are followed.
4.2.6 Automation Rules
Automation Rules allow you to define conditions and automatically trigger actions, such as sending notifications or applying predefined responses. This helps reduce manual effort, enforce policies, and ensure timely reactions to cost or usage changes.
4.2.7 Cloud Calculator
The Cloud Calculator helps estimate and compare cloud infrastructure costs before deployment. It allows you to model different configurations, compare pricing across providers, and choose the most cost-effective solution based on your requirements.
4.2.8 IaC Cost Tracker
The IaC Cost Tracker analyzes infrastructure-as-code configurations (such as Terraform) and estimates their cost impact before deployment. It provides detailed cost breakdowns and enables comparison between different versions of infrastructure, helping prevent unexpected expenses and optimize infrastructure planning.
5. Supporting systems
In addition to SaaS and cloud integrations, Binadox provides supporting systems that help you monitor infrastructure, receive recommendations, and automate workflows.
5.1 Advice
The Advice section provides recommendations for optimizing costs, improving security, and enhancing infrastructure efficiency across both SaaS applications and cloud providers.
Based on collected data, Binadox analyzes usage patterns and identifies potential savings opportunities, misconfigurations, and risks. Each recommendation includes details and suggested actions, allowing you to make informed decisions and improve your overall resource management.
5.2 Ticketing systems
Ticketing Systems allow you to integrate Binadox with your existing communication and workflow tools to receive automatic notifications about important events, such as budget alerts, upcoming renewals, detected issues, and cost recommendations.
Binadox supports the following ticketing and notification systems:
- Slack
- Jira
- Telegram
- Mattermost
- ServiceNow
- Freshdesk
- Zendesk
To open the Ticketing Systems page, go to System Configuration → Ticketing Systems in the left navigation panel. The page has two tabs: Connections and Notifications.
5.2.1 Connect a ticketing system
On the Connections tab, click Add Connection. In the Select a system to connect dialog, choose the system you want to integrate.
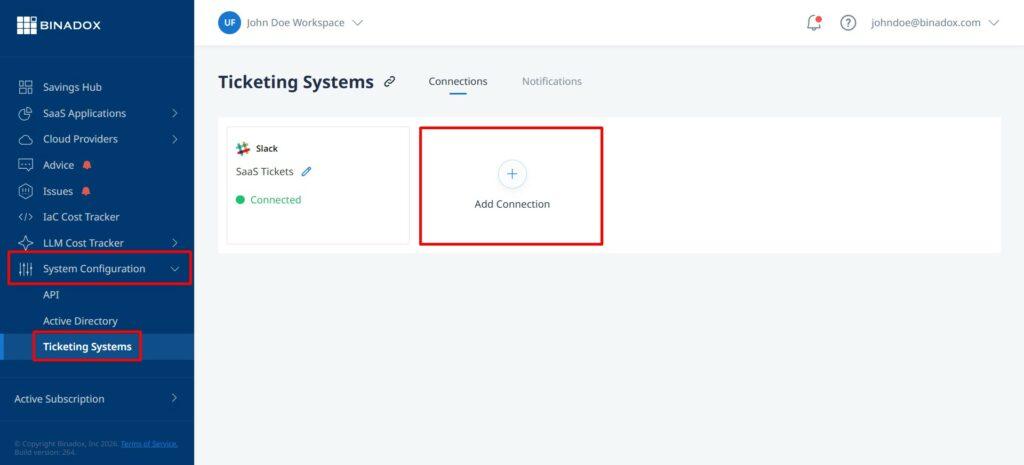
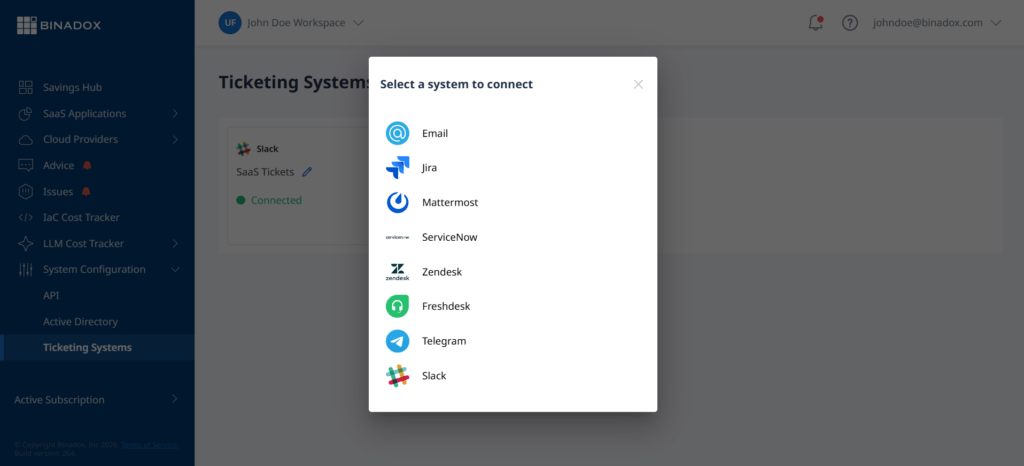
After selecting a system, follow the on-screen steps to provide the required credentials. Each system has its own connection process — for example, Slack uses OAuth authorization, while Jira and ServiceNow require API credentials. Once a system is connected, it appears on the Connections tab with a Connected status.
5.2.2 Configure notifications
On the Notifications tab, you can choose which events trigger alerts and where they are sent. Use the search field to find a specific event, or scroll through the list to review all available options.
Examples of available events: New advice, Cloud budget limit exceeded, Total cloud budget limit exceeded, Tag budget limit exceeded, AWS credit limit reached, and others related to SaaS renewals, detected issues, and cost spikes.
To enable an event, select its checkbox. Click the arrow on the right of the event row to expand it and choose which connected systems should receive the corresponding notification.
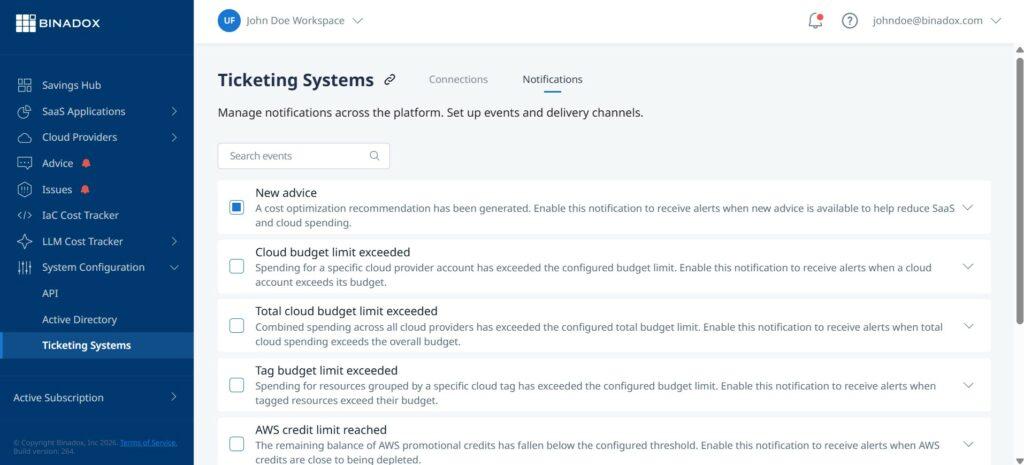
By routing alerts to your preferred channels, you ensure timely responses and streamline collaboration within your team.
6. Additional tools
Binadox also provides additional tools for analyzing and managing costs related to modern infrastructure components.
6.1 LLM Cost Tracker
The LLM Cost Tracker helps monitor and analyze costs associated with large language model (LLM) usage. It provides visibility into API consumption, usage patterns, and cost drivers, allowing you to control expenses and optimize AI-related workloads.
Binadox supports integration with major LLM providers, including ChatGPT (OpenAI API), Azure OpenAI, Google Vertex AI, and Amazon Bedrock, enabling unified cost tracking and analysis across all platforms.
6.2 MCP Cost Tracker
The MCP Cost Tracker enables cost tracking and analysis for MCP-based workloads and infrastructure components. It helps you understand how resources are consumed, identify inefficiencies, and optimize spending across your MCP environment.
7. Troubleshooting
7.1 Verification failed
If you see the Verification Failed message with the note that the token has expired, it means you opened the email confirmation link too late and it is no longer valid.
To fix this, click Resend on the screen. A new verification email will be sent to your inbox. Open the new email and click the confirmation link again to complete the activation process.
If you do not see the email, check your Spam or Junk folder.

7.2 Access denied when opening a shared workspace link
If you open a shared workspace link and see the Access denied message, it means your account does not have permission to view the workspace or page.
This can happen if you are not a member of the workspace, your invitation has not been accepted yet, or your access to the workspace has been removed.
To fix this, contact a workspace administrator and ask them to add you to the workspace or send you a new invitation. After you are added to the workspace, sign out and sign in again, then open the shared link once more.
IMPORTANT: Only users with Admin permissions can add members, remove members, or change member roles.
7.3 Account access blocked
If you see the Access Denied page after signing in, your Binadox account has been disabled and cannot access Binadox services.
To restore access, contact support@binadox.com for assistance. Include the email address you use to sign in and, if possible, attach a screenshot of the Access Denied page.
7.4 Access denied during registration
If the Access denied message appears while you are creating a Binadox account, the registration request was blocked before the account was created.
This can happen when your IP address, email address, or email domain is restricted by Binadox access control rules.
To resolve this issue, contact Binadox Customer Support. Include the email address you tried to register with and the organization or domain you are registering for. If you are registering from a corporate network, ask your IT administrator whether the request is routed through a shared proxy, VPN, or restricted IP address, and include this information in your support request.
8. Support
If you have any questions or need help, you can contact Binadox support at any time.
To submit a request, click the Help icon in the top right corner and select Contact Support. This will allow you to send your request directly from the platform.
You can also reach out via email at support@binadox.com.
Conclusion
You have completed the initial setup of Binadox. Your account is created, your workspace is configured, and your first integrations are connected.
What to do next:
- Connect the remaining cloud accounts and SaaS applications you want to monitor. Detailed integration guides are available in Cloud Integrations and SaaS Integrations.
- Invite team members in Workspace Settings → Members and assign roles based on their responsibilities.
- Configure a ticketing system to receive notifications by email, Slack, Jira, or another supported channel.