



As a DevOps engineer, you live by automation. You automate infrastructure with IaC, deployments with CI/CD, and testing with continuous validation. So why are you still manually pulling CSVs from the Azure portal to analyze cloud spend? Manual cost reports are a bottleneck; they’re slow, error-prone, and they don’t provide the real-time feedback your team needs to make informed decisions. To treat cost as a first-class metric, you need to automate azure cost data export and build a reliable data pipeline. This guide provides a hands-on, technical walkthrough for setting up and managing automated cost exports, moving your team from reactive analysis to proactive cost management integrated directly into your workflows.
Key takeaways
- You can set up a basic daily cost data export directly from the Azure Portal in under 5 minutes.
- Automating cost exports enables you to integrate spending data with CI/CD pipelines, monitoring tools (like Grafana or Datadog), and custom alerting systems.
- For ultimate control and integration, use the Azure Cost Management REST API to build a custom azure cost data pipeline.
- Properly configuring a service principal with the “Cost Management Contributor” role is essential for secure, automated access to cost data.
Why Manual Cost Reports Don’t Scale for DevOps
Manual cost reporting is an operational anti-pattern. It introduces significant friction and lag into your feedback loops. For instance, when a new feature deployment causes an unexpected spike in storage costs, you need to know immediately, not at the end of the month when someone gets around to downloading the latest invoice. Manual processes are inherently reactive.

Furthermore, manual downloads don’t integrate with the tools you already use. You can’t easily pipe a manually downloaded CSV into a Prometheus exporter, a Grafana dashboard, or a Slack bot that alerts on budget anomalies. This data remains siloed, making it difficult to correlate cost spikes with specific code commits, releases, or infrastructure changes.
An automated pipeline, by contrast, treats cost data as what it is: another stream of operational metrics. It allows you to:
- Shift left on cost: Provide developers with near-real-time feedback on the cost implications of their changes.
- Improve forecasting: Use historical data to build more accurate budget forecasts for new projects.
- Enable FinOps: Create a shared understanding of cloud costs across engineering, finance, and product teams, fostering a culture of cost accountability.
As a result, moving from manual pulls to an automated system is not just about efficiency; it’s about making cost a visible, actionable metric throughout the entire development lifecycle.
Prerequisites: Setting Up Your Azure Storage Destination
Before you can export data, you need a secure and accessible place to put it. An Azure Storage Account is the standard destination for cost exports. For a DevOps practitioner, setting this up correctly is crucial for the pipeline’s reliability and security.
Configure the Storage Account
First, you’ll need a general-purpose v2 (GPv2) storage account. When creating it, consider the following:
- Redundancy: Locally-redundant storage (LRS) is often sufficient and is the most cost-effective option for this use case. Geo-redundant storage (GRS) is likely overkill unless you have stringent disaster recovery requirements for your cost data.
- Performance Tier: Standard performance is perfectly adequate. You are not running high-throughput workloads here.
- Access Tier: The “Hot” access tier is appropriate for data that will be frequently accessed by your analysis tools. If you plan to archive data for long-term storage, you can implement lifecycle management rules to move it to “Cool” or “Archive” tiers later.
Secure Access and Permissions
This is the most critical step. For automation, you cannot rely on user-based credentials. You must configure access for a managed service. Microsoft requires specific permissions and network configurations for Cost Management to write to your storage account.
To allow the Azure Cost Management service to write data, you must grant it access. When configuring the export, Azure will register the Cost Management service principal (Microsoft.CostManagement with AppId 24a657f6-95e3-4983-9589-2f8c68143260) with the Storage Blob Data Contributor role on the storage account scope. You must have Microsoft.Authorization/roleAssignments/write permissions to do this, which are included in Owner or User Access Administrator roles.
If your storage account is behind a firewall, you must take an additional step. You need to allow access from trusted Azure services. In your storage account’s Networking settings, select “Enable for trusted services in the same region”. You can find detailed instructions in the official documentation for configuring exported data. This ensures the Cost Management service can connect and deliver the files.
Method 1: Using the Azure Portal for Scheduled Exports
The most straightforward way to get started is by using the scheduled export feature directly within the Azure Portal. This method is excellent for setting up a regular, recurring data drop without writing any code. It’s a “set it and forget it” approach.
First, navigate to Cost Management + Billing in the Azure portal. Select your scope (such as a management group or subscription). Then, in the Cost Management menu, select Exports.
From here, you can create a new export. The configuration is simple:
- Name your export: Give it a descriptive name like
daily-prod-costs-raw. - Choose the data: You can select between actual cost (usage-based), amortized cost (for reservations), and usage details. Daily actual costs are a common starting point.
- Set the schedule: You can configure daily, weekly, or monthly exports of the previous period’s data. A daily export of the prior day’s costs is a popular choice for timely feedback.
- Define the destination: Select the subscription, resource group, and storage account you configured in the prerequisite step. Specify the container and a directory path where the files should be stored.
This process takes only a few minutes. Once saved, Azure will automatically begin exporting partitioned CSV files to your storage container on the schedule you defined. While simple, this method lacks the flexibility of programmatic control. For example, you cannot easily trigger an export on-demand after a major deployment.
Method 2: How to Automate Azure Cost Data Export with the Azure CLI
For teams that live in the command line, the Azure CLI provides a powerful, scriptable interface for managing cost exports. This is a significant step up from the portal, as it allows you to integrate cost management into your existing automation scripts and CI/CD pipelines. You can version control your export configurations and ensure they are deployed consistently across environments.
Creating an Export with a Script
The core command is az costmanagement export create. Here is a sample script to get azure costs for a subscription:
# !/bin/bash

# Variables
EXPORT_NAME="daily-prod-compute-export"
SUBSCRIPTION_ID=$(az account show --query id -o tsv)
STORAGE_ACCOUNT_ID=$(az storage account show --name "yourstorageaccount" --resource-group "your-rg" --query id -o tsv)
CONTAINER_NAME="costdata"
RESOURCE_GROUP_NAME="your-rg"

# Create the cost management export
az costmanagement export create \
  --name $EXPORT_NAME \
  --type "ActualCost" \
  --scope "subscriptions/$SUBSCRIPTION_ID" \
  --storage-account-id $STORAGE_ACCOUNT_ID \
  --storage-container $CONTAINER_NAME \
  --timeframe "MonthToDate" \
  --recurrence "Daily" \
  --recurrence-period from="2026-07-01T00:00:00Z" to="2036-07-01T00:00:00Z" \
  --schedule-status "Active" \
  --format "Csv"
This script defines and creates a daily export for the current month’s actual costs. You can easily parameterize this script and run it as part of a deployment pipeline or a scheduled cron job. For example, you could use a tool like Azure DevOps Pipelines or GitHub Actions to manage these configurations as code.
Managing Exports Programmatically
In addition to creation, the CLI allows you to manage the full lifecycle of your exports. You can update an existing export with az costmanagement export update, view details with az costmanagement export show, or delete it with az costmanagement export delete. This programmatic control is essential for maintaining a clean and well-managed cost data pipeline.
Method 3: Building a Robust Azure Cost Data Pipeline with APIs
For the highest degree of flexibility and integration, you can use the Azure Cost Management REST APIs. This approach is ideal when you need to build a custom solution, such as triggering exports from an application, integrating cost data into a bespoke financial dashboard, or building a complex azure cost data pipeline with Azure Data Factory.
Authenticating with a Service Principal
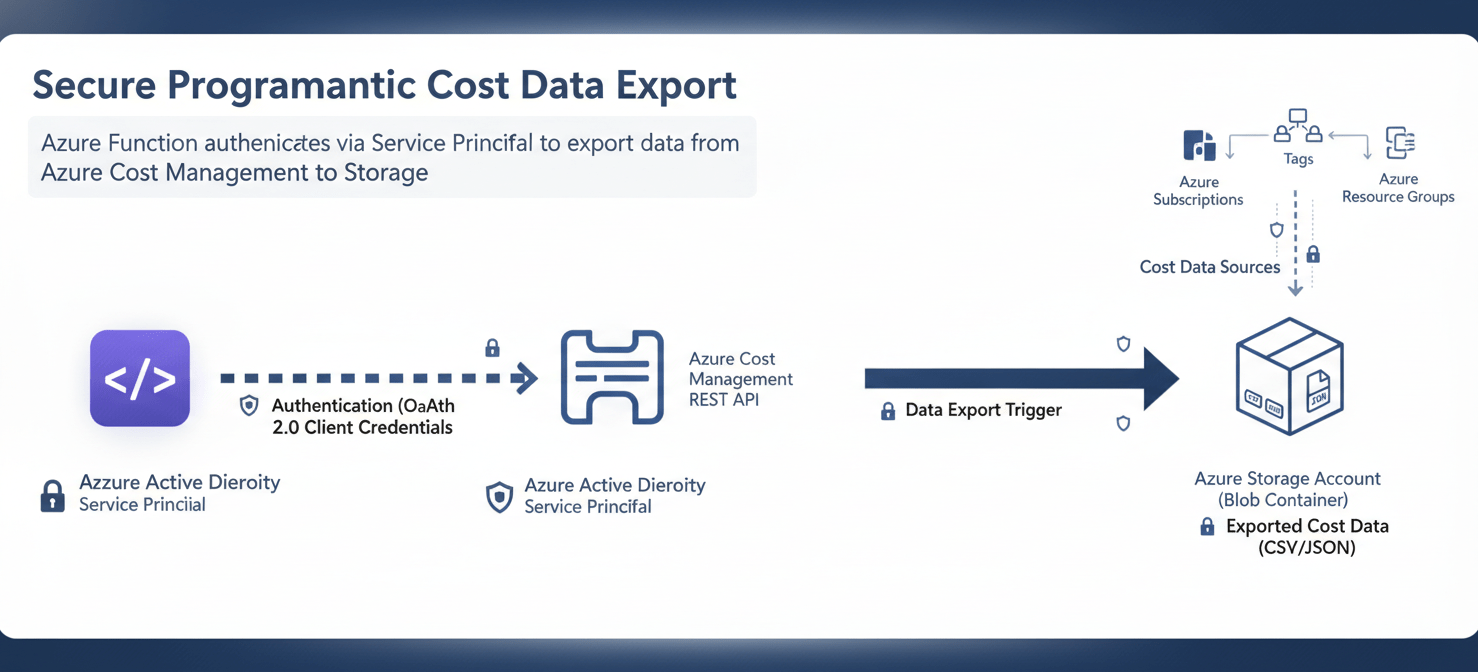
To use the API, you must first create a service principal (SPN) in Azure Active Directory. This SPN will act as the identity for your automation script or application.
You then need to grant this service principal the appropriate permissions. The Cost Management Contributor role is typically required to create and manage exports at a given scope (like a subscription or resource group). You can assign this role using the Azure CLI:
az role assignment create \
  --assignee "your-spn-app-id" \
  --role "Cost Management Contributor" \
  --scope "/subscriptions/your-subscription-id"
Calling the Exports API
With the authenticated SPN, you can now make calls to the Azure Cost Management Exports API. You would use an HTTP client in your language of choice (e.g., Python with requests, PowerShell with Invoke-RestMethod) to send a PUT request to the endpoint.
The endpoint URL would look like this:
https://management.azure.com/{scope}/providers/Microsoft.CostManagement/exports/{exportName}?api-version=2023-11-01
The request body contains the export definition in JSON format, which is very similar to the parameters used in the Azure CLI example. This method gives you fine-grained control to dynamically create, modify, and trigger exports based on events within your infrastructure or applications. For instance, you could write an Azure Function that is triggered after a major release, which then calls this API to initiate a cost export for immediate analysis of the deployment’s financial impact.
Best Practices for Managing Exported Cost Data
Simply dumping raw data into a storage account is only half the battle. To get real value, you need to manage this data effectively.
Data Partitioning and Schema
Azure automatically partitions the exported data by date, which is incredibly useful for time-series analysis. The files are typically stored in a path structure like container/directory/YYYYMMDD/. Be aware that Microsoft may occasionally add new columns to the export data. Your downstream processing jobs should be designed to handle schema changes gracefully and not break when a new field appears.
Data Lifecycle and Archiving
Not all cost data needs to be kept in hot storage forever. Implement a lifecycle management policy on your storage account to automatically transition older data to cheaper storage tiers. For example, you might keep the last 90 days of data in the “Hot” tier for active analysis, move data older than 90 days to the “Cool” tier, and then archive anything older than a year to the “Archive” tier for long-term compliance.
Ingesting and Visualizing the Data
The ultimate goal is to make this data usable. You can use services like Azure Data Factory or Azure Synapse Analytics to build pipelines that ingest the raw CSV files, transform them, and load them into a data warehouse like Azure SQL Database or a BigData cluster. From there, you can connect visualization tools like Power BI or Grafana to build the dashboards and reports that will provide actionable insights to your team.
Conclusion
Leaving your cloud cost analysis to manual, end-of-month spreadsheet exercises is a recipe for budget overruns and operational blind spots. For a modern DevOps team, cost is an operational metric, just like latency or error rates. The only way to manage it effectively is to build a system that provides timely, relevant, and actionable data. By taking the time to automate azure cost data export, you are not just building a report; you are building a feedback loop. You are instrumenting your systems to provide the financial visibility needed to make smarter engineering decisions. After all, an infrastructure that isn’t financially sustainable isn’t a sustainable infrastructure, no matter how many nines of uptime it has.
To truly integrate cost as a first-class operational metric and move beyond reactive analysis, you might want to explore how Binadox can streamline your cloud financial operations, or for a more personalized discussion, you can easily schedule a demonstration.
 7-day free trial